If you are not redirected in five seconds, click here.

Friday, September 30, 2011

Desserts for Fall: Caramel Apple Cupcakes!


Well it just so happens to be that time of year again, when the leaves have begun their colorful descent and you are all set to grab your baskets and head to your nearest apple orchard for some prime picking.  

So in honor of my favorite season, I thought these caramel apple cupcakes would be the perfect way to send you into this lovely first weekend of October . . .


CARAMEL APPLE CUPCAKES

Ingredients (for the apple cupcakes) :
~ 2-3 apples, granny smith
~ 2 cups all-purpose flour
~ 1/2 cup sugar
~ 1 teaspoon ginger
~ 1 teaspoon cinnamon
~ 1/8 teaspoon nutmeg
~ 1 teaspoon baking soda
~ 1/4 teaspoon salt
~ 2 large eggs
~ 1/2 cup oil
~ 1/4 cup apple juice
~ 1 teaspoon vanilla
~ popsicle or craft sticks


1. Rinse and core the apples. Place them on an ovenproof pan or baking sheet and bake for 30-40 minutes until soft.
2. Remove the apples from the oven, let cool slightly, then remove peel and mush the apple with the back of a fork. Measure out 1 cup of apple mush and set aside to cool.
3. Combine flour, sugar, ginger, cinnamon, nutmeg, baking soda, and salt in a medium sized bowl and whisk to combine.
4. Crack the eggs into a separate, medium sized bowl and beat with a form to break up. Add the oil, apple juice, vanilla, and cooled apple mush and mix to combine.
5. Combine the wet and dry ingredients until all ingredients come together.
6. Scoop into cupcake papers about 3/4 full so cupcakes will have a significant dome. Bake at 350 degrees for 20-22 minutes, rotating the pan after 15 minutes, until a toothpick comes out clean.

Cream Cheese Filling (optional):


~ 4 ounces Philly cream cheese
~ 1/4 stick butter
~ 2 cups sifted powdered sugar
~ 1 teaspoon vanilla

1. Be sure to bring the butter to room temperature by letting it sit out for 1 or 2 hours. Then beat the butter vigorously with an electric mixer.
2. Scrape the bowl and add the cream cheese and beat until combine.
3. Add the sifted powdered sugar and vanilla and beat until smooth.

Filling the Cupcakes:


1. Cut out a cone from each cupcake. Flip the cone and cut off the excess. Set the top aside.
2. Fill each cavity with the cream cheese filling.
3. Replace each top.


Thick Caramel:


~ 1/2 cup butter
~ 1 cup packed brown sugar
~ 1/2 cup light corn syrup
~ 6 ounces sweetened condensed milk
~ 1 tablespoon heavy cream
~ 1 teaspoon vanilla
~ 1/2 teaspoon salt

1. Bring the butter, brown sugar, corn syrup and sweetened condensed milk to a boil over medium-high heat stirring to combine.
2. With a wooden spoon, stir all ingredients together and then slowly add the heavy cream.
3. Continue to stir for about 20 minutes until the caramel reached 248 degrees. It is important to continuously stir the mixture and to allow it to reach temperature.
4. Remove from heat and stir in the vanilla and salt. Transfer to a bowl and continue to stir for 2-3 minutes allowing the caramel to cool slightly.

Final Assembly

1. Using a small offset spatula, frost each cupcake with the caramel.
2. If desired sprinkle warm caramel with any number of toppings, like coconut or crushed nuts.
3. Transfer the cupcake into the freezer to allow the caramel to set without dripping over the edge of the cupcake paper.
4. Continue frosting and topping the cupcakes and try to work fast. As the caramel cools, it becomes less spreadable. If possible work in pairs and let your helper top the cupcakes and transfer them to the freezer. By the time you reach the last few cupcakes, you will not longer need to freeze them and you can take all the cupcakes out and transfer them to the counter.
5. Top off each cupcake with a popsicle or craft stick to finish off the look.

Recipe Courtesy of The Cupcake Blog



So pretty and so yummy.  In fact, these would be just perfect for a fall wedding or bake sale, don't you think?   Have a wonderful weekend! Photobucket
Thursday, September 29, 2011

Beyond the Big Day: A Pancake Breakfast!


If that gorgeous paper mobile wasn't enough to catch your eye, just wait until you see the rest of this amazing Pancake Breakfast!  

And this perfectly planned palette of blush, yellow, and pale turquoise, combined with the promise of steaming stacks of mini-flapjacks drenched in rich maple syrup is enough to make any Bride-to-be forget all about the wedding day and focus right on combining the elements for the most delightful day-after brunch . . .


Just love the little place card flags topping off those yummy stacks . . .


And a few vintage elements thrown in can give your day that chic retro vibe . . .


Party brought to you via Design Sponge.

Fabulous Vendors:


Event Design: Ashley Meaders of The Flashdance
Photography: Jesse Chamberlin from Our Labor of Love

Ahhhh, a pancake breakfast!  This is just perfect for an intimate day after wedding brunch, a baby or bridal shower, or just a fun Sunday morning with friends, no?  And absolutely the perfect theme for girlfriends looking to toast good news with a glass of bubbly or friends with babies who can't quite make it to the late night cocktails & dinner they once enjoyed so much (present company included:)

Oh, and so I don't forget . . . if you love that paper mobile as much as I do, here's how it's done (courtesy of Grace Bonney):

"The paper mobiles are super easy to make. For the base, just take the inside of an embroidery hoop and cover it tightly with a strip of fabric. The rest of the mobile is made out of paper. Just cut strips of paper, fold them in half and then glue the ends together (it helps if you make a flap at one end).

Combine smaller pieces into bigger pieces for different designs. Once you get all the paper shapes constructed, punch a hole in the top of each one and then hang with twine. You can customize the mobiles by using differently shaped embroidery hoops or by switching up the paper color and twine."

I know it isn't Tuesday, but you know I can't ever resist a good tutorial . . . Photobucket

Wednesday, September 28, 2011

Wedding Wednesday: New York City in Canary & Grey!


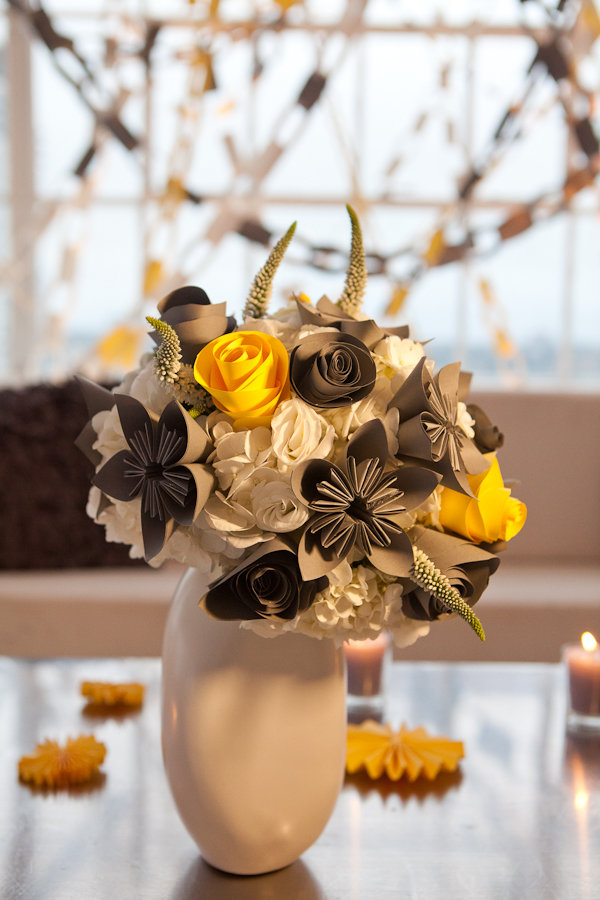
I am just so excited to show you the beautiful NYC wedding of Julia & Jim this Wedding Wednesday!  I have to say this color palette is one of my favorites.  Cheerful & elegant, sunny canary yellow is just complemented perfectly with this classic grey . . . and you know anything with paper garland & flowers just totally makes me melt . . .


The wedding was held at Studio 450 along the Hudson River, which boasts a view of the water towers, hence the hip logo . . .


How about this perfect paper chain garland?


And see how the chain garland is carried on to adorn the chair backs as well?


Ahhhh, there are those lovely paper flowers . . .


I love how this classic white background just makes the color palette pop  . . .


NYC wedding courtesy of Style Me Pretty.

Fabulous Vendors:

Wedding Planner: Just About Married, Rebecca Joyce / Event + Floral Design: Hatch Creative Studio / Wedding Photography: Dave Robbins Photography / Photo Booth: We Love Photobooths / Invitation Design: Mother of the Bride / Officiant: Friend of the Groom / Ceremony + Reception Venue: STUDIO 450 / Lighting: Lightworks Interactive / Catering: Marcey Brownstein Catering + Events / Wedding Cake Decor: Hatch Creative Studio / Hair + Make-up: Face Time Beauty Concierge / Wedding Dress: Saja Wedding / Bride’s Shoes: Stuart Weitzman / Ring Box: Bride’s Great Great Grandfather’s Snuff Box / Logo + Map Design: Mark Stinson (Groom’s Step-Brother)

Absolutely stunning!!   Just the right amount of handmade goodness to keep this big city shindig chic!  Now didn't that just brighten up your whole day? Photobucket

Tuesday, September 27, 2011

Tutorial Tuesday: Birch Bark Cylinders . . .

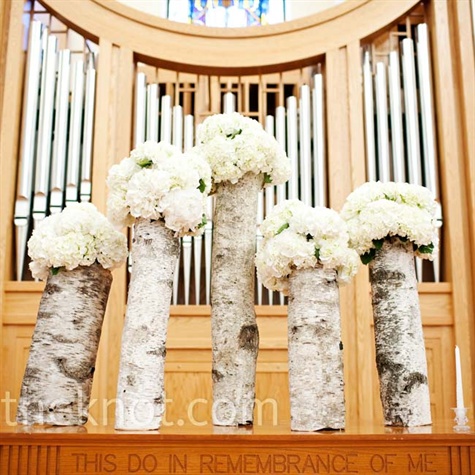
Outdoor weddings are all of the rage and these white birch vases are a great way to infuse a little nature while matching any color scheme you have in mind!  Perfect for a fall wedding or woodland-themed baby shower or birthday party, these gorgeous flower displays are oh-so-chic and more importantly, super friendly on the wallet!  First, let's get inspired . . .


Beautiful, right? Now let's get to work . . .

WHITE BIRCH VASES


Supplies You Will Need:
~ Birch Bark
~ Scissors, box cutter, or utility knife
~ Cylinder Vases (you can even get the right shape at the $ Tree!)
~ Hot Glue Gun
~ Brown Leather Rope, Rafia, or Twine
~ Your choice of flowers

Instructions:
1.Wrap birch around the vase to measure how much you’ll need for each vase leaving about a 2 in seam of bark overlapping. Glue the birch together.


2. Once the birch is wrapped on each vase, cut enough leather rope, twine, or rafia twine to wrap the vase twice and then tie in a knot or bow.


3. After the vases have been complete, add your favorite flowers (we chose a variety of seasonal white and pink blooms). The overall look of the flowers should be airy – make sure to include green accents – our favorite is scented geranium!


(tutorial courtesy of Chesnut NYC)

And aren't they even better if you carve some initials on there (all you need is a woodburning tool!). . .


Flowers not your style?  You could just make a lantern, a unity candle, or napkin rings instead . . .


(these can be found HERE)

Just the right amount of woodsy to bring the outdoors in or to give mother nature a shout out and also an amazing way to complement those feminine flowers with a bit of masculinity!  Hope you are having a wonderful start to your week!
Photobucket