If you are not redirected in five seconds, click here.

Showing posts with label DIY bridal shower. Show all posts

Tuesday, September 27, 2011

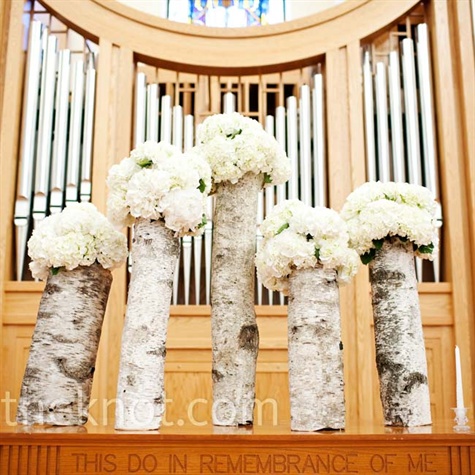
Tutorial Tuesday: Birch Bark Cylinders . . .

Outdoor weddings are all of the rage and these white birch vases are a great way to infuse a little nature while matching any color scheme you have in mind!  Perfect for a fall wedding or woodland-themed baby shower or birthday party, these gorgeous flower displays are oh-so-chic and more importantly, super friendly on the wallet!  First, let's get inspired . . .


Beautiful, right? Now let's get to work . . .

WHITE BIRCH VASES


Supplies You Will Need:
~ Birch Bark
~ Scissors, box cutter, or utility knife
~ Cylinder Vases (you can even get the right shape at the $ Tree!)
~ Hot Glue Gun
~ Brown Leather Rope, Rafia, or Twine
~ Your choice of flowers

Instructions:
1.Wrap birch around the vase to measure how much you’ll need for each vase leaving about a 2 in seam of bark overlapping. Glue the birch together.


2. Once the birch is wrapped on each vase, cut enough leather rope, twine, or rafia twine to wrap the vase twice and then tie in a knot or bow.


3. After the vases have been complete, add your favorite flowers (we chose a variety of seasonal white and pink blooms). The overall look of the flowers should be airy – make sure to include green accents – our favorite is scented geranium!


(tutorial courtesy of Chesnut NYC)

And aren't they even better if you carve some initials on there (all you need is a woodburning tool!). . .


Flowers not your style?  You could just make a lantern, a unity candle, or napkin rings instead . . .


(these can be found HERE)

Just the right amount of woodsy to bring the outdoors in or to give mother nature a shout out and also an amazing way to complement those feminine flowers with a bit of masculinity!  Hope you are having a wonderful start to your week!

Photobucket

Tuesday, June 28, 2011

Tutorial Tuesday: DIY Paper Pinwheels


What's whirly & whimsical and just plain wonderful?  Well, these playful paper pinwheels, that's what!  They are oh-so-easy to assemble and can be used for such a multitude of decorations, that I thought this would be the perfect late June tutorial to usher in the very midst of summer!

DIY PAPER PINWHEELS


Difficulty Level: easy
Supplies you will Need:

~ a bunch of cheap yellow pencils (you can sharpen and reuse them in September!)  You can fancy things up a bit with different patterned pencils...just be sure they have an eraser!!
~ scissors
~ pretty sewing pins
~ double-sided paper (stock up at your local scrapbooking store)

Here's how it's done . . .

1. Cut your paper into 4×4″ squares. (5×5″ makes a slightly larger, equally cute pinwheel . . .just play around a bit to see what size works for your project!)

2.) Next, make 4 diagonal cuts toward the center. Stop about an inch shy. No need to get too specific with measurements, just eyeball it.

2. Gently fold pieces to the left of each cut toward the center. Hold firm with your thumb.

3. Press pin through center, being careful to catch all 4 corners.

4. When the pin reaches the other side, bend it into a 90 degree angle. (Hint: I actually poked mine straight through the pencil eraser first, then bent down. It doesn’t matter how you bend it…As long as you get the job done.)

5. Press pin firmly through top of pencil eraser.

6. Give it a whirl! 


Pinwheel Tutorial Courtesy of The White Library

And in case you need to be inspired, why not fancy up those gorgeous summer pots of plants . . .


Or top off a few of your cupcakes for the big BBQ . . .


Perhaps you could liven up a summer wedding.  Paper Pinwheels will make an absolutely fabulous substitute for those expensive blooms from the florist . . . 


Even your bridesmaids could share in the fun . . .


And who doesn't want to say 'I do' under a bunch of twirly-whirlies spinning in the wind?


And you know me, I can never resist a fancy garland . . .


Looking to get personal...why not make a map of it, or even dress up one of your most treasured antique possessions?


The perfect party invitation and a festive table to frolic around. . .


Oh so fun & oh so very SIMPLE!  My favorite kind of project!!

Photobucket

Tuesday, June 21, 2011

Tutorial Tuesday: DIY Drink Umbrellas . . .


I just love finding a new project that I can't wait to start designing a custom version of . . . and these handmade drink umbrellas are absolutely no exception.  As of late, I have been all about retro striped straws with personalized flags, in fact, I was just making a few for my son's upcoming birthday party this Saturday (did I mention it was his FIRST??!!)

But my obsession is slowly changing to these swanky swirlies and I can't think of a better way to celebrate all that summer vacation means than to spruce up your next refreshing cocktail with one of these beauties.

Here's how it's done . . .

Handmade Drink Umbrellas


Difficulty Level: Easy!


Supplies You Will Need: 
~ Decorative thick paper, cardstock, or a custom template
~ Wooden skewers or toothpicks
~ Scissors
~ Circle cutter (optional, but useful) 3" is perfect-scalloped or straight edge, whatever you prefer . . .
~ Glue
~ Double sided tape 
~ bead (optional)
~ a cold drink:)
***trouble-shooting tip: If you are using your own patterned paper, you can just trace a can or glass to make your circle templates.  Make sure they are at least 3 inches in diameter or the umbrellas will be too small.

1.) First, use your circle cutter (or hand cut) 3" circles on a 12″x12″ sheet of paper (your standard size of decorative paper from Michael's). You can get 12 3″ circles out of one sheet.


2.) Draw a line from the bottom to the middle of the circle and cut along the line with your scissors . . .


3.) Overlap the cut edges about 1/4" & attach with glue or double-sided tape


4.) Put a drop of glue in the inside point of each umbrella and poke the sharp end of the toothpick or skewer through.  You can glue a bead to the outside point of the toothpick if you would like to fancy things up a bit . . .


5.) Let dry, pop into your favorite cocktail, & enjoy!


A few examples to get your inspiration ball rolling:

You can never get enough black & white damask . . . 


Breezy & Beautiful Floral Summer Stunners . . .


Festive Red, White, & Blue...perfect for a summer BBQ or 4th of July picnic, no?


A gorgeous set of personalized umbrellas (by Posh Paperie)


And my personal absolutely fab favorite, the ever beautiful dyed lace doily  . . .


So cute, kitschy, & fun . . . and the perfect little project to make your next summer shindig a memorable one!

Partial Tutorial Courtesy of The Wedding Bee
Partial Tutorial Courtesy of Swanky Press

Photobucket