If you are not redirected in five seconds, click here.

Showing posts with label whimsical wedding. Show all posts

Wednesday, September 26, 2012

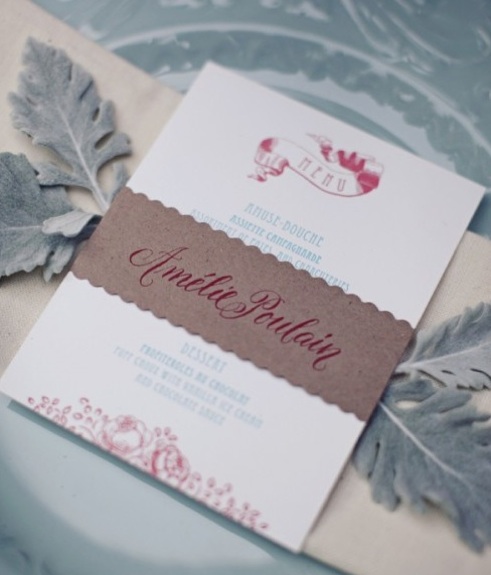
Wedding Wednesday: Illustrated Menus!

You know me, I am always looking for ways to add a bit of 'oomph' to the little details, and when you are seating a group of loved ones on your big day after your heartfelt 'I do's', it seems everyone is always ravenous!

So how do you break the ice with a round of guests who don't know each other and get them talking?  Well, bring up the delicious food that is coming their way with a fun menu card, that's how!  I love color and a bit of whimsy of course, but you can also keep things elegant with classy graphics & calligraphy font too!

Take a look at this array of examples, there is sure to be something here to get those gears a-turning . . .


Whimsical fun . . .


(menu by Merry Maps


(image from  Regina Volpi Baerwalde

(image from Meg Perotti

A 'Where the Wild Things Are' inspired shoot . . .


(above two photos courtesy of By Ksenia)

Beautiful & beachy . . .

(courtesy of One Plus One Design

 (courtesy of Yellow Owl Workshop)

(from The Knot)

One for the littles . . .


How about a little fun?

(from Oh Lovely Day


 (via Thayer Allyson Gowdy )

And I saved my favorite for last; this menu card can let your server know which options your guests have picked for dinner . . . brilliant!!

(via Heidi Ryder Photography)

What a great way to keep the theme & colors of your wedding carried right on through to your meal time!  Go ahead and get creative . . . this is the part of your big day where the REAL party starts, after all! Photobucket

Wednesday, September 28, 2011

Wedding Wednesday: New York City in Canary & Grey!


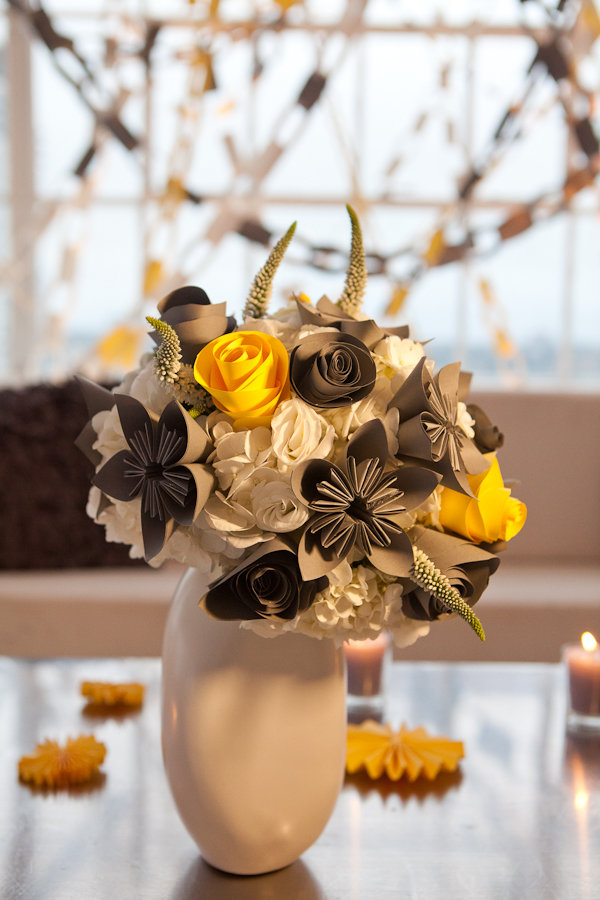
I am just so excited to show you the beautiful NYC wedding of Julia & Jim this Wedding Wednesday!  I have to say this color palette is one of my favorites.  Cheerful & elegant, sunny canary yellow is just complemented perfectly with this classic grey . . . and you know anything with paper garland & flowers just totally makes me melt . . .


The wedding was held at Studio 450 along the Hudson River, which boasts a view of the water towers, hence the hip logo . . .


How about this perfect paper chain garland?


And see how the chain garland is carried on to adorn the chair backs as well?


Ahhhh, there are those lovely paper flowers . . .


I love how this classic white background just makes the color palette pop  . . .


NYC wedding courtesy of Style Me Pretty.

Fabulous Vendors:

Wedding Planner: Just About Married, Rebecca Joyce / Event + Floral Design: Hatch Creative Studio / Wedding Photography: Dave Robbins Photography / Photo Booth: We Love Photobooths / Invitation Design: Mother of the Bride / Officiant: Friend of the Groom / Ceremony + Reception Venue: STUDIO 450 / Lighting: Lightworks Interactive / Catering: Marcey Brownstein Catering + Events / Wedding Cake Decor: Hatch Creative Studio / Hair + Make-up: Face Time Beauty Concierge / Wedding Dress: Saja Wedding / Bride’s Shoes: Stuart Weitzman / Ring Box: Bride’s Great Great Grandfather’s Snuff Box / Logo + Map Design: Mark Stinson (Groom’s Step-Brother)

Absolutely stunning!!   Just the right amount of handmade goodness to keep this big city shindig chic!  Now didn't that just brighten up your whole day? Photobucket

Wednesday, September 21, 2011

Wedding Wednesday: A Handmade & Homespun Wedding . . .

This Wedding Wednesday, I thought we could focus on how to create the day of your dreams when your funds are a bit on the  limited side.  After all, who wants to blow all of their savings on the nuptials when you have the potential of a honeymoon in Paris or Italy at stake?

So how do you create a beautiful & memorable big day when you are operating on a shoestring budget?  As weddings full of whimsy & DIY details are already all of the rage, that leaves the door wide open for you to let your creative side loose and save a dollar or two in the meantime!  Take a cue from Gary & Lisa, the fabulous couple behind The Wedding Artists Collective who certainly didn't break the bank on their gorgeous, upstate New York Nuptials.  In fact, the total cost was a mere $12,000!  Check it out . . .


Don't you just love that little guest book table with the vintage typewriter & hand-painted mailbox?  And what's more, the couple plans to keep the mailbox closed until their one year anniversary when they will pop it open & read through everyone's notes.  Perfect amount of time for all of the wedding stress to wear off so you can have a nice walk down memory lane . . .


Wedding via 100 Layer Cake

Fabulous Vendors:
Photography: Josh Goleman of The Wedding Artists Collective / Catering: Allison Appleby Gubitz from Two Sisters Catering / Flowers: Native Farm Flowers / Rentals: Columbia Tent Rentals / Venue: Undisclosed private residence / Bride’s dress & sash: Saja / Bride’s earrings and bracelet: Viv&Ingrid / Bride’s headpiece: Powder Blue Bijoux / Bride’s necklace: Late grandmother’s / Groom’s suit: John Varvatos / Wedding rings: Round Design Jewelry

All of those thoughtful touches for only $12,000?  I'll take it!  And in case you are feeling inspired to break out your inner DIY Diva, here are a few tips from Stephanie Welch Alexander from DIYNetwork to keep in mind to preserve your sanity.  

Stephanie writes:

'Meaningful ways to add to the celebration, and still cut costs:

~ Have a clear idea of what you want to help you say no to the upsell of items that would put you over budget. 

~ Enlist help or use your own DIY talents. My fiancé, a graphic designer, used his talents and printing connections to design invitations that otherwise would have blown our invitation budget. While he was busy designing invitations, I looked for things I could make myself. I designed and created my bridal attendant jewelry; enlisted my mother to help sew my two-layer veil. One co-worker made my purse, while another addressed our envelopes. Finally, my fiancé and I recycled the five dozen roses he sent to me the day of our engagement as "toss petals". Not only will you save money by doing many tasks yourself, you might also honor friends and family by including those who want to help. Nothing brings forth people's generosity with time and energy like an impending wedding!

~ Learn to say no.  Learning to be polite but firm is one of the greatest cost-cutters and stress-relievers. Bridal salespeople will try to "steer" you in certain directions -- after all, their job is to upsell. Having a firm, clear vision of what you want will keep you on track. By the same token, a reputable professional will look for ways to help you achieve your vision without breaking a bank.

~ Talk about your wedding. By sharing some of your ideas with friends, family, co-workers -- even those who work in the wedding business -- you might discover a great money-saving tip or the name of a wedding vendor who might do incredible work at a discount.

~ Avoid stores with "bridal" in the name whenever possible. This was a very valuable lesson I learned. Although I purchased my gown from a salon, by the time the wedding arrived, I had learned to shop elsewhere. I purchased my tiara from a vendor on Ebay and my shoes and accessories from a discount department store (and found exactly what I wanted); I had my mother's pearls restrung into a choker; and I purchased my bridesmaids' gowns on their behalf from Discount Bridal Service (although it has "bridal" in the name, it offers salon-quality gowns as a significant discount). To me, the word "bridal" became synonymous with "markup".

~ Be original. Sometimes saving money can be as simple as celebrating your individuality or taking into account unique attributes of your venue. Instead of a guestbook full of names that might be meaningless in 50 years, we decided to take a group shot of our entire wedding party and guests. Seeing how everyone looked on that wonderful day is so meaningful to us -- and we saved on the cost of a guestbook, pen and other accoutrements that add to the bottom line.

~ A word about the honeymoon. Avoid booking the honeymoon package at major resorts. You'll often save hundreds -- even thousands -- of dollars. While many couples opt for "all-inclusive" deals, take a look at what you're really getting. Will you really drink and eat enough to make it worth it? What if you want to travel off the resort? You'll only be adding costs. Is that bottle of champagne on the sunset cruise really worth the extra $150 you might spend? Compare costs and see whether being in the "honeymoon" class will really save you money -- or cost more. For us, being "honeymooners" would mean spending an extra $1,000, so we decided we'd go as regular vacationers and purchase the cushy add-ons as we wanted them. We still had a romantic honeymoon -- and we didn't spend one minute worrying about money. And what's better than choosing what's right for the two of you -- and starting your married life without worry?'

Have a wonderful Wednesday!!

Photobucket

Tuesday, September 20, 2011

Tutorial Tuesday: Pretty & Petite Paper Envelopes . . .

(photo courtesy of Moncy3 on Etsy)

 If you know anything about me at all then you know two things; one, I can never pass up a pretty paper project and two, I absolutely cannot resist a good bargain!  That's why these gorgeous little handmade envelopes just make me smile from ear to ear.  

You can use them in so many creative ways, and what's more, you can pick out the most stunning paper tailored to match whatever style fits your fancy!  From guest books, to favors, to escort cards the possibilities are endless!  Stay tuned for a bit of inspiration below, but first, here's how you make them . . .

Tiny Envelope Tutorial

Supplies You Will Need:

~ decorative scrapbook or origami paper
~ sample envelope in the size you would like
~ bowl of lukewarm water
~ cardboard (to use as template)
~ pen
~ glue stick or glue tape roller
~ scissors


1. Choose an envelope you already have that you like the size and shape of

2. Soak it in a bowl of water (lukewarm is best) for about one minute, or until the glue releases from the paper easily. It will not take as long as you think!

3. Pat the now unfolded envelope dry - it doesn't have to be completely dry, just not drippy - and trace it onto a thin piece of cardboard - chipboard works well, as would something like a cereal box. Try to be accurate at this stage and trace neatly.


4. Cut the template out with a pair of scissors, and you may want to label it so that in the future you (or whoever you live with) won't say "what is this strange piece of cardboard?" and toss it out!

5. Use your new wonderful template to trace out an envelope design on any and all types of paper! Think gift wrap, maps, magazines, old calenders, stamped cardstock - you name it! I like to trace using pencil on the side that will be the inside so the marks won't show.


6. Carefully cut out your envelope with scissors and fold it up - I like to do the sides first, then use the folded sides as a guide on where to fold the top and bottom. Use the handle of your scissors or a bone folder for really crisp edges.

7. Use a glue tape roller  to stick your envelope together, or glue stick but I find glue stick gets brittle after just a few months, go ahead and get a glue tape roller, they're like $5 and you can find them in the adhesive section of an office supply store or craft store.

8. *Bonus Points* if you've ever wanted to be able to lick and stick your envelope flaps, check out this Lick & Stick glue!

Tutorial Courtesy of Poppytalk

And in case you are in need of a bit more motivation, how about a guest book?


Or even escort cards . . .


Favors would be nice . . .


Perhaps you have a talent for watercolor . . .


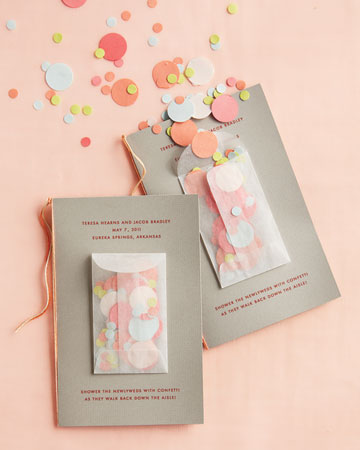
Or would like to get your confetti primed for tossing . . .


Make a map of it . . .


Save-the-Dates!


And a Bridesmaid Instruction Manual . . .


And I just love the thought of a budget friendly favor to send your guests home with; honor a loved one who is no longer with you by sharing a special recipe!  


You can even make them 'top secret' to make everyone feel super special . . .


More pretties . . .


And a few from Kumosgreetings on Etsy


Aha, I knew you'd spot that chevron I snuck in there!  And if you haven't been feeling quite bold enough, mini-envelopes are the perfect place to add a splash of color or print to your big day without going overboard!  Best yet, all you need is some pretty paper & glue, so you can add a thoughtful little touch of personality without even breaking the bank!!
Photobucket