If you are not redirected in five seconds, click here.

Showing posts with label DIY wedding. outdoor wedding. Show all posts

Friday, September 30, 2011

Desserts for Fall: Caramel Apple Cupcakes!


Well it just so happens to be that time of year again, when the leaves have begun their colorful descent and you are all set to grab your baskets and head to your nearest apple orchard for some prime picking.  

So in honor of my favorite season, I thought these caramel apple cupcakes would be the perfect way to send you into this lovely first weekend of October . . .


CARAMEL APPLE CUPCAKES

Ingredients (for the apple cupcakes) :
~ 2-3 apples, granny smith
~ 2 cups all-purpose flour
~ 1/2 cup sugar
~ 1 teaspoon ginger
~ 1 teaspoon cinnamon
~ 1/8 teaspoon nutmeg
~ 1 teaspoon baking soda
~ 1/4 teaspoon salt
~ 2 large eggs
~ 1/2 cup oil
~ 1/4 cup apple juice
~ 1 teaspoon vanilla
~ popsicle or craft sticks


1. Rinse and core the apples. Place them on an ovenproof pan or baking sheet and bake for 30-40 minutes until soft.
2. Remove the apples from the oven, let cool slightly, then remove peel and mush the apple with the back of a fork. Measure out 1 cup of apple mush and set aside to cool.
3. Combine flour, sugar, ginger, cinnamon, nutmeg, baking soda, and salt in a medium sized bowl and whisk to combine.
4. Crack the eggs into a separate, medium sized bowl and beat with a form to break up. Add the oil, apple juice, vanilla, and cooled apple mush and mix to combine.
5. Combine the wet and dry ingredients until all ingredients come together.
6. Scoop into cupcake papers about 3/4 full so cupcakes will have a significant dome. Bake at 350 degrees for 20-22 minutes, rotating the pan after 15 minutes, until a toothpick comes out clean.

Cream Cheese Filling (optional):


~ 4 ounces Philly cream cheese
~ 1/4 stick butter
~ 2 cups sifted powdered sugar
~ 1 teaspoon vanilla

1. Be sure to bring the butter to room temperature by letting it sit out for 1 or 2 hours. Then beat the butter vigorously with an electric mixer.
2. Scrape the bowl and add the cream cheese and beat until combine.
3. Add the sifted powdered sugar and vanilla and beat until smooth.

Filling the Cupcakes:


1. Cut out a cone from each cupcake. Flip the cone and cut off the excess. Set the top aside.
2. Fill each cavity with the cream cheese filling.
3. Replace each top.


Thick Caramel:


~ 1/2 cup butter
~ 1 cup packed brown sugar
~ 1/2 cup light corn syrup
~ 6 ounces sweetened condensed milk
~ 1 tablespoon heavy cream
~ 1 teaspoon vanilla
~ 1/2 teaspoon salt

1. Bring the butter, brown sugar, corn syrup and sweetened condensed milk to a boil over medium-high heat stirring to combine.
2. With a wooden spoon, stir all ingredients together and then slowly add the heavy cream.
3. Continue to stir for about 20 minutes until the caramel reached 248 degrees. It is important to continuously stir the mixture and to allow it to reach temperature.
4. Remove from heat and stir in the vanilla and salt. Transfer to a bowl and continue to stir for 2-3 minutes allowing the caramel to cool slightly.

Final Assembly

1. Using a small offset spatula, frost each cupcake with the caramel.
2. If desired sprinkle warm caramel with any number of toppings, like coconut or crushed nuts.
3. Transfer the cupcake into the freezer to allow the caramel to set without dripping over the edge of the cupcake paper.
4. Continue frosting and topping the cupcakes and try to work fast. As the caramel cools, it becomes less spreadable. If possible work in pairs and let your helper top the cupcakes and transfer them to the freezer. By the time you reach the last few cupcakes, you will not longer need to freeze them and you can take all the cupcakes out and transfer them to the counter.
5. Top off each cupcake with a popsicle or craft stick to finish off the look.

Recipe Courtesy of The Cupcake Blog


So pretty and so yummy.  In fact, these would be just perfect for a fall wedding or bake sale, don't you think?   Have a wonderful weekend! Photobucket

Tuesday, September 27, 2011

Tutorial Tuesday: Birch Bark Cylinders . . .

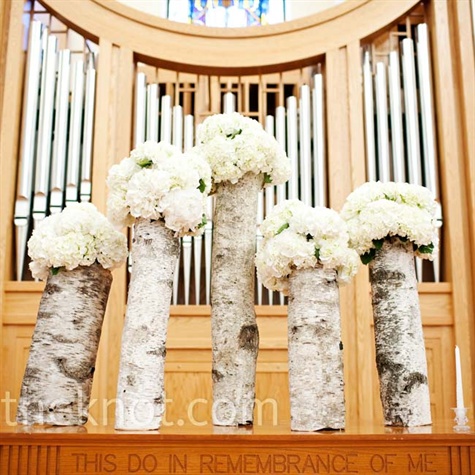
Outdoor weddings are all of the rage and these white birch vases are a great way to infuse a little nature while matching any color scheme you have in mind!  Perfect for a fall wedding or woodland-themed baby shower or birthday party, these gorgeous flower displays are oh-so-chic and more importantly, super friendly on the wallet!  First, let's get inspired . . .


Beautiful, right? Now let's get to work . . .

WHITE BIRCH VASES


Supplies You Will Need:
~ Birch Bark
~ Scissors, box cutter, or utility knife
~ Cylinder Vases (you can even get the right shape at the $ Tree!)
~ Hot Glue Gun
~ Brown Leather Rope, Rafia, or Twine
~ Your choice of flowers

Instructions:
1.Wrap birch around the vase to measure how much you’ll need for each vase leaving about a 2 in seam of bark overlapping. Glue the birch together.


2. Once the birch is wrapped on each vase, cut enough leather rope, twine, or rafia twine to wrap the vase twice and then tie in a knot or bow.


3. After the vases have been complete, add your favorite flowers (we chose a variety of seasonal white and pink blooms). The overall look of the flowers should be airy – make sure to include green accents – our favorite is scented geranium!


(tutorial courtesy of Chesnut NYC)

And aren't they even better if you carve some initials on there (all you need is a woodburning tool!). . .


Flowers not your style?  You could just make a lantern, a unity candle, or napkin rings instead . . .


(these can be found HERE)

Just the right amount of woodsy to bring the outdoors in or to give mother nature a shout out and also an amazing way to complement those feminine flowers with a bit of masculinity!  Hope you are having a wonderful start to your week!
Photobucket

Wednesday, September 21, 2011

Wedding Wednesday: A Handmade & Homespun Wedding . . .

This Wedding Wednesday, I thought we could focus on how to create the day of your dreams when your funds are a bit on the  limited side.  After all, who wants to blow all of their savings on the nuptials when you have the potential of a honeymoon in Paris or Italy at stake?

So how do you create a beautiful & memorable big day when you are operating on a shoestring budget?  As weddings full of whimsy & DIY details are already all of the rage, that leaves the door wide open for you to let your creative side loose and save a dollar or two in the meantime!  Take a cue from Gary & Lisa, the fabulous couple behind The Wedding Artists Collective who certainly didn't break the bank on their gorgeous, upstate New York Nuptials.  In fact, the total cost was a mere $12,000!  Check it out . . .


Don't you just love that little guest book table with the vintage typewriter & hand-painted mailbox?  And what's more, the couple plans to keep the mailbox closed until their one year anniversary when they will pop it open & read through everyone's notes.  Perfect amount of time for all of the wedding stress to wear off so you can have a nice walk down memory lane . . .


Wedding via 100 Layer Cake

Fabulous Vendors:
Photography: Josh Goleman of The Wedding Artists Collective / Catering: Allison Appleby Gubitz from Two Sisters Catering / Flowers: Native Farm Flowers / Rentals: Columbia Tent Rentals / Venue: Undisclosed private residence / Bride’s dress & sash: Saja / Bride’s earrings and bracelet: Viv&Ingrid / Bride’s headpiece: Powder Blue Bijoux / Bride’s necklace: Late grandmother’s / Groom’s suit: John Varvatos / Wedding rings: Round Design Jewelry

All of those thoughtful touches for only $12,000?  I'll take it!  And in case you are feeling inspired to break out your inner DIY Diva, here are a few tips from Stephanie Welch Alexander from DIYNetwork to keep in mind to preserve your sanity.  

Stephanie writes:

'Meaningful ways to add to the celebration, and still cut costs:

~ Have a clear idea of what you want to help you say no to the upsell of items that would put you over budget. 

~ Enlist help or use your own DIY talents. My fiancé, a graphic designer, used his talents and printing connections to design invitations that otherwise would have blown our invitation budget. While he was busy designing invitations, I looked for things I could make myself. I designed and created my bridal attendant jewelry; enlisted my mother to help sew my two-layer veil. One co-worker made my purse, while another addressed our envelopes. Finally, my fiancé and I recycled the five dozen roses he sent to me the day of our engagement as "toss petals". Not only will you save money by doing many tasks yourself, you might also honor friends and family by including those who want to help. Nothing brings forth people's generosity with time and energy like an impending wedding!

~ Learn to say no.  Learning to be polite but firm is one of the greatest cost-cutters and stress-relievers. Bridal salespeople will try to "steer" you in certain directions -- after all, their job is to upsell. Having a firm, clear vision of what you want will keep you on track. By the same token, a reputable professional will look for ways to help you achieve your vision without breaking a bank.

~ Talk about your wedding. By sharing some of your ideas with friends, family, co-workers -- even those who work in the wedding business -- you might discover a great money-saving tip or the name of a wedding vendor who might do incredible work at a discount.

~ Avoid stores with "bridal" in the name whenever possible. This was a very valuable lesson I learned. Although I purchased my gown from a salon, by the time the wedding arrived, I had learned to shop elsewhere. I purchased my tiara from a vendor on Ebay and my shoes and accessories from a discount department store (and found exactly what I wanted); I had my mother's pearls restrung into a choker; and I purchased my bridesmaids' gowns on their behalf from Discount Bridal Service (although it has "bridal" in the name, it offers salon-quality gowns as a significant discount). To me, the word "bridal" became synonymous with "markup".

~ Be original. Sometimes saving money can be as simple as celebrating your individuality or taking into account unique attributes of your venue. Instead of a guestbook full of names that might be meaningless in 50 years, we decided to take a group shot of our entire wedding party and guests. Seeing how everyone looked on that wonderful day is so meaningful to us -- and we saved on the cost of a guestbook, pen and other accoutrements that add to the bottom line.

~ A word about the honeymoon. Avoid booking the honeymoon package at major resorts. You'll often save hundreds -- even thousands -- of dollars. While many couples opt for "all-inclusive" deals, take a look at what you're really getting. Will you really drink and eat enough to make it worth it? What if you want to travel off the resort? You'll only be adding costs. Is that bottle of champagne on the sunset cruise really worth the extra $150 you might spend? Compare costs and see whether being in the "honeymoon" class will really save you money -- or cost more. For us, being "honeymooners" would mean spending an extra $1,000, so we decided we'd go as regular vacationers and purchase the cushy add-ons as we wanted them. We still had a romantic honeymoon -- and we didn't spend one minute worrying about money. And what's better than choosing what's right for the two of you -- and starting your married life without worry?'

Have a wonderful Wednesday!!

Photobucket

Thursday, September 15, 2011

Sweet on S'mores: A House-warming Delight!

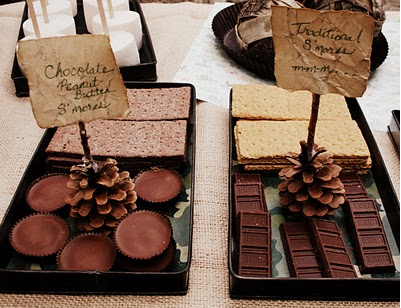
Now, I really didn't think anything could top a coffee & donut bar of a house-warming party, until I found this absolutely amazing s'more bar by Cookie Creatives . . . which just so happens to be perfect for a backyard hayride or pumpkin-carving party as well . . .


I love these tagged roasting sticks too . . .


And why not send your guests home with a little favor kit of their own?


Don't you just love that?  What's more,  the other day I saw all of these brand new flavors of marshmallows with flavors & colors that are just perfect for fall, like caramel & vanilla swirl . . .yum!

A little more inspiration for you . . .


I want a s'more bar! Photobucket

Wednesday, September 14, 2011

Wedding Wednesday: Bright & Boho-Inspired . . .

I am such a sucker for anything bright and whimsical.  Don't get me wrong, I completely appreciate classic neutrals and oh-so-often wonder if I should tone things down a bit to give off that more sophisticated & simple vibe.  But when it comes right down to it, nothing makes me gasp in sheer delight quite as much as when I see vibrant colors exploding all over a party.

That's why this Boho Wedding Shoot Inspiration, brought to you by Brienne Michelle Photography via Style Me Pretty, gave me such a thrill!  See for yourself . . .


Now don't those colors just make you swoon?  Ah, I LOVE Wedding Wednesday and I sure hope you do too! Photobucket