

How about this for a lovely Spring table setting? And not counting the flowers of course (which can always be purchased at your discount floral store or local Trader Joes) these centerpieces will only run you about $2 a piece...can you believe it?

Here's how it's done....

Difficulty Level: Easy
Supplies You Will Need:
1.) ¼” fabric ribbon
2.) Spray Adhesive (or Regular & Double-stick tape if you find it easier to work with those)
3.) Glass cylinder vases ($1 at the Dollar Tree) OR coffee tins, large soup & veggies tins, or even cardboard tubing cut to fit the size you would like. For one basic table setting, I would start with 3 containers in varying sizes & heights.
4.) Ruler
5.) Scissors or Paper Cutter
6.) Pencil
7.) Decorative papers or wrapping paper in 3-5 different patterns
8.) Don't forget the flowers!
(You can also purchase blocks of floral foam at the Dollar Tree if you need a little assistance getting your
flowers arranged the way you would like them)

1. Choose the container you would like to cover and measure a strip of the scrapbook/wrapping paper to fit around the container.
2. After measuring, cut the scrapbook paper or wrapping paper into a strip that fits around the container. (A paper cutter works best, but if you can cut a decent straight line, scissors will work too.)
3. Spray a thin layer of the spray adhesive onto your scrapbook paper strip on the side you want adhered to your container. Wait one minute for the spray adhesive to get really sticky. Then, carefully adhere the scrapbook paper strip to the container. (If you are working with tape instead of spray adhesive, wrap your paper around your vase, use the regular tape to secure the first edge to your container, then double-stick tape to secure the outer edge of the wrap to create a clean seam.)

4. To add more interest to your covered container, spray measured pieces of ribbon with the spray adhesive or back with double-stick tape and adhere to the container.


5. Then, fill your container about halfway full with water. If you are using a cardboard tubing as one of your vases, just slip a glass or tin container underneath. Cut flower stems at an angle to ensure they get the most water pumping through their stems. For a more hand-picked feel, simply cut the stems and place in the container. For more of a controlled, full look, you can use floral foam. Simply cut the floral foam into a piece that fits snuggly into your container and insert stems into foam.

And that's it! There you have it! Lovely & modern centerpieces for only a few bucks each!!!


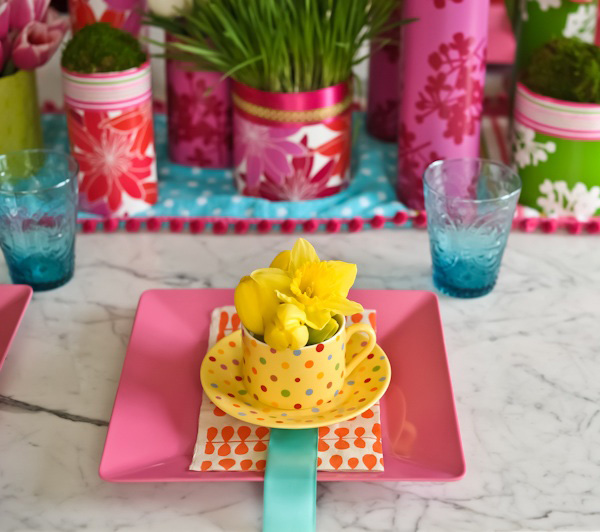
For a fun & fancy table setting for your next Spring Dinner Party, shop around at TJ Maxx, Pier One, & Marshalls for a fabulous mismatch of bright & festive table settings....colorful & full of whimsy! Have fun!
Pink Wrapped Vases Courtesy of Geranium Lake Flowers

Lovely, pretty colours....such a pretty Easter display and a great idea...
ReplyDeleteSusan x
I love this! I am going to post on my blog under the DIY projects! Thanks for sharing!
ReplyDeletewww.weddingleftovers.com