If you are not redirected in five seconds, click here.

Showing posts with label affordable centerpieces. Show all posts

Tuesday, January 31, 2012

Tutorial Tuesday: Cheap & Chic Glass Bud Vases . . .


I have spent plenty of time searching for a pretty little assortment of vintage turquoise vases for the living room mantel and never can seem to find the amount that I want or the right color of blue.  So imagine my delight when I came across this super simple project from Teresa Blackburn over at Relish; just the look I was going for at a fraction of the price & the perfect way to re-use those glass bottles I have leftover in the kitchen . . .


Supplies you will need:

~ Various clean, empty bottles- any variety of bottles recycled from your kitchen will work, including dressing, olive oil, and vinegar bottles. You can also do this project with a collection of canning or plastic jars.
~ 1 can robin’s egg Blue spray paint—I used Design Master’s paint which can be found at most large art and craft stores. Be sure to choose paint with a “flat” finish to create a pretty glow when light hits the finished vases.
 
Directions:
1.    Place clean, dry bottles on spray surface.
2.    Spray and layer color until bottles are evenly coated.
3.    Let dry for at least an hour before using bottles as vases.

To use as Vases:

Fill each bottle carefully with water and place a blossom in each one. Line bottles up in a window, down a dining table, or on a shelf above the sink.
To care for vases after painting, wipe carefully with a damp cloth. Do not put in dishwasher or in hot soapy water.

And a bit more inspiration . . .


An assortment of these beauties would be a lovely & very budget-friendly centerpiece for the tables at your wedding or shower too...just picture the glass painted in white or whatever neutral tone you are leaning towards for your big event and the beautiful blooms bursting with color in your brightest hue!

Now hit up that kitchen for your best glass bottles and whip up something delicious to use up that olive oil or salad dressing!! Photobucket

Tuesday, April 19, 2011

Tutorial Tuesday: The Paper Wrapped Vase...


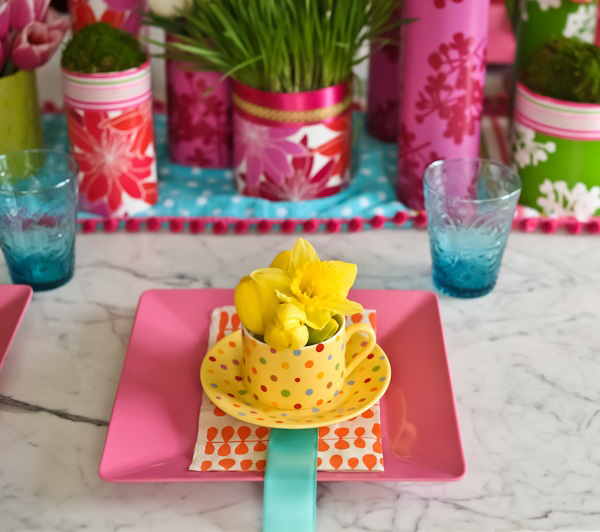
How about this for a lovely Spring table setting?  And not counting the flowers of course (which can always be purchased at your discount floral store or local Trader Joes) these centerpieces will only run you about $2 a piece...can you believe it?  


Here's how it's done....


Difficulty Level: Easy

Supplies You Will Need:

1.)  ¼” fabric ribbon
2.) Spray Adhesive (or Regular & Double-stick tape if you find it easier to work with those)
3.) Glass cylinder vases ($1 at the Dollar Tree) OR coffee tins, large soup & veggies tins, or even cardboard tubing cut to fit the size you would like.  For one basic table setting, I would start with 3 containers in varying sizes & heights.
4.) Ruler
5.) Scissors or Paper Cutter
6.) Pencil
7.) Decorative papers or wrapping paper in 3-5 different patterns
8.) Don't forget the flowers!
(You can also purchase blocks of floral foam at the Dollar Tree if you need a little assistance getting your  
flowers arranged the way you would like them)


1. Choose the container you would like to cover and measure a strip of the scrapbook/wrapping paper to fit around the container.

2. After measuring, cut the scrapbook paper or wrapping paper into a strip that fits around the container. (A paper cutter works best, but if you can cut a decent straight line, scissors will work too.) 

3. Spray a thin layer of the spray adhesive onto your scrapbook paper strip on the side you want adhered to your container.  Wait one minute for the spray adhesive to get really sticky.  Then, carefully adhere the scrapbook paper strip to the container.  (If you are working with tape instead of spray adhesive, wrap your paper around your vase, use the regular tape to secure the first edge to your container, then double-stick tape to secure the outer edge of the wrap to create a clean seam.)


4. To add more interest to your covered container, spray measured pieces of ribbon with the spray adhesive or back with double-stick tape and adhere to the container.


5. Then, fill your container about halfway full with water.  If you are using a cardboard tubing as one of your vases, just slip a glass or tin container underneath.  Cut flower stems at an angle to ensure they get the most water pumping through their stems.  For a more hand-picked feel, simply cut the stems and place in the container.  For more of a controlled, full look, you can use floral foam.  Simply cut the floral foam into a piece that fits snuggly into your container and insert stems into foam.


And that's it!  There you have it!  Lovely & modern centerpieces for only a few bucks each!!!  


For a fun & fancy table setting for your next Spring Dinner Party, shop around at TJ Maxx, Pier One, & Marshalls for a fabulous mismatch of bright & festive table settings....colorful & full of whimsy!  Have fun!  

Partial Tutorial Courtesy of Cori Cook Floral Design and Hostess with the Mostess

Pink Wrapped Vases Courtesy of Geranium Lake Flowers 


Photobucket

Monday, April 18, 2011

Chic & Affordable Centerpieces; The Wrapped Vase...

Trying to plan a gorgeous party but strapped by a tight budget? Now you can have all of the lovely luxury of an expensive, professionally designed floral centerpiece without the hefty price tag.


Believe it or not, these are actually just wrapped glass cylinders (which can be found in a multitude of sizes at your local Dollar Tree for only $1 a piece!)  Don't have that spare change lying around?  No worries, you can cover your old coffee tins & soup cans instead.  

Cover them up with fabric, decorative paper, wrapping paper, wallpaper, or even lace and you have a chic and cheap centerpiece at a fraction of the cost!

The trick is to stick to around three per table, all of varying sizes and different patterns that compliment the overall scheme of your party.  Hit up your local Trader Joe's or discount flower market and arrange the vases yourself...you know you've always wanted to embrace your inner floral designer!

Here are a few to admire & inspire....


Cover them in wrapping paper...


Or wrap them in decorative stock paper...


Or even embossed wallpaper...


Or why not try a simple textured fabric?


How about some white stenciled burlap?


Or even lace...


And who says you have to stick to flowers?


Even your crafting room could use a little fancying...


There you have it!  And why limit yourself to special events when you can enjoy these wrapped beauties year round?  Just change out the paper or fabric with every new holiday or season...or whenever you feel inspired and you will have a fresh design to renew the soul of your inner craftinista!!  

Stay tuned for tomorrow's simple tutorial on how to create a few of these lovelies all by yourself and you'll be delighting in an artful & affordable fresh flower Spring paradise before you know it!


Photobucket