If you are not redirected in five seconds, click here.

Showing posts with label cheap wedding ideas. Show all posts

Wednesday, March 14, 2012

Wedding Wednesday: Mish Mash~Getting it all out There . . .

Have you ever cleaned out your closet and found a whole bunch of stuff that you want to keep, but can't 'categorize' as any one thing?  Well, in going through all of my wedding inspiration pictures I have saved over the past several months, I seem to have managed to hold onto the most lovely & random photos...ones that I have been excited to share with you but haven't found the day or the post to do it!

So today I have decided to throw a 'mish mash' at you of assorted ideas to take a look at.  Who knows, maybe they will ignite just the spark you need as you are planning your big day or maybe you will just find yourself with a whole bunch of pretty pictures to stare at?  But either way, I hope you are entertained . . .

Cake Crazy . . .


Don't you just love those rosettes?


Lovely Locks . . .


And my very favorite . . .

Ravishing Rings . . .


Photo Booth Fabulous . . .


Reception Love . . .


Beautiful Blooms . . .


Paper Pretties . . .


Best idea ever . . . an 'I spy' game to keep the kiddos busy!


Nifty Napkins . . .


For the coffee bar . . .


Wine-loving favors . . .


A stunning 'Thank you' card photo-op!


Now I WARNED you it was a mish mash, didn't I?  But I do apologize if your head is spinning a bit:)  Whew, I feel ever so much better getting that all out there!  See you tomorrow!
Photobucket

Tuesday, June 28, 2011

Tutorial Tuesday: DIY Paper Pinwheels


What's whirly & whimsical and just plain wonderful?  Well, these playful paper pinwheels, that's what!  They are oh-so-easy to assemble and can be used for such a multitude of decorations, that I thought this would be the perfect late June tutorial to usher in the very midst of summer!

DIY PAPER PINWHEELS


Difficulty Level: easy
Supplies you will Need:

~ a bunch of cheap yellow pencils (you can sharpen and reuse them in September!)  You can fancy things up a bit with different patterned pencils...just be sure they have an eraser!!
~ scissors
~ pretty sewing pins
~ double-sided paper (stock up at your local scrapbooking store)

Here's how it's done . . .

1. Cut your paper into 4×4″ squares. (5×5″ makes a slightly larger, equally cute pinwheel . . .just play around a bit to see what size works for your project!)

2.) Next, make 4 diagonal cuts toward the center. Stop about an inch shy. No need to get too specific with measurements, just eyeball it.

2. Gently fold pieces to the left of each cut toward the center. Hold firm with your thumb.

3. Press pin through center, being careful to catch all 4 corners.

4. When the pin reaches the other side, bend it into a 90 degree angle. (Hint: I actually poked mine straight through the pencil eraser first, then bent down. It doesn’t matter how you bend it…As long as you get the job done.)

5. Press pin firmly through top of pencil eraser.

6. Give it a whirl! 


Pinwheel Tutorial Courtesy of The White Library

And in case you need to be inspired, why not fancy up those gorgeous summer pots of plants . . .


Or top off a few of your cupcakes for the big BBQ . . .


Perhaps you could liven up a summer wedding.  Paper Pinwheels will make an absolutely fabulous substitute for those expensive blooms from the florist . . . 


Even your bridesmaids could share in the fun . . .


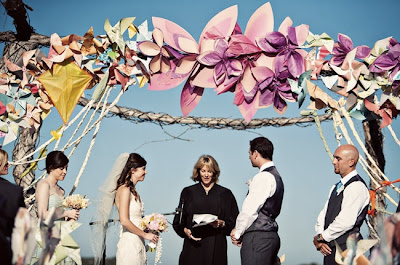
And who doesn't want to say 'I do' under a bunch of twirly-whirlies spinning in the wind?


And you know me, I can never resist a fancy garland . . .


Looking to get personal...why not make a map of it, or even dress up one of your most treasured antique possessions?


The perfect party invitation and a festive table to frolic around. . .


Oh so fun & oh so very SIMPLE!  My favorite kind of project!!

Photobucket

Tuesday, June 7, 2011

Tutorial Tuesday: DIY Vintage Photo booth . . .


What a fun & easy way to grab some unique photos of your next party?  Well look no further than this easy little photo booth project, vintage inspired and easy to customize to whatever color & theme you are looking for . . .


Difficulty Level: Moderate


Supplies You Will Need:

- Plywood (all wood and tools from Home Depot)
- (2) 2’x3’ Wood beams
- Sawhorse
- Ruler/Measuring tape
- Hammer and nails
- Wood screws
- Handheld jigsaw
- Handheld drill
- Mod Podge
- Paintbrush
- Waterproof sealant
- Vintage picture frame (I got mine at a thrift store)
- Vintage wallpaper (eBay)
- Floor molding (optional)


Here's What You Do:


Step 1: The plywood usually comes in a 4’x8’ sized sheet. To make it easier, have the store cut the top for you – we asked for a 19” cut to make the final height 6’5”.

Step 2: Lay your plywood flat on the sawhorse. Measure your picture frame. Make sure you start your measurements near the middle of the frame itself – you don’t want the plywood to show on the inside of the frame, nor would you want gaps around the outside of the frame! Decide where you want your frame to be, and draw your measurements on the wood.

Step 3: Use a drill bit large enough to make a hole the width of the jigsaw blade in all corners of your measurements on the plywood. Now use the handheld jigsaw to cut out the entire shape.

Step 4: Stand the plywood upright. Cut each of your beams to about 5’ high. Measure and cut a 70 degree angle off the top of the beam. Hold this up to your wood frame until the angle lies completely flat against the block. Now take a ruler and place it horizontally on the ground, against the bottom of the beam, and use it to draw a line against the wood. Cut with the jigsaw – this will make the bottom of the beam level with the ground. Using the excess wood, cut (2) 10” pieces to use as mounting blocks. On the “back” of the frame, nail a mounting block onto each side. Make sure you hammer the nails through the front, so the heads are flush with the wood. Set the (2) beams aside for later.

Step 5: Lay your frame back onto the sawhorse. Measure and cut your wallpaper to size. Working with one strip at a time, brush your mod podge (what I had on-hand, but if you have wallpaper paste, that would probably work well, too) onto the top third of the wood. Line up and press your wallpaper onto it. Run over the surface with a ruler or other flat object to make sure there are no air pockets. Repeat for the middle and bottom third and all remaining strips of wallpaper until the entire front of the wood is covered. Let dry for at least 24 hours.

Step 6: Brush a thin layer of waterproof sealant over the entire surface of the wallpaper. Let dry for at least 24 hours.

Step 7: Optional: We really wanted to make it look like a piece of an actual wall, so we cut (2) 4’ long pieces of floor molding and attached one to the top and bottom of the wood frame, with Gorilla Glue.

Step 8: Stand the wood frame upright. Take one of the 5’ beams that you cut earlier and line it up against one of the mounting blocks. Drill 2 pilot holes (one on top, one 4 to 6 inches directly below the first hole) through the beam and partly into the mounting block. Next, screw the wood screws into the pilot holes. We used a 2” screw for the top (the thinner part of the beam) and a 2 3/4” screw for the bottom. Repeat for the other side.

Step 9: Mount your picture frame over the hole. Whew, you’re done! Now take your new “photobooth” somewhere pretty and snap away!

And how about adding a few old photographs of your parents or grandparents wedding to the wall as well?  What a great way to honor those who have gone before you . . .


And who says you need to reserve photo booth snapshots for a wedding?  This would be a wonderful way to document all sorts of parties...from bridal showers, to engagement parties, to birthday celebrations.  Let the fun begin!


Tutorial Courtesy of the Ruffled Blog Photobucket

Monday, April 18, 2011

Chic & Affordable Centerpieces; The Wrapped Vase...

Trying to plan a gorgeous party but strapped by a tight budget? Now you can have all of the lovely luxury of an expensive, professionally designed floral centerpiece without the hefty price tag.


Believe it or not, these are actually just wrapped glass cylinders (which can be found in a multitude of sizes at your local Dollar Tree for only $1 a piece!)  Don't have that spare change lying around?  No worries, you can cover your old coffee tins & soup cans instead.  

Cover them up with fabric, decorative paper, wrapping paper, wallpaper, or even lace and you have a chic and cheap centerpiece at a fraction of the cost!

The trick is to stick to around three per table, all of varying sizes and different patterns that compliment the overall scheme of your party.  Hit up your local Trader Joe's or discount flower market and arrange the vases yourself...you know you've always wanted to embrace your inner floral designer!

Here are a few to admire & inspire....


Cover them in wrapping paper...


Or wrap them in decorative stock paper...


Or even embossed wallpaper...


Or why not try a simple textured fabric?


How about some white stenciled burlap?


Or even lace...


And who says you have to stick to flowers?


Even your crafting room could use a little fancying...


There you have it!  And why limit yourself to special events when you can enjoy these wrapped beauties year round?  Just change out the paper or fabric with every new holiday or season...or whenever you feel inspired and you will have a fresh design to renew the soul of your inner craftinista!!  

Stay tuned for tomorrow's simple tutorial on how to create a few of these lovelies all by yourself and you'll be delighting in an artful & affordable fresh flower Spring paradise before you know it!


Photobucket