If you are not redirected in five seconds, click here.

Friday, February 8, 2013

Countdown to Valentine's Day! 6...


Oh my heavens, I just love today's idea!  I love it so much that I added a free printable for you too!  First off, the recipes are both so easy...and I even included two different options (and two different printables) for whichever type of dessert you prefer!  

First off, the printable (you can download it below)....


And next up, the idea!! 


Pop Tart Cake Pops
(via The Family Kitchen)

Ingredients:

FOR THE TWO-BITE POP TARTS:
1 c. fresh cherries, pitted and diced
3 T. sugar
2 T. cornstarch
2 T. water
1/2 tsp. almond extract
1 pkg. prepared pie crusts

FOR THE POPS:
wooden popscicle sticks

FOR THE GLAZE:
1 c. powdered sugar
1-2 T. milk
1/2 tsp. vanilla
food coloring and sprinkles (optional)

Directions:

1.) In a small saucepan, combine cherries, sugar, cornstarch and almond extract. Heat on stove over medium heat until mixture has thickened. Remove from heat and allow mixture to cool. Unroll pie crusts and using a pizza cutter to slice them into 1 1/2″x 2″ rectangles (I used a ruler to measure mine into equal sizes.  Just use a butter knife to score your pie crust before cutting).

2.) Place a wooden popscicle stick on top of one of the cut rectangles, then spoon a small amount (about 1 1/2 tsp.) of cooled cherry filling into the center of the pie square, taking care not to get it near the edges.   Gently lay a second rectangle over the top of the cherry filling.  Press the edges of the rectangles together with a fork.  Transfer to a baking sheet.  Bake poptart pops in an oven preheated to 400 degrees for 8-10 minutes, or just until the edges begin to brown.

3.) In a small bowl, combine powdered sugar, milk, and vanilla to make glaze.  Tint with food coloring, if desired.  Spoon over cooled poptart pops, sprinkle with colored sugar, and allow to the glaze to harden slightly before serving. Enjoy!

Cake pops not your thing?  Well then how about these absolutely divine homemade pop tarts.  You are really going to love how simple these are...and how much better for you than the store bought kind!!


Homemade Pop Tarts
(courtesy of So Rumbly in my Tumbly)

Ingredients:

~ Pie crust, refrigerated or homemade
~ Jam or Preserves (I used raspberry)
~ Glaze or Egg Wash
~ Sparkling Sugar

Directions:

1.) Preheat the oven to 375°

2.) Roll out one of the pie crusts and square the edges. Cut into rectangles. Place 1 tsp of jam in the center of a rectangle and top with another piece of crust. Crimp all four edges. Repeat until all of the pie crust is used. Take the rounded edges that you cut off and roll them together to form more pop-tarts.

3.) Brush with egg wash.

4.) Place on a baking sheet lined with parchment paper.  Bake the pop-tarts for about 7 – 8 minutes or until slightly brown.

5.) Once cool, pour glaze over and decorate with sugar. If you don’t want to add extra sugar with the glaze, you can use an egg wash on the tops with some white sugar.

To Make the Glaze:
~ 1 cup powder sugar
~ milk to thin

1.) Place powdered sugar in bowl. Pour milk slowly until it has a consistency of really thick syrup.


The printable comes in two versions....one perfect to cut into squares, cut a small slit on the top & bottom center of each label and slide it onto your cake pop stick and the other to cut out and fold over table-tent style, to add to the tray of your homemade pop tarts!

Here's where you get them . . .


And don't you worry, we'll be back all weekend to keep the countdown coming!!

Photobucket

Thursday, February 7, 2013

Countdown to Valentine's Day! 7...


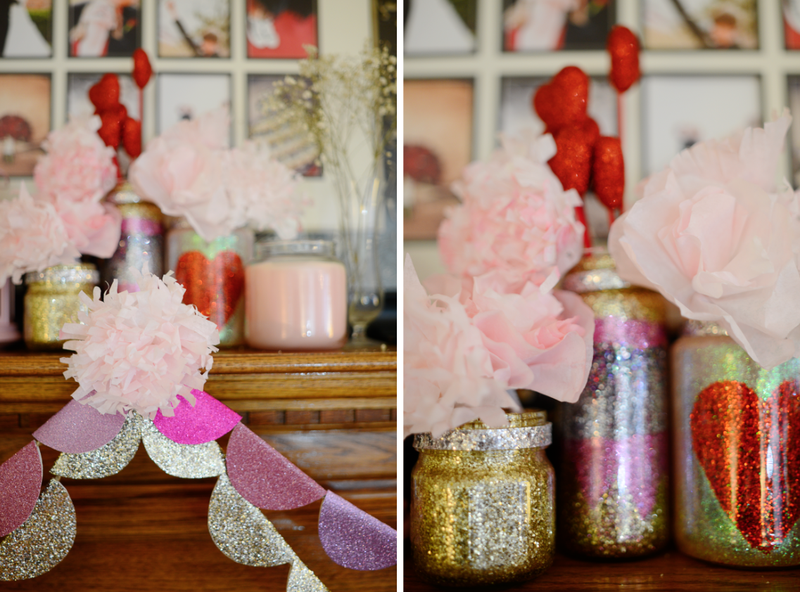
Well, here we are, only 7 days away!  Today we mark off the halfway point with an awesome little craft from my favorite girls over at A Beautiful Mess....GLITTER JARS!!  You know I love me some glitter, and these sparkly little numbers are just the most fantastic DIY project for a lazy weekend day in late winter.  See for yourself . . .


Valentine's Day Glitter Jars


Supplies You Will Need:

~ Craft Glue
~ Glitter
~ Paint brushes
~ Mason Jars

Directions:


1. Paint various designs on the inside of the jar with the glue. I chose to paint large hearts, stripes, and a solid gold for my three jars. Polka dots would also be cute!


2. Pour a bit of glitter into the jar to coat where you've painted on the glue, then tap the jar upside down onto a piece of paper a few times to remove the excess.


3. If you're using various colors of glitter on one jar, do one color at a time and allow the glue to dry thoroughly before you start another color. This keeps the colors from mixing!


4. After you've finished the designs and the glue has dried, coat the entire inside of the jar with a thick layer of glue and allow to dry for at least 24 hours. This forms a "seal" over the glitter and keeps it from flaking off.

5. Fill the jars with your favorite Valentine's treats! Note: Kind of obvious, but even though the glitter won't flake off I'd still recommend only using treats that are individually packaged.


A touch more fun . . .


And my absolute favorite?  The most awesome make-up brush holder EVER!!


Ahhh, some girls (and guys) were just born with glitter in their veins:)  

Photobucket

Wednesday, February 6, 2013

Countdown to Valentine's Day! 8...


What's in store for Day 8?  Well, these gorgeous heart brownie cupcakes via Delish and courtesy of the grande Madame herself, Martha Stewart, that's what!  These little delights are not only about as yummy as it gets, but oh-so-very cute too!  Check it out . . .


Heart Brownie Cupcakes

Ingredients:

~ Vegetable oil cooking spray
~ 3 cup(s) all-purpose flour
~ 1 1/2 teaspoon(s) baking powder
~ 1 1/2 teaspoon(s) coarse salt
~ 15 ounce(s) (3 3/4 sticks) unsalted butter, cut into pieces
~ 12 ounce(s) unsweetened chocolate, coarsely chopped
~ 3 cup(s) sugar
~ 6 large eggs, room temperature
~ 1 tablespoon(s) pure vanilla extract

Basic Buttercream Frosting:


~ 12 ounce(s) (3 sticks) unsalted butter, softened
~ 1 pound(s) confectioners' sugar, sifted
~ 1/2 teaspoon(s) pure vanilla extract


Directions (for cupcakes):

1.) Preheat oven to 350 degrees. Line standard muffin tins with paper liners. Coat an 8-inch square cake pan with cooking spray, line bottom with parchment, then spray parchment.

2.) Whisk flour, baking powder, and salt in a large bowl. Place butter and chocolate in a heatproof mixer bowl set over a pot of simmering water, stirring until chocolate melts.

3.) Attach bowl to mixer, add sugar, and whisk on medium-high speed until smooth, about 3 minutes. Beat in eggs, 1 at a time, then vanilla. Reduce speed to low, and add flour mixture.

4.) Divide batter among muffin cups, filling each 2/3 full. Spread remaining batter in square Brownie pan (these will be for the hearts that top the brownie). Bake until set but still soft, about 20 minutes. Let cool in tins and pan on wire racks.

Directions (for Buttercream)


1.) Beat butter with a mixer on medium-high speed until pale and creamy, about 2 minutes.

2.) Reduce speed to medium. Add sugar, 1/2 cup at a time, beating after each addition, about 5 minutes. (After every 2 additions, increase speed to high, and beat for 10 seconds, then reduce speed to medium-high).

3.) Add vanilla, and beat until buttercream is smooth. Use immediately, or cover and refrigerate for up to 3 days. (If refrigerated, bring to room temperature,and beat on low speed until smooth before using.)


Directions (for finishing):

1.) Frost cupcakes with buttercream. Cut out 24 hearts from brownie in pan using a 1 1/2-inch heart-shaped cutter. Top each cupcake with a heart.

(image via Domestic Wannabe)

Pretty darn cute and crazy clever too!  Pop on back tomorrow for some more February 14th inspiration...

Photobucket

Tuesday, February 5, 2013

Countdown to Valentine's Day! 9...


This really is a ton of fun, coming up with a new idea to highlight as every day we get closer to this lovely holiday!

Today's source of inspiration is a darling little project from Smitten on Paper via  Green Wedding Shoes, and is so downright simple and sweet, you are just going to swoon with glee!!  Take a look . . .


DIY HEART GARLAND


Supplies You Will Need:

~ Baker’s Twine
~ Stripes of paper in various sizes and colors
~ Hole Punch
~ Double Sided Tape

Directions:


Step 1: Grab a strip of paper and fold it in half. A variety of different size stripes of paper and colors will add some charm to your heart garland, trust us-it’ll be so cute when the hearts are in different weights of chubbiness!

Step 2: While your paper is still folded in half, add double sided tape to the outside of one end.

Step 3: Curl the two ends in until they meet in the middle and form the shape of a heart, then press down so it is secured by the tape.

Step 4: Add 3 hole punches. Add one in the center and one on the left and right side of the heart. Hole punch toward the top so the hearts don’t topple over when strung through with twine.

Once all your hearts are hole punched, just string through some baker’s twine and you’re done!


Twenty minutes later and you have the sweetest little banner, perfect for stringing along the mantel, along the TV stand, or wherever makes your heart content:) Photobucket

Monday, February 4, 2013

Countdown to Valentine's Day! 10....


Hey there, hello, & Happy Monday!  With only ten more days left until the most romantic day of the year, I thought it would be fun to countdown with 10 days of inspiration for you to bring a little love into your life.

First up, Rock Candy cupcakes...a super retro riot that are a ton of fun and oh-so-pretty to look at too, these little stunners are made by dyeing regular rock candy with gorgeous colors to make it look like sparkling crystal.  Here's what you do...


ROCK CANDY CUPCAKES
(via Sugar Britches Cakery and created by Elisa Strauss)

Ingredients:


For the rock-candy crystals:
• 1 1/2 cups (12 ounces) vodka
• Food-coloring gels: bakers rose, super red
• 2 pounds rock-candy crystals

For the cupcakes:
• 1 cake recipe, any flavor
• 1 frosting recipe

Equipment:
• Trays lined with parchment or wax paper
• Metal bowl
• Toothpicks
• Strainer• Cupcake tins
• Pale pink cupcake wrappers
• Small offset spatula

To prepare the rock-candy crystals:

1.) At least 1 day in advance, dye the rock-candy crystals.
Combine the vodka and 1/4 teaspoon of pink or red food coloring in a metal bowl. Stir to distribute the food coloring evenly.

2.) Place a handful of rock-candy crystals in a strainer and lower the strainer into the vodka mixture. After a few seconds, remove the strainer from the bowl, allowing the excess liquid to drain back into the bowl. If the color is too dark, add some more vodka or water to lighten it.

3.) Spread the dyed rock-candy crystals in a single layer on a tray lined with parchment paper and let them dry overnight.

4.) Repeat this procedure with the rest of your rock-candy crystals. If you want more than one color (at least three shades will provide a nice assortment), start with the lightest shade, then add more food coloring to the vodka to adjust the color of the rock-candy crystals, and color the next set. The longer you keep the strainer in the mixture, the darker the crystals will become. Keep the different colors separate while drying.

To prepare and assemble the cupcakes:

1.) Prepare the cake batter as directed. Line the cupcake tins with wrappers. Fill each halfway with batter and bake the cupcakes as directed by the recipe. Let them cool completely.

2.) While cupcakes are cooling, make the frosting.

3.) When they are cool, frost the cupcakes with a dome of frosting. (Create a dome by spooning or piping a small amount of frosting onto the cupcake. Beginning at the center, use an offset spatula to pull icing out to the edges and create a smooth, domed surface 1/2-inch thick.)

4.) Use a spoon or your hands to pile the colored rock-candy crystals onto the cupcakes. If the candy is not sticking to itself to create the height you want, spritz it with some water. Let the cupcakes set for 10 to 15 minutes.

Makes 24 cupcakes.


(above two images via A Little Zaftig)

Aren't they gorgeous?!  We'll be back tomorrow with more . . .
Photobucket

Saturday, February 2, 2013

Super Bowl 2013-FREE FOOD LABELS!!!

Well, I know it is Saturday and tomorrow is the BIG day of Super Bowl parties, but if you are anything like me you won't mind how late I am on getting these FREE printable Super Bowl cupcake/food label circles to you!!

Perfect to dress up your mini-sandwiches, snacks, or cupcakes with for game day tomorrow and so very simple to download & print up for free on your home computer!

Then just use a circle punch or a pair of scissors to cut them into circles or squares (whichever you prefer!), attach them to a striped paper straw, a toothpick, or mini-skewer and you are all set to dress up your snacks from simple to superb!!


 Get yours right here:


These would look GREAT with gold foil liners, no?


Or, if you live close to a fab baking supply store, maybe gold dragees?


Or even just a few quick sprays of Wilton gold color mist!


Sorry to throw this at you so last minute:)  But they are FREE, so who's complaining?  Have a wonderful Game Day!!!!!


Photobucket

Friday, February 1, 2013

FROSTED: Score With Skinny Snacks This Super Bowl Sunday


Every year I can't wait for Super Bowl Sunday, not only because I love to watch an exciting football game between two of the season's best teams, but also because of the fabulous greasy food that is always served at every Super Bowl party.  I love to pile my plate full of loaded cheesy nachos, crispy french fries with vinegar, spicy chicken wings with creamy dipping sauces, and slices of gooey pizza covered in pepperoni.

Now, you can imagine my disappointment this year because I am trying to eat healthier. I just assumed that meant no yummy party appetizers this Sunday....but, I was totally wrong!! So this week I am sharing with you some scrumptious Super Bowl Party snacks that are lite and will also be a delightful surprise for your guests on Sunday night!

Just shout, "Go, Fight, Win," while you enjoy tons of goodies that will keep you looking trim!

Buffalo Hummus
(Courtesy of Jax House)


Ingredients:
(Serves 8 people)
  • 1 (15 oz) can of chick peas, drained and rinsed
  • 1/3 cup of tahini
  • 1 clove of garlic, crushed
  • 4 Tablespoons of Frank’s Buffalo Sauce
  • 3 Tablespoons of water
  • 1/2 teaspoon of salt
  • Blue cheese crumbles
  • Carrots and/or celery
Directions:

1.  Combine all ingredients and puree in food processor or blender until smooth. Place in refrigerator to chill until ready to serve. Server with carrots and celery, top with additional Frank’s sauce and blue cheese.


Mini BLT Cups
(Recipe by The Endless Meal)


BLT Cup Ingredients:
(Makes 24 cups)
  • 24 grape tomatoes
  • 24 small pieces of lettuce, such as arugula or baby spinach
  • 1/4 cup of crumbled crisp cooked bacon (about 3 pieces)
  • 24 small pieces of bacon for garnish (about 2 pieces)
Chipotle Aioli:
  • 1 egg yolk, at room temperature
  • 1 teaspoon fresh squeezed lemon juice
  • 1/2 teaspoon of Dijon mustard
  • 1/2 cup of grape seed or other neutral flavored oil (not olive!)
  • 1-2 teaspoons of chipotles in adobo sauce
  • 1/2 teaspoon of soy sauce
  • 1/2 teaspoon of miso
  • 3/4 teaspoon of sugar
  • 3-4 drops of liquid smoke
  • Salt to taste

Aioli Directions:

1.  In a medium bowl whisk together the room temperature egg yolk with the lemon juice and Dijon mustard. Slowly add the oil in a very small stream whisking contently. If the oil starts to build up and not become incorporated, stop pouring and whisk the aioli aggressively. Continue whisking and pouring the oil in slowly until it is completely incorporated.

2.  Combine all other ingredients in a small blender. Add the aioli and blend until completely mixed and there are no visible chipotle seeds left. Salt to taste.

TIP: If you are using store bought mayo, DO NOT put it in the blender as it will turn runny. Simply blend the chipotles, soy, miso and sugar together as best you can and then mix it into the mayo. It will not be as smooth but it will still be tasty. Do not use Miracle Whip as it will taste funny in this dish.

BLT Cup Directions:

1.  Cut the bottoms of the tomatoes off (they will stand on their tops.) Gently squeeze and roll the tomatoes between your fingers to remove the pulp. (Can be made up to 1 day ahead)

2.  Stuff 1 piece of arugula (or other lettuce) into each tomato cup. Then place 1/2 teaspoon of bacon into each. Top with a squeeze of chipotle aioli and a piece of bacon for garnish.


Loaded Sweet Potato Rounds
(Via A Couple Cooks)


Ingredients:
(Yields 1 baking sheet full of rounds)
  • 2 pounds of sweet potatoes
  • 1-1 1/2 Tablespoons of olive oil
  • 1 teaspoon of garlic powder
  • 1 teaspoon of chili powder
  • 1 teaspoon of kosher salt
  • Hot sauce
  • Mexican blend shredded cheese
  • 3 green onions
  • Sour cream
Directions:

1.  Preheat the oven to 450°F. Cut the sweet potatoes into 1/4 inch slices. Place the slices in a large bowl, sprinkle with 1-1 1/2 tablespoons of olive oil, 1 teaspoon of garlic powder, 1 teaspoon of chili powder, and 1 teaspoon of kosher salt, and stir to thoroughly coat both sides of all slices. Place on a baking sheet lined with parchment paper (for easy cleanup). Bake 10 minutes on one side, then remove from the oven, flip all rounds, and bake another 10 minutes until soft.

2.  While the potatoes bake, thinly slice the green onions (both the white and green parts).

3.  When the potatoes are done, remove them from oven and add a dot of hot sauce on each round (or more, if you love heat). Top each round with shredded cheese and wait a few minutes for the cheese to melt (the potatoes will be hot enough at this point to melt the cheese).

4.  To serve, place the rounds on a platter. Add a dollop of sour cream on each round, and garnish with sliced green onions.

TIP: To make it easier to dollop, you can mix the sour cream in a bowl with a few drops of water to loosen it.


Baked Mozzarella Sticks
(Recipe from Skinny Taste)


Ingredients:
(Makes 24 sticks)
  • 12 sticks part-skim, reduced sodium mozzarella string cheese
  • 1 large egg, beaten
  • 2 Tablespoons of flour
  • 5 Tablespoons of Italian seasoned breadcrumbs
  • 5 Tablespoons of panko crumbs
  • 2 teaspoons of parmesan cheese
  • 1 Tablespoons of dried parsley
  • Olive oil cooking spray 

 Directions:

1.  Cut cheese in half to give you 24 pieces. Place cheese in the freezer until cheese is frozen.

2.  In small bowl, whisk the egg. Place the flour on another small dish. In separate bowl, combine bread crumbs, panko, parmesan cheese, and dried parsley.

3.  Dip the frozen sticks in flour, shaking off excess, then into the egg, then coat with the crumbs.

4.  Repeat this process with the remaining cheese placing them on a tray with wax paper. Place cheese back into the freezer until ready to bake (this is a must or they will melt before the crumbs get golden).

5.  When ready to bake preheat oven to 400° F. Line a baking sheet with aluminum foil and lightly spray with oil.

6.  Place frozen cheese sticks on baking sheet. Spray the tops of the mozzarella sticks with a little more oil and bake in the bottom third of your oven until crisp, about 4 to 5 minutes. Turn and bake an additional 4 - 5 minutes watching them closely so they don't melt.


Shrimp and Cheese Stuffed Jalapenos Poppers
(Courtesy of Cooking For Keeps)


Ingredients:
  • 9-10 medium sized jalapenos, sliced lengthwise seeded and stemmed
  • 3 pieces of reduced-fat bacon, cooked and chopped
  • 2 green onions, chopped
  • 6 ounces of reduced-fat cream cheese, softened
  • 1/2 cup mozzarella, shredded
  • 1/2 teaspoon garlic powder
  • 4 ounces of baby shrimp or chopped shrimp
  • 2 egg whites
  • 3/4 cup of panko bread crumbs
  • 1/2 cup of whole wheat bread crumbs
  • Salt to taste
Directions:

1.  Preheat oven to 425 degrees. Place a cooling rack on top of a rimmed baking sheet.

2.  Combine bacon, onions, cream cheese, mozzarella, and garlic powder in a small bowl. Season to taste with salt. Fold in shrimp.

3.  In a small bowl whisk egg whites until they become frothy. Combine panko and whole wheat bread crumbs in a small bowl. Season with salt and pepper.

4.  Fill each jalapeno with cream cheese mixture. Coat in egg white and then bread crumbs. Place breaded jalapenos on the cooling rack and then place in the freezer for 15 minutes. Once the poppers have chilled, drizzle with olive oil and then bake for 20-25 minutes until poppers are brown and cheese is oozing out.


Spicy Sausage Pizza Stuffed Mushrooms
(Via Cook and Be Merry)


Ingredients:

  • Stuffing mushrooms, washed, dried, stems removed
  • Cooking spray, such as Pam
  • Pizza sauce, your favorite
  • Spicy Italian sausage, casing removed
  • Fontina cheese slices, cut into 1-inch squares
  • Parmesan cheese
  • Mozarella cheese slices, cut into small batons
  • Italian parsley leaves for garnish
  • Kosher salt
Directions: 

1.  Preheat oven to 425 degrees F. Line a baking sheet with parchment or foil.

2. Place the mushrooms on the baking sheet, stem side down. Spray lightly with cooking spray. Bake for 5 minutes.

3. Drain mushrooms on paper towels stem side down. Press paper towel over top. You may need to change paper towel more than once. If liquid appears in stem well, blot it out. Cool to room temperature.

4. Crumble the sausage in a sauté pan and cook until no longer pink and starting to brown. Drain on paper towel. Reserve.

5. Place mushrooms on paper towel covered work surface. Fill mushroom with a small piece of Fontina, a little Parmesan, a couple teaspoons pizza sauce and some sausage. Sprinkle with a little Kosher salt.

6. Microwave filled mushrooms on high for about 20 seconds until very warm. Garnish with mozzarella batons and parsley leaves. Serve very warm.


What could be better than eating snacks that keep your waist small while watching an exciting game of football? Picture how fabulous these skinny snacks would be served at your ladies only Super Bowl cocktail party, as a way to sneak some healthy goodies into the buffet at your husband's Super Bowl gathering, or even as a fabulous spread at your next Fantasy Football draft.

So serve up some delicious skinny Super Bowl goodies that will delight...have your guests screaming, "TOUCHDOWN" with each bite! Have a great weekend!


Photobucket