If you are not redirected in five seconds, click here.

Showing posts with label Birthday Party. Show all posts

Friday, February 8, 2013

Countdown to Valentine's Day! 6...


Oh my heavens, I just love today's idea!  I love it so much that I added a free printable for you too!  First off, the recipes are both so easy...and I even included two different options (and two different printables) for whichever type of dessert you prefer!  

First off, the printable (you can download it below)....


And next up, the idea!! 


Pop Tart Cake Pops
(via The Family Kitchen)

Ingredients:

FOR THE TWO-BITE POP TARTS:
1 c. fresh cherries, pitted and diced
3 T. sugar
2 T. cornstarch
2 T. water
1/2 tsp. almond extract
1 pkg. prepared pie crusts

FOR THE POPS:
wooden popscicle sticks

FOR THE GLAZE:
1 c. powdered sugar
1-2 T. milk
1/2 tsp. vanilla
food coloring and sprinkles (optional)

Directions:

1.) In a small saucepan, combine cherries, sugar, cornstarch and almond extract. Heat on stove over medium heat until mixture has thickened. Remove from heat and allow mixture to cool. Unroll pie crusts and using a pizza cutter to slice them into 1 1/2″x 2″ rectangles (I used a ruler to measure mine into equal sizes.  Just use a butter knife to score your pie crust before cutting).

2.) Place a wooden popscicle stick on top of one of the cut rectangles, then spoon a small amount (about 1 1/2 tsp.) of cooled cherry filling into the center of the pie square, taking care not to get it near the edges.   Gently lay a second rectangle over the top of the cherry filling.  Press the edges of the rectangles together with a fork.  Transfer to a baking sheet.  Bake poptart pops in an oven preheated to 400 degrees for 8-10 minutes, or just until the edges begin to brown.

3.) In a small bowl, combine powdered sugar, milk, and vanilla to make glaze.  Tint with food coloring, if desired.  Spoon over cooled poptart pops, sprinkle with colored sugar, and allow to the glaze to harden slightly before serving. Enjoy!

Cake pops not your thing?  Well then how about these absolutely divine homemade pop tarts.  You are really going to love how simple these are...and how much better for you than the store bought kind!!


Homemade Pop Tarts
(courtesy of So Rumbly in my Tumbly)

Ingredients:

~ Pie crust, refrigerated or homemade
~ Jam or Preserves (I used raspberry)
~ Glaze or Egg Wash
~ Sparkling Sugar

Directions:

1.) Preheat the oven to 375°

2.) Roll out one of the pie crusts and square the edges. Cut into rectangles. Place 1 tsp of jam in the center of a rectangle and top with another piece of crust. Crimp all four edges. Repeat until all of the pie crust is used. Take the rounded edges that you cut off and roll them together to form more pop-tarts.

3.) Brush with egg wash.

4.) Place on a baking sheet lined with parchment paper.  Bake the pop-tarts for about 7 – 8 minutes or until slightly brown.

5.) Once cool, pour glaze over and decorate with sugar. If you don’t want to add extra sugar with the glaze, you can use an egg wash on the tops with some white sugar.

To Make the Glaze:
~ 1 cup powder sugar
~ milk to thin

1.) Place powdered sugar in bowl. Pour milk slowly until it has a consistency of really thick syrup.


The printable comes in two versions....one perfect to cut into squares, cut a small slit on the top & bottom center of each label and slide it onto your cake pop stick and the other to cut out and fold over table-tent style, to add to the tray of your homemade pop tarts!

Here's where you get them . . .


And don't you worry, we'll be back all weekend to keep the countdown coming!!

Photobucket

Thursday, February 7, 2013

Countdown to Valentine's Day! 7...


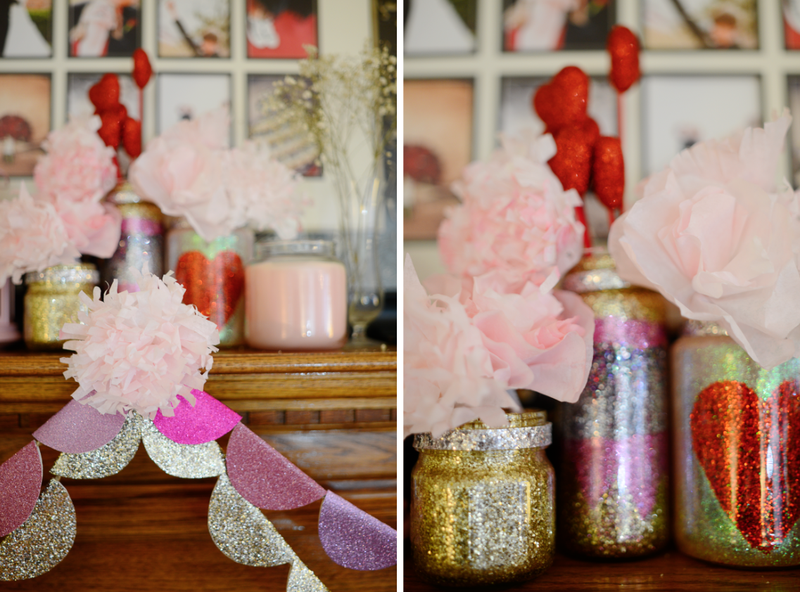
Well, here we are, only 7 days away!  Today we mark off the halfway point with an awesome little craft from my favorite girls over at A Beautiful Mess....GLITTER JARS!!  You know I love me some glitter, and these sparkly little numbers are just the most fantastic DIY project for a lazy weekend day in late winter.  See for yourself . . .


Valentine's Day Glitter Jars


Supplies You Will Need:

~ Craft Glue
~ Glitter
~ Paint brushes
~ Mason Jars

Directions:


1. Paint various designs on the inside of the jar with the glue. I chose to paint large hearts, stripes, and a solid gold for my three jars. Polka dots would also be cute!


2. Pour a bit of glitter into the jar to coat where you've painted on the glue, then tap the jar upside down onto a piece of paper a few times to remove the excess.


3. If you're using various colors of glitter on one jar, do one color at a time and allow the glue to dry thoroughly before you start another color. This keeps the colors from mixing!


4. After you've finished the designs and the glue has dried, coat the entire inside of the jar with a thick layer of glue and allow to dry for at least 24 hours. This forms a "seal" over the glitter and keeps it from flaking off.

5. Fill the jars with your favorite Valentine's treats! Note: Kind of obvious, but even though the glitter won't flake off I'd still recommend only using treats that are individually packaged.


A touch more fun . . .


And my absolute favorite?  The most awesome make-up brush holder EVER!!


Ahhh, some girls (and guys) were just born with glitter in their veins:)  

Photobucket

Thursday, August 16, 2012

Fancy Frill Balloons (Geranimo Style!) . . .

(via BHLDN)

All good things are eventually unavoidable and you've seen these lovelies floating around for awhile now.  A delightful combination of two very good things married together in celebratory bliss, Geranimo balloons just scream 'fabulous party' and turn the ordinary, ho-hum poppers into works of art!

But while stunning, these suckers can run you a small fortune, so if you are a nifty DIYer, we thought we would share this little tutorial with you, so you can put together a few all of your own!  First, a bit of inspiration . . .


(photo courtesy of Juliet Cardon)


(photo courtesy of Green Wedding Shoes)

(image courtesy of Bridal Musings)


If you don't have time to whip these up on your own or your budget is not an issue, you can purchase these ready made and custom designed right here: Geranimo Balloons

Or you can save a little cash, roll-up your sleeves, and get started on your own, with this clever little tutorial from Blue-Eyed Yonder . . .

FANCY-FRILL BALLOONS

Supplies You Will Need: 
(Makes 5 balloon streamers) 

~ Big, Round Balloons (36 inch round) 
~ 1 metal key ring
~ 1 metallic gold door curtain (Found at Party City, similar to this)
~ 1 package metallic Christmas tinsel garland (Found at Hobby Lobby)
~ Tissue paper fringes, paper hearts & other miscellaneous trimmings...

(How to make Tissue Tassels: via Mint Love Social Club)

Directions:


Basic Summary: To make these streamers, all of the foil, tissue paper, trimmings, etc. are tied to a metal key ring that is then secured to the base of a 36″ balloon.

1.)  Start by tying a string to the key ring and hanging it from the ceiling. Adjust the height of the key ring so that it is similar in height to where you want the base of the balloon to be. (This way, you can build your streamers without having to hold they key ring and it will allow you to adjust the lengths of your streamer material accordingly.)


2.) Attach the metallic gold door curtain to the key ring first. The metallic gold curtain is key in this project. It will give you that beautiful “puddling” effect at the floor that is so indicative of the Geronimo balloons. Begin by laying the curtain out on the floor and cutting it into 5 equal pieces, lengthwise. You should end up with 5 – 8′ sections. Feed the top portion of the curtain through the key ring and secure with ribbon. 

3.) Once the gold curtain is secured to the key ring, the rest is pure imagination. There really is no right or wrong way to decorate the streamer. If you can tie it to the key ring, then chances are you can add it to the streamer. (Just be careful that the decor doesn’t get too heavy. Too much weight could cause the balloon to droop.)

(This example includes pieces of metallic Christmas tinsel with a wire center, with the wire wrapped around the metal key ring.  Cut out paper hearts are glued to a long, pink ribbon and tied to the key ring along with different style tissue paper tassels attached to ribbon as well.)


4.) Once you are satisfied with the look of the streamer, use a piece of curling ribbon to tie the metal key ring to the base of the balloon. Make sure the balloon is weighted down enough so it won’t float away. These balloons hold tons of helium and most likely will need something kind of heavy to hold them down.  Voila!!


Simple as can be and you can go on and get as creative as you want!!  Think of the fun you will have searching out ribbons, streamers, paper butterflies . . .


The options are endless!  Basically any theme that matches your party can be incorporated into the the 'frills' of these fantastic floaters, so go ahead and get crazy with it!  Happy Thursday!!
Photobucket

Tuesday, July 24, 2012

Clever Cupcake Cakes!

(image from Coco Cake Cupcakes)

If you are throwing a baby shower or birthday party, everyone knows you can't skimp on cake; pretty much a necessity and most definitely the #1 tried & true dessert!  But just in case cake decorating isn't your thing and you want something cheap and budget-friendly to take its place on your sweets table, why not go the cupcake route instead?

Not only can you make a few different flavors to keep all of your guests happy, but you don't have to worry about slicing or serving, extra plates or silverware either!  It's a win-win, don't you think?

Take a look at a few fantastic designs and then sit right down and come up with your own special something!  You just can't get much simpler than this!

 (via Betty Crocker)

(courtesy of  Coco Cake)

The prettiest (and easiest!) bunch of flowers . . .


(courtesy of the Cupcake Blog)

Beautiful butterfly . . .

(courtesy of That Sweet Ang)

A few cakes after my two-year-old son's transportation-obsessed heart:)


 (courtesy of Cake Central)
Race cars!

(courtesy of Decadent Designs

(courtesy of Rhapsody of Cacophony)

Loving this gorgeous Owl cupcake cake!  Would be absolutely stunning at an Owl Baby gender reveal party too...with pink or blue filling waiting inside the cupcakes to announce the big news!!  And we have just the invitations for you, found RIGHT HERE:)

(image courtesy of Family Fun

Divine birds in their nest cupcakes . . .


Aren't those just adorable?  And quite a bit less daunting than making an entire cake look amazing too!  Hope you are enjoying your week so far...pop back tomorrow for a fun new debut from our Juneberry Lane shop:)
Photobucket

Thursday, July 19, 2012

The Only 10 Supplies Every Girl Needs to Re-order for Every Party


So, the other day we focused our energy on how to stock up the garage and kitchen with supplies you will re-use again and again; for all of your favorite events and holidays.  And today it is time to roll on over to the fun stuff and put together a quick list of the smaller details you will need to make each and every party a 'custom' & unique event!

So first things first, you need to PICK A THEME!!  Once you decide on a direction, well the rest, my friends, is smooth sailing!  And you don't just need to stick with a theme for birthday parties....each and every one of your  holidays can center around one idea as well (think a 'Milk & Cookies' Christmas party, a "Good as Gold' St. Patrick's Day bash, or a 'Brats & Beer-Tasting Oktoberfest' Halloween Party, just to name a few).

Having one central idea in mind will help you with every element of the planning process too!  Know what else will help?  The printable PDF list we have attached below for you to print up and whip out whenever you have a new party to put together!!  So back to our 'ten things'; here goes . . . 


1.) Invitations:

Well, being this is our Juneberry Lane specialty, you know I am going to start with this EVER SO IMPORTANT item:)  After all, you NEVER have a second chance to make a first impression!!  

Invitations set the tone for the entire party; will they be thoughtful, special little pieces of art that your guests will hang on the refrigerator for weeks to come in excited anticipation of your big day or a last minute text message that will only make your loved ones remember that they have to spend $ on yet ANOTHER present?  You decide:)

A few Juneberry customs . . .


2.) Custom Banner:

Super easy to make, extremely affordable, and precisely the right way to announce the theme of your party and to tie it all together.

You can get these lovelies anywhere; make your own or order a simple, DIY version from Etsy (did I mention that Juneberry Lane makes custom, printable versions of whatever you need?)  And don't be afraid to get creative; string up old vintage records as 'background' for a "Rock-a-Bye Baby' themed shower banner or a few pretty doily circles to 'girly' things up a bit!  A couple of examples . . .


3.) Cupcake Circles/Cake pop Labels/Straw flags/Food & Drink Labels etc.:

I grouped these all together because you can usually have a set 'custom-made' for you for your entire party for very cheap.  Once I have the template for a party invitation designed, I can easily turn them into any type of label you need for your party and am more than happy to do it at a fraction of the cost in lieu of selling the files separately.  And I guarantee I am not alone!  

Just send a message to your favorite seller and ask if they will be willing to create matching labels & paper goods for you as a set for a discount!

Some of our customs . . .


4.) Retro striped straws:

Fun, very affordable, and now available in any color you need, these little lovelies work great to dress up your cocktails & beverages and also make a cupcake fantastic in no time!  And since you already stocked up on those mason jars or $1 tree glass tumblers to re-use at every party, ordering a quick pack of pretty straws is the perfect way to spruce them up for whatever theme you have decided on!  


My absolute favorite seller is Sweet Estelle on Esty; fast, affordable, great selection, and high quality every time!!  Just add the straw flags . . .


5.) Table runners/Fabric:

You already have your re-usable table skirt, so now you will just need to find a table-top covering for your dessert and favor/beverage/gift table to match your event and put the icing on the cake, so to speak.  

Head to your local fabric store and buy 2-3 yards of your favorite fabric that goes along with your party colors & theme.  You can leave the edges rough and just tuck them up under or hem them with a sewing machine or iron-on hem tape, it's up to you.  Don't forget to give it a pass with a hot iron first, if the material allows!  Nothing spoils a pretty dessert table like unsightly folds and wrinkles.  

My favorite cost-effective go-to runner is burlap; it can be combined with elegant, luxurious accessories if you are looking for a more glamorous feel or paired nicely with wooden serveware for a more rustic camp-theme, outdoorsy, or fall harvest type of event.  And don't forget about our post to use wrapping paper instead of fabric if you need to bring the budget down a bit!  In case you missed it, you can check it out here:  Juneberry Lane Wrapping Paper Runners

6.) Backdrop for your Main Dessert Table:

I see all types of backgrounds when perusing around for different party ideas to share with you, from a curtain of crinkled paper streamers to a wall of balloons and beyond.  What's important here is to only go as far as time and your budget allow.  

You can save a bundle by thinking out of the box-mini tissue poms scattered across the wall, a strand of paper or fabric bunting, or even a Target shower curtain in a retro-mod print that you love.  Just see for yourself . . .


7.) Favors/Labels:

Everyone loves to take home a little something to remind them of what a fabulous time they had at your party!  No need to spend a fortune here, either...in fact, a homemade jar of something delicious or a fresh baked mini-loaf of your favorite sweet bread (think banana bread for a safari/monkey themed shower:) work just perfectly and are an excellent find for your friends when they are scouring the kitchen for a late night snack:)

Ask the seller who created your paper party goods to include a little label for these too; a quick print on the computer, a touch of cutting, hole-punching, and tying on will just take a few minutes and can add just the right touch! 


8.) Paper Plates, Flatware, & Napkins:

I love the $ Tree for simple, colored plates, napkins, & flatware.  You already have so much pattern & theme work involved in your table runners, backdrop, and paper party goods that sticking with the simple, solid-colored stuff here keeps the party classy and chic....

9.) Cake/desserts:

Go ahead and order something fancy here, if you like, as cakes are not only everyone's favorite party treat but also make for beautiful decoration the whole party through.  Or get totally wild and pipe your own cupcakes (topped off with your paper circle labels and retro straws, they will steal the show!)  

If you are feeling like switching things up a bit, add in cake pops (see HERE for our easy how-to),  a table of pies, or a plethora of different cookies!  There can never be too many sweets, in my opinion:)

10.) Food, Beverages, and one 'Signature' Cocktail or Drink:

I love to cook and adore trying out new recipes, but when it comes to throwing a birthday party, the last thing I want is the stress of a new recipe or losing out on decorating time to slave away over the oven.  You don't have to drop a bundle of dough to have your day catered though!  Now that you have gorgeous serveware to use again and again, you can order pizzas, sandwiches from your grocery store deli, or even El Pollo Loco or Baja Fresh and your guests will gobble up the good stuff in pure style!

Even if you prefer to do all of the food prep yourself, make sure to test out any new recipes before the party.  And if the event calls for it, feel free to go 'potluck style' and have every guest bring a different cookie (for the milk & cookies Christmas party, that is:) or judge a 'cook-off' and let everyone bring their best chili, brats, pies, or pasta.  

As for drinks; a few cases of water, beer, soda, and economy bottles of wine will do the trick.  For a special touch, add in a 'signature' cocktail that compliments the theme of your party; I have found that these creative concoctions always delight the party-goers and make for a fun & carefree afternoon.  We did 'Turbulence Tamer' white sangria cocktails for my son's 2nd Airplane-themed birthday party...a big hit with the parents who spent the afternoon chasing rowdy toddlers around.  

And now that you have a gorgeous beverage dispenser or two, you might as well get your $20 worth!!

YOUR FREE, PRINTABLE PDF LIST of EVERYTHING YOU NEED FOR YOUR PARTY: Party Supply Checklist

And there you have it!  Two days of 'TOP TEN' to get you completely prepared for any party or event your are putting together!  I hope this helps eliminate some stress and gets you excited for all of the upcoming fun to be had.  I can't wait to see what you come up with...happy planning everyone!  

Photobucket