This past weekend my husband and I decided to clean out our kitchen to make some room for all of our fabulous shower and wedding gifts that we received. I usually dread cleaning out the kitchen as it always makes me realize how much of a kitchen utensil and appliance hoarder I am. While emptying and wiping out cabinets I usually find quirky baking accessories (such as: eccentric cupcake liners, random piping bags, and several bottles of the same shade of food coloring) and forgotten cooking supplies (like: two extra knife block sets, my George Foreman grill from college, and more oven mitts and aprons then I know what do with).
But while cleaning out one of our drawers I came across two sets of ice cube trays that my husband and I used in our refrigerator several years ago at our old rental house. We now have an ice cube maker, so I was just about ready to toss them into the trash when I remembered all of the variety of different fruit and herb ice cube recipes that I have seen throughout sites like Pinterest and Facebook. So after a good hard scrubbing I decided to keep them...and I am SO glad that I did!
After searching for some frozen lime cubes to put in my husband's Gin and Tonic, I stumbled across a recipe on how to make chocolate candies in those unused freezer trays. I continued researching and found a variety of different ways to satisfy that sweet tooth, while recycling this old piece of kitchen equipment. Who would have known that you could make dessert in ice cube trays?
Now try a taste of these tempting treats that will have you wondering why anyone would use their ice cube trays for anything but sweets!
Mini Creamsicles
(Recipe by
With Lovely)
Ingredients:
- 1 1/2 Cup of fruit (fresh or frozen)
- 1 1/2 Cup of heavy whipping cream (or milk, if you want to go lower-calorie)
- 4 Tablespoons of sugar
Directions:
1.)
Combine fruit and 2
Tablespoons of sugar over medium-low heat in a small saucepan. Cook, stirring occasionally, for about 3 minutes or until mushy, but
not quite liquid.
2.) Transfer mixture to ice cube trays (silicone works best), filling each about 1/2 full and insert a toothpick in each one. Freeze for about an hour or until set
3.) Mix heavy whipping cream or milk with remaining 2 Tablespoons of sugar in a
small saucepan over medium heat until sugar is melted. Pour on top of
set fruit mixture in your ice tray Freeze for at least 3 hours or until completely frozen.
Chocolate Covered Strawberries
(Recipe from
Cheap Recipe Blog)
Ingredients:
(Makes approximately 12 strawberries)
- 12 medium strawberries
- 1 (12 Ounce) bag of chocolate chips
Directions:
1.) Rinse strawberries and set aside to dry.
2.) Melt chocolate chips in the microwave, or in a double boiler
on the stovetop. Heat until chocolate is melted, and stir until smooth.
3.) Fill each ice cube slot about 2/3 full with chocolate. Place one
strawberry in each slot. Place tray in refrigerator and chill for at
least one hour until chocolate is set.
4.) To remove strawberries from tray, simply grab both ends of the tray
and turn slowly in opposite directions - just like you do to remove ice
cubes from the tray.
(Recipe via
Real Women of Philadelphia)
Ingredients:
- 1/2 Cup of graham cracker crumbs
- 2 Tablespoons of brown sugar
- 2 Tablespoons of salted butter, melted
- 250 Grams of Philadelphia Brick Cream Cheese (room temperature)
- 2 Tablespoons of orange zest
- 1 Teaspoon of pure orange extract
- 1/2 Cup of powdered sugar
- 1 1/2 Cups of frozen whipped topping (thawed)
- 2 Cups of chocolate molding wafers
- 25 orange zest curls, for garnish
Directions:
1.) In a large bowl, mix together the graham cracker
crumbs and brown sugar then incorporate the melted butter. Press
evenly into silicone ice cube molds (1 Teaspoon per cube) and refrigerate.
2.) In
a large bowl with an electric mixer, cream together the cream cheese,
orange zest, orange extract and powdered sugar then fold in the whipped
topping until it's smooth.
3.) Remove
the prepared graham cracker ice cube molds from the fridge and fill
each cube the rest of the way with cheesecake. Let it set in the
freezer for at least an hour before coating.
4.) In a double boiler or a heatproof bowl set over a pot of simmering water, melt the molding wafers until they're smooth.
5.) Pop
the set cheesecake out of the molds and set them on a wire rack with a
plate underneath for easy cleanup. Pour the melted chocolate over each
piece of cheesecake until all are covered. Place a curl of orange zest
on top and let the chocolate set.
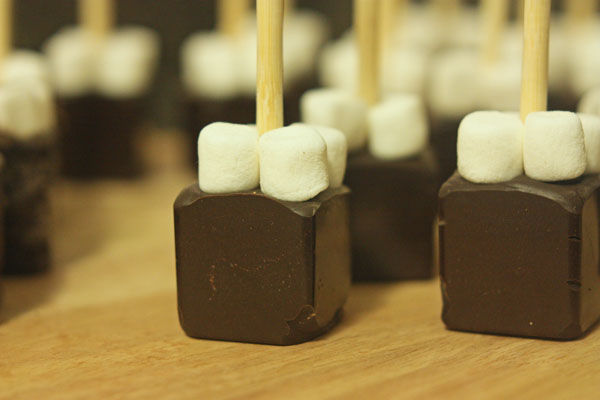
Hot Chocolate Sticks
(Recipe by
30 Pounds of Apples)
Supplies:
- Wooden sticks (at least 5 inches long)
- Piping bag or sandwich bag with 1/2 inch corner cut off
- Ice cube tray (each cavity approximately 1 ounce)
Ingredients:
(Makes about 15-16 sticks)
- 9 Ounces of milk chocolate (not chips)
- 7 Ounces of semi-sweet chocolate (not chips)
- 1/2 Cup (1.5 oz) of loosely packed cocoa
- 1 (4.5 oz) Cup of loosely packed powdered sugar
- 1/8 Teaspoons of salt
- Mini marshmallows
Directions:
1.) In a medium bowl, sift together cocoa, powdered sugar, and salt. Set aside.
2.) Chop chocolate into small pieces (no larger than about 3/4 inch
long) and combine in a glass bowl that is completely dry.
3.) Microwave in
30 second bursts on 50% power, stirring between each burst, ensuring
that your spatula is also completely dry. Once chocolate is about 2/3
melted (there are still some chunks in the melted chocolate), stir until
remaining chunks melt. This prevents the chocolate from getting too
hot.
4.) Pour melted chocolate into the mixing bowl containing the dry
ingredients and stir until combined. Mixture will be very thick, similar
to brownie batter. Spoon mixture into a piping bag (no coupler or tip
is needed) or into a sandwich bag with the corner sliced off. Pipe the
chocolate into an ice cube tray.
5.) Once all chocolate has been piped, pound the tray lightly on the
counter to eliminate air bubbles and to flatten the tops of the cubes if
they are uneven. Working one cube at a time, insert a stick and place
four mini marshmallows onto the top of the cube.
6.) Once all cubes are
complete, set aside until cubes are completely dry. You can also place
them in the fridge if you are in a hurry.
7.) Once all cubes are dry, remove carefully from the molds. Wrap pretty and store in the cupboard.
To Use:
1.) Heat up 1 cup milk (approximately 1 ounce of chocolate should be
used for each cup of milk, so adjust based on the weight of your cube)
and stir in. Cube will take several minutes to dissolve completely.
Chocolate Caramels
(Recipe via
EBakerie.com)
Ingredients:
- 6 Tablespoons of Unsalted Butter
- 1 Cup of 35% Cream
- 1/4 Teaspoon of Salt
- 1 1/2 Cups of White Sugar
- 1/4 Cup of Light Corn Syrup
- 1/4 Cup of Water
- 1 Cup of Dark Chocolate
- Candy Thermometer
Directions:
1.)
In one small sauce pan combine
butter, cream, and salt. Bring to a low boil for 1 minute. Remove from
heat.
2.) In another slightly larger small sauce pan combine sugar, corn
syrup, and water. (**Be cautious while pouring in ingredients, add them all
to the middle of the pot.**) You want to be cautious that the sugar doesn’t
crystallize/burn on the edges of the pot. Heat over medium high heat
until sugar mixture begins to turn brown or an amber color. Do not stir
the pan, you can gently swirl the pot to distribute the heat if
necessary.
3.) At approximately 310 degrees F it should start to have a
caramel-like aroma and will turn a very pretty reddish brown. Now pour
your cream/butter mixture into the sugar. (**BE CAREFUL. It will bubble up
ferociously.**)
4.) Now here’s when your candy
thermometer comes into play. Heat mixture, while stirring occasionally
until it reaches 248 F. Once it does, remove from heat and pour into
sprayed ice cube trays. I recommend using ice cube trays that had silicone bottoms allowing these to “pop” out
easier.
5.) Pop these into the freezer for an hour. Melt chocolate either in a
double broiler or the microwave. Transfer chocolate to a plastic baggy and snip a corner.
Drizzle on chocolate however you please. Let chocolate harden in refrigerator.
Party Bark
(Recipe from
Happy Hour Projects)
Ingredients:
(Makes 28 peices)
- 1/2 package of Vanilla Candiquik
- 2 Tablespoons of chopped peanuts
- 2 Tablespoons of Heath toffee chips
- 2 Tablespoons of mini chocolate chips
- 1 ounce of Craisins
Directions:
1.)
Stir all your mix-ins together.
2.) Melt your chocolate. Pay close attention to the package
directions. If you melt it in the microwave it only takes a minute. Stir it often. **Don't overheat it... that will just make it
harder – not smoother.**
3.) Spoon your melted chocolate into the cube sections, or fill empty ketchup/mustard bottles with
melted chocolate, and squirt into two ice cube trays.
4.) Cool your bark until it’s solid. If you’re in a rush, you can
speed this process up by putting it in the refrigerator, though it’s not
necessary – it will harden just was well on the counter.
5.) Then, just pop them out and serve.
What a simple, yet scrumptious way to create goodies for your next gathering! Imagine how fabulous these treats would look displayed in your candy dish at your next holiday party, packaged in patterned candy bags and given as a favor at next shower, or as a decorative touch to the top of a dozen cupcakes or layer cake at your kids' next birthday party.
So make a little room in your refrigerator and pop out some of these cube creations that will make you glad you never threw out those leftover ice trays! Have a great week!!