If you are not redirected in five seconds, click here.

Showing posts with label spring decor. Show all posts

Wednesday, April 20, 2011

Creamsicle Orange & Aqua Birthday....

Racking your brain for a 'theme' for your next birthday party, shower, or celebration and just can't seem to find one that works for you?  Well, maybe you're just not that type of girl.  So why not get carried away and let yourself be inspired by color?  


I am absolutely in love with this Creamsicle Orange & Aqua Birthday Party...simple & elegant with just a touch of fun!  The warm orange and cool aqua tones just complement each other perfectly and it is beautiful down to every last detail...


Handmade lollipops...


Cake boxes to take home with you...


And you just knew there simply had to be orange soda...


The adorable favors...


And my word, have you ever seen so many cakes?  Well, I do suppose one can never have too many cakes...

Party Courtesy of Tralala (French clothing designer)
Photos courtesy of Childs Style Magazine Photobucket

Tuesday, April 19, 2011

Tutorial Tuesday: The Paper Wrapped Vase...


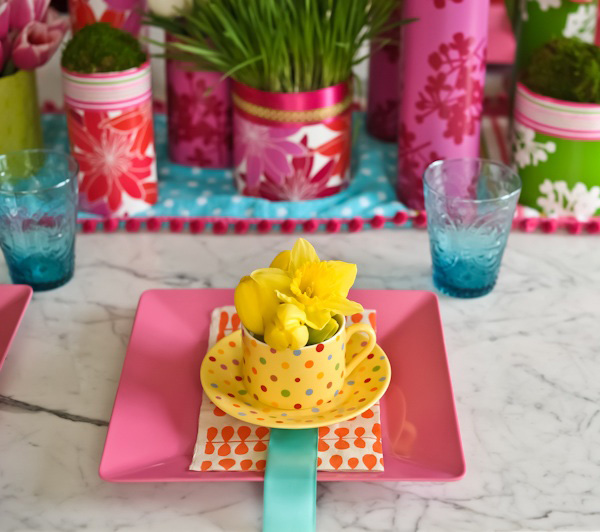
How about this for a lovely Spring table setting?  And not counting the flowers of course (which can always be purchased at your discount floral store or local Trader Joes) these centerpieces will only run you about $2 a piece...can you believe it?  


Here's how it's done....


Difficulty Level: Easy

Supplies You Will Need:

1.)  ¼” fabric ribbon
2.) Spray Adhesive (or Regular & Double-stick tape if you find it easier to work with those)
3.) Glass cylinder vases ($1 at the Dollar Tree) OR coffee tins, large soup & veggies tins, or even cardboard tubing cut to fit the size you would like.  For one basic table setting, I would start with 3 containers in varying sizes & heights.
4.) Ruler
5.) Scissors or Paper Cutter
6.) Pencil
7.) Decorative papers or wrapping paper in 3-5 different patterns
8.) Don't forget the flowers!
(You can also purchase blocks of floral foam at the Dollar Tree if you need a little assistance getting your  
flowers arranged the way you would like them)


1. Choose the container you would like to cover and measure a strip of the scrapbook/wrapping paper to fit around the container.

2. After measuring, cut the scrapbook paper or wrapping paper into a strip that fits around the container. (A paper cutter works best, but if you can cut a decent straight line, scissors will work too.) 

3. Spray a thin layer of the spray adhesive onto your scrapbook paper strip on the side you want adhered to your container.  Wait one minute for the spray adhesive to get really sticky.  Then, carefully adhere the scrapbook paper strip to the container.  (If you are working with tape instead of spray adhesive, wrap your paper around your vase, use the regular tape to secure the first edge to your container, then double-stick tape to secure the outer edge of the wrap to create a clean seam.)


4. To add more interest to your covered container, spray measured pieces of ribbon with the spray adhesive or back with double-stick tape and adhere to the container.


5. Then, fill your container about halfway full with water.  If you are using a cardboard tubing as one of your vases, just slip a glass or tin container underneath.  Cut flower stems at an angle to ensure they get the most water pumping through their stems.  For a more hand-picked feel, simply cut the stems and place in the container.  For more of a controlled, full look, you can use floral foam.  Simply cut the floral foam into a piece that fits snuggly into your container and insert stems into foam.


And that's it!  There you have it!  Lovely & modern centerpieces for only a few bucks each!!!  


For a fun & fancy table setting for your next Spring Dinner Party, shop around at TJ Maxx, Pier One, & Marshalls for a fabulous mismatch of bright & festive table settings....colorful & full of whimsy!  Have fun!  

Partial Tutorial Courtesy of Cori Cook Floral Design and Hostess with the Mostess

Pink Wrapped Vases Courtesy of Geranium Lake Flowers 


Photobucket

Monday, April 11, 2011

A 'Sprinkle' Baby Shower (Fabulous on a Budget!)


If you have a friend or family member having a second baby, and odds are you do in this wonderful time of baby boom bliss, what better way to celebrate the promise of a new arrival than with a little 'sprinkle' baby shower and a nice glass of bubbly?  What's even better is that, thanks to Paige from Paiges of Style, you can do it all on an extremely friendly budget!

Behold...


A child's umbrella is perfect for this party theme, and can be found on Amazon for under $13...


The mini pies in mason jars were a piece of cake {or pie} using pre-made mini-pie crusts and frozen mixed berries from Trader Joe’s.  Just scrap the bottom crust of the pie & use a top crust only.  They are tasty and couldn’t be easier!


Clear, glass Christmas ornaments make lovely hanging party decorations.  Perfect for any color scheme & easy to use again and again, they will only run you about $3 for 10 and can be found at your local florist shop year round...


Now this is a tip that has me over the moon.  See that absolutely stunning floral, vintage inspired backdrop that is the perfect touch for your Spring Sprinkle?  It is a shower curtain and from Target no less!  Fabric shower curtains are perfect for the backdrops to your dessert tables for a few reasons:

First, they are 72 inches wide, rather than the standard fabric width of 45 or 54 inches, so they will cover the whole width of the back of most tables. Second, they are already hemmed for you and even have loops at the top so you can easily secure it to a rod to hang without having to break out the sewing machine. And last but not least, you can’t beat the $20 price tag for something that you can reuse in the future!


For that extra Spring touch, using sod on the dessert table gives you that perfect fresh feel and will only cost you about $2.50 a square.

An easy & affordable menu for the party?  A DIY mac and cheese bar with various toppings so each guest can doll up their mac and cheese to their liking. Try bacon, blue cheese, green onions and some more extra sharp cheddar cheese. 


As we've said here before at Juneberry Lane, stocking up your kitchen with neutral serving dishes ensures you that you will never have to buy a specific piece for any of your entertaining needs.  You can use them over & over and not spend a penny ever again...

. 
 A dozen cupcakes from your local grocery store are a steal at around $6.99.  Just dress them up with some simple cupcake wrappers and take the bakery a sample of the color you are using so they can match it perfectly. . .


The total cost for the whole event was less than $200!  What a beautiful way to honor your friend and not break the bank while doing it!!  
– Photography: Carly Taylor
Photobucket

Friday, April 8, 2011

Bonus Tutorial: Easter Bunny Garland...


This sweet little bunny garland project was inspired by Martha Stewart's Easter decorating workshop.  And why stick to just the garland when you can make cupcake toppers & snack bag labels too?

Difficulty Level: Easy

Materials You Will Need:
~ Bunny template found here: Martha Stewart's Website
~ Decorative paper to match your home/party decor
~ Scissors
~ Pencil
~ Twine
~ Hole punch


How To Do It:
1. Download Bunny Template from Martha Stewart's Website
2. Trace Bunny to Scrapbook paper (repeat this step as often as you need to make a garland length to fit your desired area)
3. Cut out Bunnies
4. Punch 2 holes at the center of the head on each bunny...side by side and about an inch apart.
5. Weave twine through bunny holes

And there you have it!!


Photobucket