If you are not redirected in five seconds, click here.

Showing posts with label DIY centerpieces. Show all posts

Friday, March 30, 2012

Easy Elegance: The Sweetest Spring Mason Jars . . .


Looking for a quick DIY project to make a simply stunning centerpiece for your Easter Brunch?  Well, look no further, because these easy-peasy bunny jars from The CSI Project are just the things to create a whimsical & fun focal point for your holiday tablescape!


Bunny Mason Jars

Supplies You Will Need:
~ mason jars of all shapes & sizes...as many as you like!  
~ Krylon Spray Paint in your favorite Spring colors
~ small bag of potting soil
~ pretty flowers (that grow well in small groups).  Those in the photos are alyssum:)
~ A roll of white vinyl
~ an exacto knife or scissors
~ cookie cutters in Spring shapes


Directions:
1.) With your jars flipped with the mouth down, spray paint each jar the color you want. The first coat should be a very light coating, not covering all the way. After the first coat sets for just 10 minutes, you can follow up with a second coat. Repeat until you have the coverage you want.


2.) After they have dried 24 hours, transfer over your Spring plants. Make a paper funnel and place it in the mouth of your jar. Slowly scoop in potting soil.  Fill just over two thirds full, leaving plenty of room for your plant.


3.) Remove your flowers, roots and all, from the pots you bought them in.  Separate your flowers into smaller, natural groups.  


4.) Transplant your flowers into the jar. Add in any extra soil around the plant that is needed to fill the jar.


5.) Repeat with all of the jars.


6.) Unroll as much of the white vinyl as you need and using your Spring cookie cutters, trace shapes onto it.  With an exacto knife (or a pair of scissors if you don't have one!) cut out the shapes and apply them to the side of your mason jars.


Repeat with all the jars, some of the jars, and whatever shapes you like!!


Aren't those darling?  And you don't have to stick with just Easter & bunnies, you know!  These would look great with any colors or shapes that go with your next big event . . . you can fill them with plants, wrapped candy,  straws, heck, whatever you like!

And in case you feel like fancying things up a bit for Easter, now that you have been all inspired, don't forget to check out our Easter Brunch invitations in the Juneberry Lane Etsy Shop!


And don't forget about our sweet little 'Bunny Tail' cake pops from last year . . .


  Why, they would go quite nicely with these lovely mason jars too, don't you think?  Have a wonderful weekend!! Photobucket

Tuesday, September 27, 2011

Tutorial Tuesday: Birch Bark Cylinders . . .

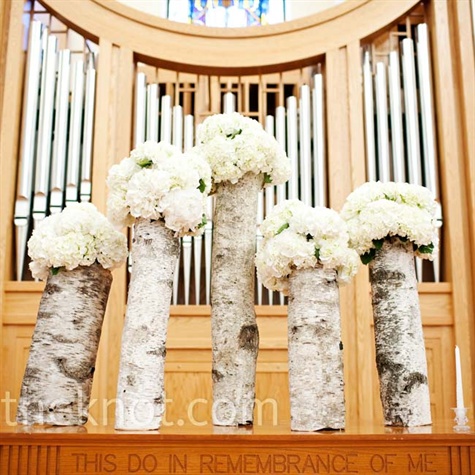
Outdoor weddings are all of the rage and these white birch vases are a great way to infuse a little nature while matching any color scheme you have in mind!  Perfect for a fall wedding or woodland-themed baby shower or birthday party, these gorgeous flower displays are oh-so-chic and more importantly, super friendly on the wallet!  First, let's get inspired . . .


Beautiful, right? Now let's get to work . . .

WHITE BIRCH VASES


Supplies You Will Need:
~ Birch Bark
~ Scissors, box cutter, or utility knife
~ Cylinder Vases (you can even get the right shape at the $ Tree!)
~ Hot Glue Gun
~ Brown Leather Rope, Rafia, or Twine
~ Your choice of flowers

Instructions:
1.Wrap birch around the vase to measure how much you’ll need for each vase leaving about a 2 in seam of bark overlapping. Glue the birch together.


2. Once the birch is wrapped on each vase, cut enough leather rope, twine, or rafia twine to wrap the vase twice and then tie in a knot or bow.


3. After the vases have been complete, add your favorite flowers (we chose a variety of seasonal white and pink blooms). The overall look of the flowers should be airy – make sure to include green accents – our favorite is scented geranium!


(tutorial courtesy of Chesnut NYC)

And aren't they even better if you carve some initials on there (all you need is a woodburning tool!). . .


Flowers not your style?  You could just make a lantern, a unity candle, or napkin rings instead . . .


(these can be found HERE)

Just the right amount of woodsy to bring the outdoors in or to give mother nature a shout out and also an amazing way to complement those feminine flowers with a bit of masculinity!  Hope you are having a wonderful start to your week!
Photobucket

Tuesday, May 10, 2011

Tutorial Tuesday: Lovely Lace Paper Perfection . . .


Have an absolute blast coloring Easter Eggs a few weeks ago and want to continue the fun?  I just love all of the projects you can create using these gorgeous hand-dyed paper doilies.  

They look beautiful dressing up a brown kraft bag filled with treats for affordable favors, they make a smashing garland for that ultra-feminine friend in your life, or best yet, use them to make an absolutely unforgettable embellishment on your next invitation.   


Difficulty Level: Easy


Supplies You Will Need:


~ A bowl or baking dish (I used a Pyrex baking dish)
~ White paper doilies (found at Michael's or Jo Anne's)
~ Food coloring
~ Paper towels
~ Rubber gloves

1.) Fill the baking pan or bowl with only enough water to cover the doilies – this is key, because you need the food coloring to be very concentrated. You will need to use quite a lot of food coloring. My first two or three attempts were failures (I had too much water in my dish and not enough food coloring). After I dumped out most of the water, and really poured in a lot of dye, it worked nicely.


2.) Submerge the doily in the dish/bowl for a few seconds (10 or 15 seconds is sufficient). I started to get bolder toward the end of this craft and I left them in for longer, just to see.

3.) Gently take them out of the dish and lay them on a paper towel to dry. They are very fragile, so use caution when you take them out of the pan.

4.) Blot them dry right away with another paper towel very gently. Set aside to dry. (I laid mine out on a table, underneath a ceiling fan, and they dried very quickly).

If you don’t want your fingers to turn green or blue or purple, like mine did, use rubber gloves to take the doilies out of the dye. Also, this craft is a paper towel hog; you will want to have lots of paper towels handy.

This is definitely a kid friendly activity, except it might take kids (depending on how old they are) a couple of tries to get the doily out of the dye without tearing it.


Perhaps you need a pretty garland . . .


Or fabulous favor wrappers on a bag or mason jar . . .


Maybe you were thinking of some lovely gift wrap . . .


And don't forget our favorite, the invitations . . .


And since we are getting extra crafty on this fine Tuesday in May, why not do ahead & make your own envelopes to match.  You can either leave them white, or use up a few more of those beautiful colored ones you have lying around . . .


These DIY Lace Envelope Doilies are a great way to dress up your shower or wedding invitations or programs, and a great touch for outside spring and summer weddings!


Materials :

~ 9 inch square doilies
~ Vellum/tracing paper
~ Craft Adhesive Spray
~ Art Card
~ Cutter/double-sided tape/cutting mat/ ruler

1. Create a template for the tracing paper/vellum. I used my old drawing block as the template. After a few attempts to get the right template, I am satisfied with my crisp looking template!
2. Trace the template into the tracing paper and use cutter to cut it. But for the folded side in the middle, use the blunt edge of the cutter to give a folding mark.
3. Spray the tracing paper with the Adhesive Spray. Don’t forget to put newspaper to cover the surrounding area. Leave it for 15 secs. Carefully stick it to the doilies, make sure it fits perfectly.
4. Fold the doilies to follow the tracing paper’s structure. Secure the inside of the envelope with double-sided tape. Voila! Beautifully hand-crafted envelope.


And there you have it.  Dozens and dozens of doilies to turn into all sorts of fantastic creations.  Lacy, vintage, romantic, & so much fun to put together! Photobucket

Tuesday, April 19, 2011

Tutorial Tuesday: The Paper Wrapped Vase...


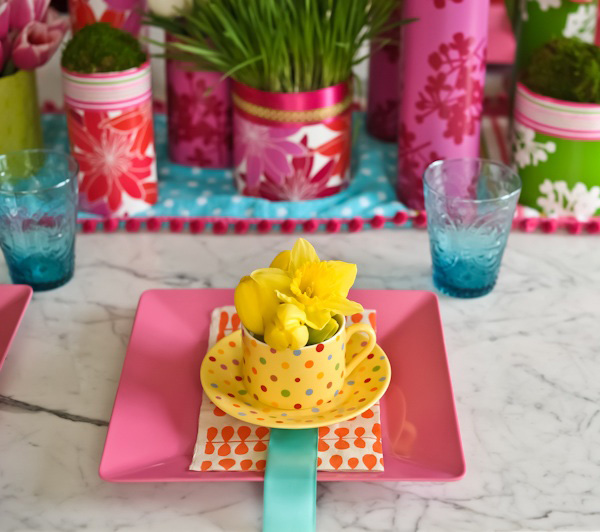
How about this for a lovely Spring table setting?  And not counting the flowers of course (which can always be purchased at your discount floral store or local Trader Joes) these centerpieces will only run you about $2 a piece...can you believe it?  


Here's how it's done....


Difficulty Level: Easy

Supplies You Will Need:

1.)  ¼” fabric ribbon
2.) Spray Adhesive (or Regular & Double-stick tape if you find it easier to work with those)
3.) Glass cylinder vases ($1 at the Dollar Tree) OR coffee tins, large soup & veggies tins, or even cardboard tubing cut to fit the size you would like.  For one basic table setting, I would start with 3 containers in varying sizes & heights.
4.) Ruler
5.) Scissors or Paper Cutter
6.) Pencil
7.) Decorative papers or wrapping paper in 3-5 different patterns
8.) Don't forget the flowers!
(You can also purchase blocks of floral foam at the Dollar Tree if you need a little assistance getting your  
flowers arranged the way you would like them)


1. Choose the container you would like to cover and measure a strip of the scrapbook/wrapping paper to fit around the container.

2. After measuring, cut the scrapbook paper or wrapping paper into a strip that fits around the container. (A paper cutter works best, but if you can cut a decent straight line, scissors will work too.) 

3. Spray a thin layer of the spray adhesive onto your scrapbook paper strip on the side you want adhered to your container.  Wait one minute for the spray adhesive to get really sticky.  Then, carefully adhere the scrapbook paper strip to the container.  (If you are working with tape instead of spray adhesive, wrap your paper around your vase, use the regular tape to secure the first edge to your container, then double-stick tape to secure the outer edge of the wrap to create a clean seam.)


4. To add more interest to your covered container, spray measured pieces of ribbon with the spray adhesive or back with double-stick tape and adhere to the container.


5. Then, fill your container about halfway full with water.  If you are using a cardboard tubing as one of your vases, just slip a glass or tin container underneath.  Cut flower stems at an angle to ensure they get the most water pumping through their stems.  For a more hand-picked feel, simply cut the stems and place in the container.  For more of a controlled, full look, you can use floral foam.  Simply cut the floral foam into a piece that fits snuggly into your container and insert stems into foam.


And that's it!  There you have it!  Lovely & modern centerpieces for only a few bucks each!!!  


For a fun & fancy table setting for your next Spring Dinner Party, shop around at TJ Maxx, Pier One, & Marshalls for a fabulous mismatch of bright & festive table settings....colorful & full of whimsy!  Have fun!  

Partial Tutorial Courtesy of Cori Cook Floral Design and Hostess with the Mostess

Pink Wrapped Vases Courtesy of Geranium Lake Flowers 


Photobucket