If you are not redirected in five seconds, click here.

Showing posts with label free printables. Show all posts

Saturday, December 22, 2012

Elf on a Shelf Free Printables!!


Hello there & Happy Holidays!  Just popping in to share these fun, free "Elf on a Shelf' printables with you!  As you know, your littlest family friend is supposed to make his/her departure on Christmas Eve, so surprise the kiddos on Christmas morning with this note left in his regular spot on the mantle:)

I also whipped up a couple of others...a 'special treat' version and a little note from Santa to remind your little that it is Elf's last day, so treat him well!!  


You can download them on our Google Drive page here:


https://drive.google.com/file/d/0Bzu5w7KxC6K3N2w2ZmVER2VxTWs/edit?usp=sharing


There you go...hope you like them!!!! Photobucket

Tuesday, September 4, 2012

Tutorial Tuesday: Two Yummy Desserts for Fall (with FREE printable Labels!!)

And just like that, Labor Day weekend has come and gone and it is now quite officially the start of fall!  I can see from all of the mass activity amongst my Pinterest set that most of you have become ENTIRELY obsessed with all things autumn, so what better way to kick things off than with two simply delicious recipes and a couple of free printables to go along with them?  

Surprise the kiddos with some delicious caramel apples waiting on the counter when they get off their bus this week....or more importantly, enjoy a slice of this delightful peanut butter banana bread with that newly available Pumpkin Spice Latte that you pick up on your way home!  


Peanut Butter Banana Bread

Ingredients:

Bread:
~ 1 1/2 cups mashed ripe banana
~ 1/3 cup plain fat-free yogurt
~ 1/3 cup creamy peanut butter
~ 3 tablespoons butter, melted
~ 2 large eggs
~ 1/2 cup granulated sugar
~ 1/2 cup packed brown sugar
~ 1 1/2 cups all-purpose flour (about 1 1/2 cups)
~ 1/4 cup ground flaxseed
~ 3/4 teaspoon baking soda
~ 1/2 teaspoon salt
~ 1/2 teaspoon ground cinnamon
~ 1/8 teaspoon ground allspice
~ 2 tablespoons chopped dry-roasted peanuts (optional)
~ Cooking spray

Glaze:
~ 1/3 cup powdered sugar
~ 1 tablespoon 1% low-fat milk
~ 1 tablespoon creamy peanut butter

Directions:

1. Preheat oven to 350°.
2. To prepare bread, combine first 5 ingredients in a large bowl; beat with a mixer at medium speed. Add granulated and brown sugars; beat until blended.
3. Weigh or lightly spoon flour into dry measuring cups; level with a knife. Combine flour and next 5 ingredients (through allspice) in a small bowl. Add flour mixture to banana mixture; beat just until blended. Stir in nuts. Pour batter into a 9 x 5-inch loaf pan coated with cooking spray. Bake at 350° for 1 hour and 5 minutes or until a wooden pick inserted in center comes out clean. Remove from oven; cool 10 minutes in pan on a wire rack. Remove bread from pan; cool.
4. To prepare glaze, combine powdered sugar, milk, and 1 tablespoon peanut butter in a small bowl, stirring with a whisk. Drizzle glaze over bread.

(recipe courtesy of Maureen Callahan, Cooking Light)


Homemade Caramel Apples

Ingredients:

~ 6 apples
~ 1 (14 ounce) package individually wrapped caramels, unwrapped
~ 2 tablespoons milk
~ wooden skewers/craft sticks

Directions:

1.) Remove the stem from each apple and press a craft stick into the top. Butter a baking sheet.

2.) Place caramels and milk in a microwave safe bowl, and microwave 2 minutes, stirring once. Allow to cool briefly.

3.) Roll each apple quickly in caramel sauce until well coated. Place on prepared sheet to set.

(recipe courtesy of allrecipes.com)

And without further adieu, here are your FREE printable labels (scroll below for the links to download!!):


Multiple Banana Bread Labels

(just print as many as you need & cut the entire colored portion out, fold at the line where the solid box meets the pattern to create a tent, and you are all set!!)

Multiple Caramel Apple Tags

(Print as many as you need and cut the squares out.  Using a craft knife, make a small slit at the top & bottom center of the square label, about 1/2 an inch from the top (and bottom!) and slide along your wooden craft caramel apple stick!)

Here is how the label should look on your stick (a pic example of a cake pop version, so you can see the placement of the slits:)  A picture to follow as soon as our Juneberry Caramel Apples are ready to go:)...


There you go!  You are all set for that fall bake sale, book club meeting, or even just to have a couple close friends over for some strong coffee and good conversation!  Hope your short week is off to a terrific start! Photobucket

Tuesday, February 7, 2012

Pretty Valentine's...One for the Girly Girls!

Now even though I am desperately in love with the Superhero Valentine cards from yesterday, I thought it only fair that I lead you to a free printable for the girls, just in case the little lady in your life isn't too into Superman.

I just love these sweet treats from Skip to My Lou, and I especially love the FREE download that comes with them!!  Flowers, Butterflies, and everything that makes a little girl's heart sing!  Take a peek . . .


VALENTINE BUTTERFLIES


Directions:

1.) Download Butterfly Valentine HERE

2.) Print on colored cardstock

3.) Cut out the butterflies, , make slits in the center for the sucker, and add decorations if you prefer (cut out shapes of paper, stickers, glitter, etc.)

4.) Insert sucker and then add some wiggly eyes to the top of the sucker and add a piece of tape to the back to keep the sucker securely in place.

FLOWER VALENTINE'S


Directions:


~ Simply download the file HERE, cut & assemble!
~ If you want to add a leaf to write your munchkin's name on...you can download it right HERE


Sweet, simple, unique, and FREE!  All you need is a bag of lollipops, tape, and some colored cardstock and you will be ready to go!!!  You have a week...ready, set, GO!! Photobucket

Tuesday, November 22, 2011

Tutorial Tuesday: Thanksgiving Place Cards - Rustic, Simple, & Scene-Stealing!


What's great about Thanksgiving is that you really don't need too much to really spice up the details.  A pretty mantel, a gorgeous table runner, a fab centerpiece, and sweet little place cards like these and you will be all set!

What I love about pre-planned seating is that you can make sure none of your guests have to worry about where they should sit; no one has to spend a second thinking about whether a couple wants to sit next to each other or a child next to a parent!

Now don't worry, I know you are busy getting all of those last minute groceries and stressing out about what time to put the bird in the oven, so I am making sure to keep it simple with a fun project to add some rustic glam to your table, with very minimal fuss.

But first, some inspiration of course!  Pinecones are easy to find and always a hit . . .


Even more so when you add glitter, of course . . .


Feathers are ALL the rage this season . . .


And a pumpkin three ways!


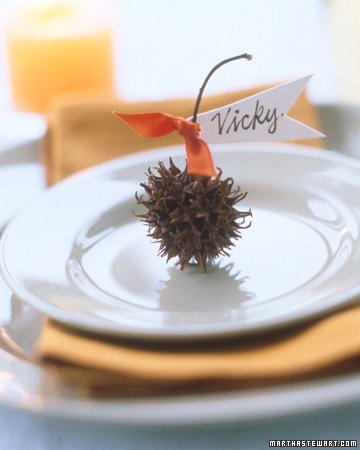
These little buggers make me so angry when I am out taking my son for a walk in his stroller, so getting some use out of them instead of just getting them caught in the wheels makes them somewhat bearable . . .


Simple not your thing?  Okay, go ahead and get a little crafty . . .


Or scale it back, find a pretty leaf and use a paint marker; easy-peasy and still elegant & beautiful . . .


Paper leaves will do the trick too . . .


Now that you are feeling totally convinced that you absolutely cannot have another dinner party without place cards, let's get to the DIY business!  Thanks to eab designs, we have this sweet little leaf tutorial . . . and even a free leaf template so you don't have to rely on your drawing skills!  Here's what you do . . .


PAPER LEAF PLACE CARDS

Supplies you will need:
~ heavy paper in whatever color you prefer (the above pic is 67 lb card stock in cream)
~ scissors
~ chalk ink (optional, but it makes the gorgeous 'burned' edge look-or you can actually burn the edges if you trust yourself with the matches.  Be careful & go outside:)
~ bone folder (optional-it scores the leaf and gives it that three dimensional look.  You can buy these for very cheap at Michael's or your local craft store, but if you don't have time, just use anything you have without a sharp edge - like the back of a butter knife or the rounded side of a pen or paintbrush.)
~ marker
~acorns, pears, or pinecones  and twine (optional-if you want to tie your leaves to something rustic)

Directions (from eab designs)

1.) Print out the template on card stock (I used 67 lb paper in cream), and then cut out each leaf.

You can find your free leaf template HERE

I have two great tips for cutting intricate curves.  The first is to maneuver the paper as you cut, not the scissors.  Secondly, a small pair of scissors will be your best friend.  I love these curved ones from Fiskars.  They are available at Michael's for under $10 and I use mine all the time.


2.) After I cut the leaves out, I add my guests' names and then dab chalk ink on the edges to give them a bit of color.  For a more three dimensional effect, I score the center using a bone folder and straight edge. Gently fold the crease toward the center of the leaf and with your fingers curl up the edges slightly here and there.

3.) Your guests' names can be added by freehand, or you can open the template in photoshop, or another software program, and add the names there using the font of your choice.

The leaves can be used alone, or tied to a fall decoration.  Above I've used felted acorns and jute twine.  Pine cones, walnuts or a fresh pear would also be nice.  You can even rest them on top of a wine glass.


As usual, its the little details that steal the show; and the best part about most of these place card ideas is that you can get the kids out of your holiday-planning hair for a bit by sending them off on a backyard treasure hunt for your supplies!!! Photobucket

Thursday, November 10, 2011

Free Thanksgiving Banner & A Thanksgiving Line of Invites:)

This little 'Turkey Day' banner was such fun to design, and as I am in a thoroughly thankful mood over our upcoming holiday season, I figured it was time to say THANK YOU to all of YOU!

You have made me such a happy girl with all of your wonderful comments, orders, and loyal readership in general, that I want to start showing my gratitude with more regular freebies!

I had a little fun stringing it to my own mantle, just to give you the idea, but if you scroll down below you can download the files to print & cut your very own.  Here it is and I hope you enjoy!


And here are your FREE printable files . . .
Turkey Day Banner 1

Turkey Day Banner 2

Turkey Day Banner 3

Turkey Day Banner 4

Turkey Day Banner 5

You can either print it up and glue it to a solid paper stock backing (if you are really feeling fancy-I recommend turquoise; surprise, surprise:), or just cut it along the borders (like I did!).  Use scissors or an exacto knife to make two small slits in the upper corners, and string it up with twine or yarn to hang wherever you choose!

And just in case you would like to add a little fun & excitement for your loved ones on the big dinner day, you can purchase the customized 'Thanksgiving Turkey Day' Invite printable file in the Juneberry Lane Etsy shop for the very reasonable price of $5.99.  These would be perfect for a Thanksgiving Eve Cocktail Party or a After-Dinner Dessert Night too!  Check it out, it is a personal favorite of mine . . .


Hooray for free things!!!  Thank you again for being wonderful!! Photobucket