If you are not redirected in five seconds, click here.

Showing posts with label romantic wedding. Show all posts

Wednesday, October 5, 2011

Wedding Wednesday: A California Eclectic Romance . . .


I am so excited to bring you the stunning California Eclectic Wedding of Carly & David this Wednesday . . . just wait to you see all of the gorgeous details; just so very pretty & personal, and the vintage touches combined with the always perfect Southern California weather just makes for the most sunny & lovely affair!  Take a look . . .


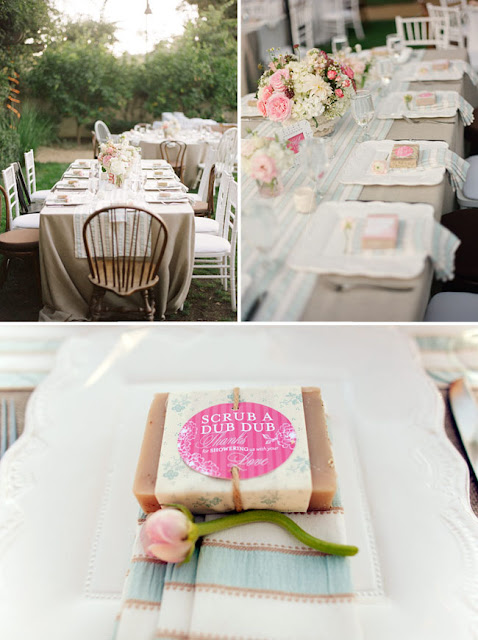
And on to the lovely little reception . . .


I am so crazy for these strings of lights and the mismatched chairs . . . perfect!


And the couple had a silhouette artist present to create 2 silhouettes for every guest, couple, or family . . . one for them to take home and one for them to leave for the bride & groom.  What a wonderful way to commemorate who shared your big day with you!


'They framed sweet quotes that Carly + David say to each other (“I love you to the moon and back”), as well as favorite romantic lyrics (“Love Me Tender”), and placed them among the guests’ dining tables. They also incorporated some Carly-isms wherever they could! “Bless your heart” was used on the drink flags and “Goodness gracious” was on the pie table.'


So in love with those blush-hued cocktail glasses . . .


A word from Amorology, the event designers . . .

"As soon as Carly told us that her colors were oatmeal + blush, we began thinking up different ways we could weave the use of oatmeal through out the wedding – besides just the color palette! From floral centerpieces with oats at the bottom, to favors, to the oatmeal toss that showered the happy couple as they exited, we subtly incorporated oats wherever we could.

Our favorite was indeed the oatmeal toss, where we handed guests tiny envelopes that read “Oat to Joy!” For the favors, the couple purchased oatmeal soaps that we wrapped in custom coordinating floral fabrics. These sat at each place-setting and greeted guests with a fun tag that read “Scrub a dub dub, thanks for showering us with your love!”


The oatmeal to toss . . .


I just love it when a bride changes into a 'send-off' outfit.  So retro & chic . . .


Wedding via Green Wedding Shoes

Fabulous Vendors:
photography: Jessica Claire // event design + planning: Amorology // ceremony: Newport LDS temple // reception venue: Arroyo Trabuco Golf Course, Mission Viejo, CA // music: Hit it music // floral design: Twigg Botanicals // rentals: Town & Country Event and Archive Vintage Rentals // lighting: Shine Lighting // wedding dress: custom made by Nancy Barrus at Avenia Bridal // hair + makeup: Swell Beauty // videographer: Benny Ek // Silhouette Artist: Nancie (714-771-8445) // paper elements: Brightly Designed // linens:la tavola

Just darling, don't you think? Photobucket

Tuesday, May 10, 2011

Tutorial Tuesday: Lovely Lace Paper Perfection . . .


Have an absolute blast coloring Easter Eggs a few weeks ago and want to continue the fun?  I just love all of the projects you can create using these gorgeous hand-dyed paper doilies.  

They look beautiful dressing up a brown kraft bag filled with treats for affordable favors, they make a smashing garland for that ultra-feminine friend in your life, or best yet, use them to make an absolutely unforgettable embellishment on your next invitation.   


Difficulty Level: Easy


Supplies You Will Need:


~ A bowl or baking dish (I used a Pyrex baking dish)
~ White paper doilies (found at Michael's or Jo Anne's)
~ Food coloring
~ Paper towels
~ Rubber gloves

1.) Fill the baking pan or bowl with only enough water to cover the doilies – this is key, because you need the food coloring to be very concentrated. You will need to use quite a lot of food coloring. My first two or three attempts were failures (I had too much water in my dish and not enough food coloring). After I dumped out most of the water, and really poured in a lot of dye, it worked nicely.


2.) Submerge the doily in the dish/bowl for a few seconds (10 or 15 seconds is sufficient). I started to get bolder toward the end of this craft and I left them in for longer, just to see.

3.) Gently take them out of the dish and lay them on a paper towel to dry. They are very fragile, so use caution when you take them out of the pan.

4.) Blot them dry right away with another paper towel very gently. Set aside to dry. (I laid mine out on a table, underneath a ceiling fan, and they dried very quickly).

If you don’t want your fingers to turn green or blue or purple, like mine did, use rubber gloves to take the doilies out of the dye. Also, this craft is a paper towel hog; you will want to have lots of paper towels handy.

This is definitely a kid friendly activity, except it might take kids (depending on how old they are) a couple of tries to get the doily out of the dye without tearing it.


Perhaps you need a pretty garland . . .


Or fabulous favor wrappers on a bag or mason jar . . .


Maybe you were thinking of some lovely gift wrap . . .


And don't forget our favorite, the invitations . . .


And since we are getting extra crafty on this fine Tuesday in May, why not do ahead & make your own envelopes to match.  You can either leave them white, or use up a few more of those beautiful colored ones you have lying around . . .


These DIY Lace Envelope Doilies are a great way to dress up your shower or wedding invitations or programs, and a great touch for outside spring and summer weddings!


Materials :

~ 9 inch square doilies
~ Vellum/tracing paper
~ Craft Adhesive Spray
~ Art Card
~ Cutter/double-sided tape/cutting mat/ ruler

1. Create a template for the tracing paper/vellum. I used my old drawing block as the template. After a few attempts to get the right template, I am satisfied with my crisp looking template!
2. Trace the template into the tracing paper and use cutter to cut it. But for the folded side in the middle, use the blunt edge of the cutter to give a folding mark.
3. Spray the tracing paper with the Adhesive Spray. Don’t forget to put newspaper to cover the surrounding area. Leave it for 15 secs. Carefully stick it to the doilies, make sure it fits perfectly.
4. Fold the doilies to follow the tracing paper’s structure. Secure the inside of the envelope with double-sided tape. Voila! Beautifully hand-crafted envelope.


And there you have it.  Dozens and dozens of doilies to turn into all sorts of fantastic creations.  Lacy, vintage, romantic, & so much fun to put together! Photobucket