

Since we are halfway through October and our time for scares & spooks is almost up, I thought I might as well just share this fantastic tissue pom idea; the sweetest little Autumn decoration that can last with you right on in to Thanksgiving!
If you are looking to add a little panache to your porch for the trick-or-treaters or just wanting to spice up your pad a little in these last couple of weeks, I think these Owl Tissue Poms are just adorable! And best yet, they are so very easy too:
OWL TISSUE POMS
Supplies You Will Need:
~6-8 sheets of (approximately) 20″x 30″ tissue paper (for the owl’s body)
~ 1 additional sheet of tissue paper, same color (for the owl’s head, ears, and wings.) If your pack comes with 8 sheets like mine did, use 7 for the body and 1 for the head.
~ Floral wire
~ Styrofoam ball, approximately 5″ in diameter.
~ Felt in black, white, and orange.
~ Pink/orange pipe cleaners for legs
Directions:
1. Accordion fold 6-8 sheets of tissue paper. Tie with floral wire. Snip ends, either as a rounded edge, or pointed edge.

2. Fluff your pom, pulling each layer of tissue up, one at a time.

3. You’ll end up with a flat sided, flower-like pom.

4. Squish it together to make it more oblong, and less round. You’re aiming for an owl-like body shape.

5. Cut your spare piece of tissue so that it will cover the styrofoam ball. Twist the remaining tissue and glue down with a glue gun. This is your owl’s head. Use a glue gun to glue the head to the flat side of the body. Pull up the top layer of tissue and glue to hide the area between the head and body.

6. Cut wing shapes from tissue paper and glue in place.

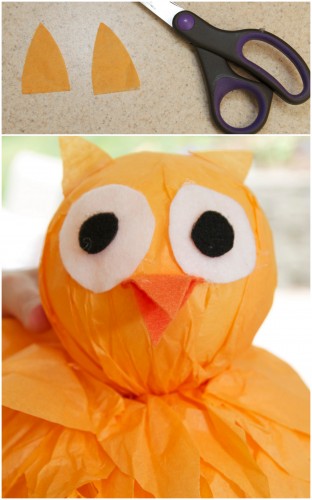
7. Cut eyes and beak shapes. For eyes, cut 2 large white circles and 2 smaller black circles. For beak, fold piece of orange felt in half and cut into triangle. Glue eyes together, and glue beak together on the outer edge to help the beak stay together, but appear open.

8. Glue eyes and beak to head.

9. Cut ear shapes and glue to head.
10. Cut pipe cleaners and twist to make legs. Glue into the base of the body.

11. Display by either mounting on a small wooden rod, or by hanging with monofilament.

Get ghostly with it . . .

So fantastic, and easy too, right? A pom just makes everything perfect!!


