If you are not redirected in five seconds, click here.

Tuesday, July 26, 2011

Tutorial Tuesday: Summer in Paradise with White Sangria & Prosecco Perfection. . .


What could be more simply delicious for that late July heat than a frosty pitcher of White Sangria?  Perfect for summer BBQs or that late afternoon get together with your neighbors on the front porch, this cocktail is yummy, ice cold, and full of fruit & fabulousness!


White Sangria

Ingredients:

6 cups Sauvignon Blanc (you don't need anything too pricey here, since you are mixing in all of that fruit, juice, & sugar, something simple and friendly on the budget will do just fine.)
1/4 cup superfine sugar
1 cup white grape juice
1 orange, thinly sliced
1 lemon, thinly sliced
1 cup white grapes, skewered on a toothpick
1 cup club soda

Preparation:

In a large pitcher or other container, combine the wine and sugar. Stir until the sugar dissolves. Add the remaining ingredients, excluding the club soda, and mix well.

Place the pitcher in the refrigerator and let the sangria sit for at least 1 hour (and up to 4 hours). The sangria will sweeten with time, so the longer it sits, the better.

Just before serving, stir in the club soda and ice cubes.

So simple & so satisfying too.  Enjoy!

Recipe brought to you by Eat, Drink, Pretty and Real Simple

Sangria not your thing?  Well maybe these super yummy, refreshing, & oh-so-pretty Prosecco Fruit Coolers might be the perfect outdoor treat to wet your whistle.


And what could be more simple than adding a bit of Prosecco to a glass with your fruit bar inside?  Thank you to Southern Living for this delicious recipe and hope you all are surviving the heat!! Photobucket

Monday, July 25, 2011

Married in Malibu: Wine, Whimsy, & a Wedding in the Vineyard . . .

Every now & then a wedding comes along that is so lovely, I just can't help sharing the photos with you.  And these gorgeous 'I dos' are no different.

Set at the breathtaking Saddlerock Ranch Vineyard in our own Malibu, CA and designed by the fabulous Nancy of So Happi Together, these two lovebirds took their fantastic taste in music, family, & of course, vino, and created a one-of-a-kind day to remember . . .

vineyard wedding

Mae Mae Paperie

A bit about the invitations, in the brides words:  "We wanted our invite to reflect our love for music.  We decided on the idea to create a cd type booklet that on the inside contained liner notes on the left and a “cd” on the right. The liner notes would be the invite and instead of a cd full of songs, we wanted to create a stop motion film on dvd. We found recycled cardboard sleeves (which was perfect because Matt is an environmental engineer). We fell in love with a font/design that Mae Mae Paperie and our planner So Happi Together came up with for a shoot they had previously done together. Together with Megan at Mae Mae Paperie we found a way to incorporate the design into the cardboard cases we found.  We used a local letterpress company to save money and we also lined  all our invitation and rsvp envelopes ourselves with a color that matched our bridesmaid dresses."

Malibu vineyard wedding

wedding altar

wedding drinks

vineyard wedding

wedding details

How about that outdoor lounge they created using one of a kind custom pieces from Found Vintage Rentals . . .

vineyard wedding details

refreshments table

refreshments table

wedding cake

wedding dessert bar

vineyard wedding tablescape

malibu vineyard wedding

So, so pretty & full of class and amazing detail, don't you think?

CREDITS:
Photography: Gabriel Ryan Photographers / Wedding Dress – Vera Wang on Melrose / Shoes – Badgley Mischka  / Suit – Hugo Boss / Shirt – Thomas Pink / Shoes & Belt – Ferregamo / Tie & Cufflinks – Burberry / Ceremony & reception venue: Saddlerock Ranch / Printer – Aardvark Letterpress /Calligrapher – Copper Willow Paper Studio / Cinematography: Joe Simon Wedding Films / Hair and Makeup: Kelly Zhang / Floral Design: Holly Flora / Catering: Lawry’s The Prime Rib / DJ & MC: Richard Blade / Lighting: Bella Vista Designs / Rentals: Classic Party Rentals, Luxe Event Rentals, Found Vintage Rentals, Chiavari Chair Rentals, La Tavola Linens / Cake, desserts, macaron favors: Sweet and Saucy Shop / Valet: Premiere Valet Service / Security: Sandman Security / Photobooth: Sassy Booths Photobucket

Friday, July 22, 2011

A Dream Home Tour: Part 5 . . .

Well here we are, on the final leg of our dream home tour.  I hope you have enjoyed walking through this lovely home with me.  Many thank you's to Cristi & Jeff, for letting us into their beautiful home, to the fabulous Lindy Allen from Four Chairs Furniture, for designing this visual masterpiece, and to Erin from House of Turquoise, for leading us to this gorgeous house.

I hope you have been inspired to start a few decorating projects of your own!  Now I won't keep you waiting.  Here they are, the master suite, laundry room, & the bonus attic space . . .


Loving that rug . . .


And this wallpaper in the master bath is FANTASTIC . . .


It's all in the details . . .


In the laundry room . . .


And the attic bonus room . . .


Well, I am afraid, my friends, that we have come to the end & the tour is finished.  But fret not, we will be continuing an earlier series next week, 'Dining Under the Stars',  so you will have all of that lovely outdoor entertaining inspiration to look forward to.  Have a wonderful weekend! Photobucket

Thursday, July 21, 2011

Harry Potter Butter Beer & Broomsticks . . .

Okay, in honor of all of those millions of screaming fans out there making this final Harry Potter movie almost $600 million worldwide, I thought this AMAZING drink recipe & broomstick garnish would be perfect for those super fans out there and would make the perfect pre-movie beverage for those of you heading out to the theatre this weekend.

And this one goes out to my favorite superfans out there (Tiffany, Tony-Lyn, & my sweet little sister, Meggie).  I hope this little treat helps numb the pain as you say goodbye to a spectacular series . . .

Butterbeer
Use these fantastic garnishes to add a bit of magical flair to your favorite Harry Potter party drink.  Or use the broom handles to skewer together any tasty morsels that threaten to scurry away on the dessert table.


Broomstick Picks

Materials Needed:
~ Raffia
~ Wooden skewers
~ Colored embroidery floss
~ Brown thread

Tools:
~ Sewing machine
~ Hot glue gun & glue
~ Scissors

BroomA

1.  Gather small bunch of raffia – about 20 strands. Stitch bundled raffia together. (Seam is about 3/4" long.) Trim raffia to 5" wide, with seam centered.

BroomB

2.  Place medium-size dot of hot glue to left of thread seam. Place the blunt end of skewer into glue, extending skewer about 1" past thread seam.

BroomC

3.  Fold right half of raffia over skewer. Secure with glue or simply keep a hold on raffia till Step 4 is completed.

BroomD


4.  While holding raffia ends securely, wrap colored embroidery floss around broom bristles, about ½" from folded end of raffia. Wrap thread 3-4 times and secure with knot. Trim raffia to even out end of broom.

ThreeBrooms

These brooms are surprisingly easy to make -- bookmark for next Halloween : )

Butter Beer Recipe

Madam Rosmerta would agree that no wizard party is complete without a pint of freshly-brewed Butterbeer. With our house elf now missing, it took us quite a few iterations before we discovered the perfect potion for this usually overly-sweet concoction. A hint of ginger and the sweetness of butterscotch combine to create a delightful and refreshing drink, capable of making even Severus Snape smile.


Butterbeer Recipe:

12 oz. (one bottle) ginger beer
36 oz. (three bottles) cream soda
3 T butterscotch ice cream topping

Butterscotch300

Thoroughly chill unopened ginger beer and cream soda in refrigerator until icy-cold.  Refrigerate empty, glass pitcher as well.  Once beverages are chilled, in a small mixing bowl or tall glass, stir 1-2 oz. of cream soda into butterscotch topping till thoroughly combined.  Pour all remaining soda into chilled pitcher. Quickly add butterscotch mixture to pitcher.  Stir till just combined;  do not over-stir.  Pour over ice and serve immediately.  Serves 6.

For a frothy sparkle, dip the rim of each glass in corn syrup, pulling drips of syrup downward with a toothpick.  Then dip each glass rim in a mixture of colored sugar.  Before dipping, spread the corn syrup & sugar mixture each onto a separate, flat-bottomed plate.

SugarRim


For an old-world, textured effect, mix fine, yellow sugar with coarser, gold sugar.  Colored sugars are available at many grocery stores and craft chains.  The sugars shown here are both from Michael's.

Thank you to the amazingly creative Heather Bailey for this wonderful craft & drink recipe, and enjoy your movie, girls!! Photobucket

Wednesday, July 20, 2011

A New Line of 'Up' Invitations & Labels, Just For the Heck of It . . .

Now I really had no intention of extending this party beyond a day or two, but I figured, while we were at it, what the heck, why not design a few 'Up' goodies, just in case the last couple of days have inspired you.

I was having so much fun with this theme that I put these paper party printables together this afternoon, and I am just so very pleased with how they turned out.  So here goes . . .

The Invitations . . .


The Favor Labels . . .


And Cupcake Toppers too . . .


And this is how they come, delivered to your e-mail box . . .


Now tomorrow we are moving on to something new, I promise, but for today you can pick these new paper goodies up in our Juneberry Lane Etsy Shop, and you will be all set for that next Up, Up, & Away Event.  And wouldn't this just make the perfect little casual outdoor birthday party, bridal shower, or rehearsal dinner?  Yup, I think so too:) Photobucket

Tuesday, July 19, 2011

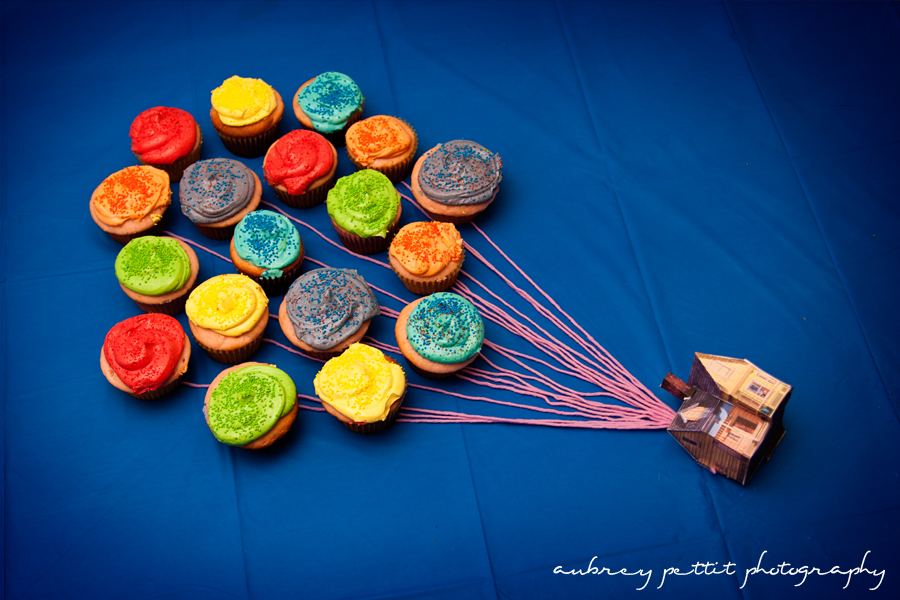
Tutorial Tuesday: Upcakes & Other Dessert Magic . . .


Because yesterday's wedding was such fun, I thought we should keep it going for a bit and find some fantastic desserts for your next 'Up' inspired birthday party, shower, or big event.   First, there is this amazing tutorial for the perfect cupcake from the whiz of all kitchen whizzes, Bakerella.  Aren't these just the cutest things, and when you see how easy they are, you are going to be thrilled!

Here's what you do (in Bakerella's words):

You’ll need some cupcakes and frosting. Any kind. Your favorite cupcake recipe or even a cake mix. Frost the cupcakes with an offset spatula and make it look kinda messy. They don’t need to be perfect. You are going for fluffy and cloudlike. Then sprinkle white sanding sugar over the top for some extra texture and sparkle.


Pretty.

IMG_4915

For the balloons, you can use doughnut holes. They are a great size and lightweight enough so they won’t topple over.

IMG_4903

Apply some of the frosting to the surface of the doughnut hole. Don’t be afraid to get your fingers messy.

IMG_4929

After you frost the doughnut, drop it in a bowl of miniature confetti sprinkles and then swirl it around in the bowl until the doughnut is completely covered in sprinkles.

IMG_4932

Lay them on wax paper and repeat.

IMG_4934

For the balloon strings, I used these noodles. They have a nice color and are really thin. But, they do break easily and can break off in the cupcake if you’re not careful. So you may want to try something thicker, like spaghetti noodles or even just regular toothpicks.

IMG_4982

Insert the noodles at an angle so they all point in together at the bottom.

IMG_4939

And then stick them straight into the cupcake, while holding the noodles together. Cute.

IMG_4974

And crunchy. Make sure to remove all the noodles before you bite in and … Enjoy!

IMG_4979

And a few more thoughts that I love . . .

A gorgeous cake . . .


On the sweetest dessert table . . .


More cupcake inspiration . . .


A house of Gingerbread . . .


And my very favorite, a little idea I dreamed up last night.  Now, I need you to really get your creative brain a-working for this one.  

First, you go to TJ Maxx/Home Goods & buy one of those darling little wooden houses you always see there . . .


Then you pull out your paints and create something as close to this as you can . . .


And drill a bunch of scattered holes in the roof (you will see why in a moment:)

Next up:  Balloon Cake Pops (in the rainbow colors of course) . . .


Make a whole bunch of them . . .


And place them in bunches in the drilled holes on your house roof.  

I mean, can you picture that?  A cake pop stand made from the 'Up' house with a bunch of 'balloon' cake pops floating on top?  One of these days I am going to get around to putting one of these together for you:) 

Now you are all set to get planning for your next event!  And isn't this music just divine, by the way?
Photobucket