If you are not redirected in five seconds, click here.

Showing posts with label engagement party. Show all posts

Tuesday, April 10, 2012

Tutorial Tuesday: A Bohemian Backyard Bash & Feathery-Fab Cocktail Sticks!!

Oooh, just in time for the warm weather, our friends at 100 Layer Cake have whipped up the most fantastic little Bohemian Backyard Party, complete with a lovely tutorial on how to make some retro-fab cocktail sticks too!

So what could be better for a Tutorial Tuesday than a bit of outdoor inspiration to get you all revved up for the long, balmy nights that lie ahead?  So tie up your locks with a vintage silk head scarf, throw on your favorite tunic & ankle length skirt, and kick back for a boho-casual beauty of a party . . .


Ahhh, see what a few Indian-block tapestries, a vintage rug, and a few poufs can do!  You can even make your own flower arrangements (stay tuned for a fun tutorial on this coming to Juneberry Lane soon!!)


Check out the tutorial for the drink stirrers below, and the yummy beverages are straight from this DESIGN SPONGE recipe . . . Cardamom Rose Cocktails!!


Fabulous Vendors:

Photography: Scott Clark Photo / Tabletop and rug rentals: Casa de Perrin / Moroccan poofs, blankets, and tea glasses: Imports from Marrakesh / Tree lanterns: Allsop Garden / Catering: Whoa Nelly! / Handmade textiles (we used for pillows and napkins): Nancy Straughan Textiles / Harissa favors: J & R Foods / Indian blankets and Feather-topped drink stirrers: 100 Layer Cake Boutique

And now for the tutorial . . .

DIY FEATHER-TOPPED DRINK STIRRERS


***You can purchase a DIY kit to make these exact cocktail stirrers right here at 100 Layer Cake, or you can gather the supplies you'll need on your own. . .


Supplies You Will Need:
~ Scissors
~ Glue Gun
~ Assorted feathers in different colors & sizes
~ Bamboo skewers
~ Trim (ribbon, twine, or whatever suits your fancy:)


Directions:


1.) Lay out your supplies for the first feather drink stirrer . . .


2.) Start with your biggest feather first and position it in the direction you like. Add a spot of hot glue, and then affix the feather to the top of the stirrer.


3.) Repeat with the second biggest feather and go on down the line until you have them all as you would like them . . .


4.) To add the trim, squeeze out a spot of glue along the lower part of the feather tips . . .


5.) Attach the trim and wind it up the stirrer until it covers the messy part of the feathers. You might want to add another spot of glue midway, if you think it’s necessary. Then one more spot of glue at the top to attach the end of the trim.


6.) Snip the remaining trim away from the stick, and voila! You can cut the stirrers down to size if you’d like them to match the height of your glasses. Or if you want to use these little beauties on a cake or cupcakes, leave the pointy end intact.
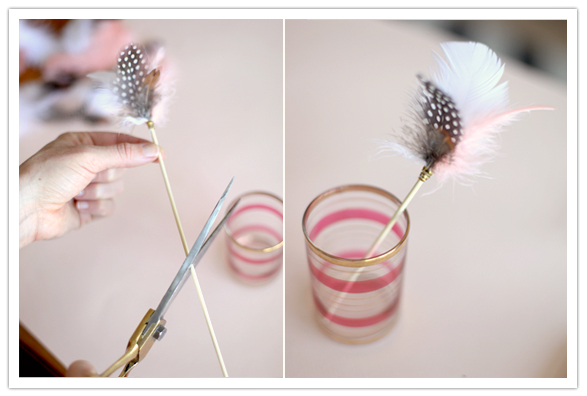


And there you have it!  A beautiful topper to your refreshing summer cocktail!!  Now if that doesn't get you inspired to Spring clean the house for the fun festivities ahead, I don't know what will!!! Photobucket

Wednesday, August 24, 2011

Coffee & Donut Tasting Housewarming Party

As I think about the warm weather beginning to fade, I am filled with daydreams of chilly autumn mornings and just how much I love a steaming mug of coffee on a beautiful fall day.  And this is why I simpy adore the thought of a 'Coffee & Donut Tasting Party'.  Perfect for the coming months and the ideal theme for any bridal shower, brunch, or special little gathering coming your way.

And in case you need a little help envisioning how to make this happen, we can thank Eat, Drink, Pretty for leading us to this delicious donut-devouring housewarming party.  Thank goodness bathing suit season is nearly over . . .


Oh yum, yum, yum, I love coffee . . .


And don't forget the tasting notes . . .


I do believe that is a bacon-flavored donut . . .

Now how can you beat a housewarming brunch like this one?  What a fun & classy way to give your friends a tour of your new digs . . . and perhaps score a few presents for your new pad while you are at it:)

Photos Courtesy of Tiny Water Photography
Paper Party Goods Courtesy of Alice Koswara
Floral Designs Courtesy of Botanica Floral Designs
Photobucket

Tuesday, August 9, 2011

Tutorial Tuesday: DIY Party Blowers, Wahoo!

It's time to celebrate!  Well, I am not so sure what we are celebrating, but once you see how easy it is to make these fantastic & fun vintage-style party blowers, you will think of something, I am sure!


Supplies You Will Need:

~ Straws 
~ Patterned Paper (size 12" by 12")  Each sheet of paper yields six party blowers.
~ Double-Sided Tape
~ Glue
~ Rubber Bands
~ Pencil

1.) Start with 12 x 12 sheets of scrapbook paper from a local craft store like Michael's in your party's colors.  Cut the paper into 2" x  10" strips from each sheet . . .

birthdaywreath3

2.) Fold the paper in thirds by folding towards the middle and then adhere both folded sides down with  down a long strip of the double-sided tape.  (Fold each strip twice so that the two long sides meet in the middle and make sure your piece of tape goes all along the seam to seal it up.  When you stick your two folds of paper down, make sure the double-sided tape is completely covered by the folds, so that no tape is left peeking out and thus causing your roll of paper to stick when you try to blow the finished party blower out.  NEXT,  fold down one end about 1/4 inch to seal the end before going on to the next step.)


3.) Then starting at one end, roll the strip onto a pencil. 


4.) Use your rubber band to wrap it around each roll and leave it there for 24 hours. . .


5.) Remove your rubber bands and put some glue along the inside rim of the open end of the scrapbook paper roll. I found it easier to pour out some glue onto a plate and use a toothpick to apply the glue. Then cut a straw in half, resulting in two 4-inch pieces. Take one piece and insert it into the open end of the paper roll, about 1 inch or so. Fold in the corners of the paper roll end and dab on some more glue to close it up.


6.) Then take your ribbon piece and wrap it around (try to actually stick the ribbon on both the straw and the scrapbook paper, unlike the picture below:)


Partial Tutorial Courtesy of Silly Pearl

A little more inspiration . . .


Make a wreath of it!


So simple and so easy to make, but most importantly, the kids will love them & they make such a cute decoration to scatter around the tables at your party.  What's more, you can even personalize them with special messages, fortunes, or party wishes inside, and when you blow on them, you can read your message along the tongue of the paper as you watch it unroll, woo-hoo!
Photobucket