If you are not redirected in five seconds, click here.

Tuesday, March 20, 2012

Tutorial Tuesday: Golden, Chocolate-Filled Easter Eggs . . . WOW!!


Easter is almost upon us . . . can you believe it?  And although bright & cheerful Easter Eggs usually steal the show on this particular Spring holiday, I just love a taste of the unexpected; especially when that unexpected taste involves chocolate!

These Golden Chocolate-filled Eggs brought to us from The Kitchn are just plain magical!  And the very best part is the decadent surprise that awaits you once you crack open that shiny shell!  And wait until you see all of the yummy variations you can fill up your sparkly stunners with . . .

From The Kitchn:
"Chef Migoya uses regular eggs shells, paints them gold, fills them with melted chocolate variations, and puts them back into a decorated egg carton.

They are painted with gold dust that is made into liquid by adding a little alcohol. This gold powder is the same type used for cake decoration -- all FDA approved. You crack and peel the shell off just like a hard-boiled egg, then eat the hardened chocolate inside."

Golden Chocolate Easter Eggs
(makes 1 dozen)

~ 12 large eggs
~ Chocolate filling (recipe follows)
~ 1 1/2 tsp gold powder *
~ 1 tsp tequila, plus drops as needed

Directions:
1.) Wash each egg in warm water and dry thoroughly. Insert a sterilized needle into the small end of the egg to make a small hole. Do the same with the large end using a skewer to make a 1/4-inch hole. Insert the needle into the large end and break the yolk. Remove the contents of the egg by blowing into the small hole through a straw. You can also blow air through by using a baster.

2.) Place the shells in a large stock pot and slowly fill it with warm water until the egg shells are covered. Gently bring the water to a boil, then reduce the heat and allow to gently simmer for 10 minutes.

3.) Carefully pour out the hot water and gently rinse the shells with hot water. Remove the shells from the water and place upside down on a towel. Allow to dry for 30 minutes.

4.) Pour the melted chocolate filling into a pastry piping bag fitted with a small round tip and fill the prepared egg shell through the large hole.

5.) Return the filled eggs to the egg carton.

6.) Place the gold powder in a medium stainless steel bowl and add the tequila. Stir until completely blended. You can adjust the thickness of the mixture by adding tequila a drop at a time until you obtain the desired thickness - the mixture should be thin enough to easily spread. Use an artist brush to paint the egg shells gold.

7.) If you have an extra egg carton, cut off the high edge of the cradle and place the painted eggs back in this carton.

8.) Put the carton of painted eggs into a freezer for 7 - 10 minutes to firm the chocolate and set the paint.

9.) Remove carton from freezer and place the golden eggs into a decorated egg carton.

Chocolate Filling:
(Makes enough filling for 12 large eggs)

~ 18 ounces (approximately 2 1/4 cups) semi-sweet chocolate, melted

Directions:
1.) Melt the chocolate using a double boiler over a water bath or in a microwave according to directions on the package.

Variations:
Add ¼ cup of one the following to the melted chocolate:
Praline crunch**
English toffee, finely chopped
Finely chopped toasted almonds and shredded coconut
Finely chopped toasted macadamia nuts – you can also substitute white or milk chocolate for the semi-sweet above

You can choose to decorate your eggs with different colors by using food coloring or colored edible powders.

*Colored powders can be found in the cake decorating isle at craft stores nationwide.
**Praline crunch may be found in the freezer section of your grocery store by the ice cream.


And a bit of inspiration . . .


How about that posh bed of white feathers...the oh-so-glamorous-girl's way to do Easter Eggs!  This is just the stuff that fairy tales are made of, no?  Stay tuned for more fun & fabulous Spring treats and have a wonderful week!!

Photobucket

Friday, March 16, 2012

Favor Friday: DIY Rock Candy!

I am so pleased to announce the very special first installment of a new little series over here at Juneberry Lane, Favor Friday!  I am absolutely in love with all things hand-made & home-cooked when it comes to sending your guests off with a little piece of your party; such a fun way to wrap up your event and to keep the memories rolling in throughout the weeks ahead!

Today we are featuring a sweet & yummy throwback treat, sent over from my little sister and put together by Gluesticks, homemade Rock Candy is a fun way to get the whole family involved in the party-planning!  Just take a look . . .


Homemade Rock Candy


Supplies You Will Need:
~ Sugar (lots of sugar)
~ Water
~ Food Coloring
~ Bamboo Skewers
~ Funnel
~ Jars or Glass Cups
~ Clothespins


Directions:
1.) Trim down your skewers to a reasonable size to fit in whatever jars or cups that you will be using. You'll also want to get rid of the point. Dip them in water, then roll in sugar. Let dry completely and set aside. This gives the sugar a base. Something to stick to when it starts to crystallize.


2.) Mix equal parts of water and sugar in a pot on med-high heat until dissolved. Then continue to add sugar until you have AT LEAST a 2:1 ratio. You can also do a 3:1 ratio. It will get to a point where it won't dissolve anymore. We used 8 cups of water and 16-18 cups of sugar and it made a lot. So you can definitely half the recipe. We wanted a lot of colors. You are making a nice, sticky, sugary syrup. Mix until mixture starts to simmer.  You do not need it to a rolling boil or bring it to a certain temperature with a candy thermometer. Easy.


3.) Allow your syrup to cool for 10 minutes or so and ladle into your jars using a funnel to catch spills. It is still pretty hot at this point. We used the tips that we trimmed off of our skewers and dipped them into concentrated food coloring paste, then swirled the skewer into our hot syrup mixture to add assorted colors to the different jars. You can use liquid food coloring, but I like the paste better.


4.) Then attach a clothespin to each skewer (the ones you dipped in sugar and let dry) and place in cup. Make sure the skewer isn't touching the bottom or sides of jar/glass. They need room to grow. Since our glasses were narrow, one skewer seemed to work out best, but we added two in a few of the colors.

5.) Place your jars in a warm location with lots of natural light.  Here they are on day one...you can see that there is a bit of sugar build up from when we dipped them in water and then let them dry in sugar as well as on the bottom of the glass.


6.) Day 3. More crystallization.


7.) Day 5. The syrup is crystallizing on the bottom of the glasses as well.


 DONE! Seven days!

*There will be crystallized sugar in the bottom of your jars/glasses. Just run them in hot water and chip it out with a butter knife. It comes out pretty easily.*


TROUBLESHOOTING TIPS FROM BRANDY:

~ Make sure your glass/jars are clear and CLEAN.
~ Make sure your sugar ratio is AT LEAST 2:1-3:1 You may need more depending on how quickly it reaches saturation...
~ "Mix equal parts of water and sugar in a pot on med-high heat until dissolved. Then continue to add sugar until you have AT LEAST a 2:1 ratio. You can also do a 3:1 ratio. It will get to a point where it won't dissolve anymore......"
~ When I said it will get to a point where it will not dissolve anymore, that does not mean that it will be gritty and super thick. It will still look like a clear syrup, but a little cloudy. That is when you will know that it is a saturated ratio. Just make sure you bought extra sugar so that if you get to a 2:1 or 3:1 ratio and it is still dissolving super quickly that you can add a little more.
~ Place in a WARM, SUNNY location. I made this last batch in September when it was still humid and 80+ degrees. I'm not sure if the time of year has anything to do with it or not.
~ If after a couple of days you don't see any sugar settling on the bottom of the glass, it means that there most likely wasn't enough sugar when you started. Just reheat your syrup to a simmer and add a bit more. Pull your skewers out and just roll the sticky skewers in more sugar and let it sit while you reheat your syrup. Is this frustrating to do? Yep. I know, because I've done it before! ~ Brandy

How much fun is that?  Hope you have a wonderful weekend and a very Happy St. Patrick's Day!
Photobucket

Wednesday, March 14, 2012

Wedding Wednesday: Mish Mash~Getting it all out There . . .

Have you ever cleaned out your closet and found a whole bunch of stuff that you want to keep, but can't 'categorize' as any one thing?  Well, in going through all of my wedding inspiration pictures I have saved over the past several months, I seem to have managed to hold onto the most lovely & random photos...ones that I have been excited to share with you but haven't found the day or the post to do it!

So today I have decided to throw a 'mish mash' at you of assorted ideas to take a look at.  Who knows, maybe they will ignite just the spark you need as you are planning your big day or maybe you will just find yourself with a whole bunch of pretty pictures to stare at?  But either way, I hope you are entertained . . .

Cake Crazy . . .


Don't you just love those rosettes?


Lovely Locks . . .


And my very favorite . . .

Ravishing Rings . . .


Photo Booth Fabulous . . .


Reception Love . . .


Beautiful Blooms . . .


Paper Pretties . . .


Best idea ever . . . an 'I spy' game to keep the kiddos busy!


Nifty Napkins . . .


For the coffee bar . . .


Wine-loving favors . . .


A stunning 'Thank you' card photo-op!


Now I WARNED you it was a mish mash, didn't I?  But I do apologize if your head is spinning a bit:)  Whew, I feel ever so much better getting that all out there!  See you tomorrow!
Photobucket

Tuesday, March 13, 2012

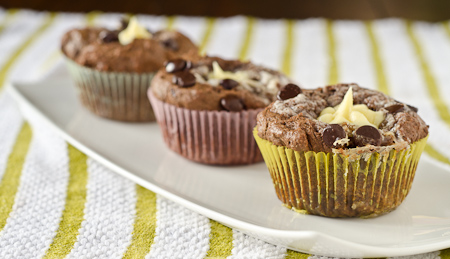
Tutorial Tuesday: Cadbury Creme Egg Cupcakes . . . Yum!!


As you all know, I just love it when cupcakes get creative!  And nothing is more delightful than taking a classic holiday staple and turning it into something unexpected!!  So today it brings me great joy to send these amazing little 'Cadbury Creme Egg Cupcakes', from Daily Unadventures in Cooking, your way.

Inspired by the beloved Easter 'Egg' treats that many consider a Bunny day must-have, these chocolate goodies are just the thing to get a smile out of your guests and to have your co-workers and colleagues gasping in delight!  Take a peek . . .


CADBURY CREME CUPCAKES


Ingredients:

~ 1/4 cup butter, softened
~ 1/2 cup golden corn syrup
~ 3 cups icing sugar
~ 1 teaspoon vanilla
~ yellow food colouring (optional)
~ 1/2 cup butter, softened
~ 1/2 cup sugar

~ 2 eggs, separated
~ 1/2 teaspoon vanilla


~ 3 ounces unsweetened chocolate, roughly chopped

~ 
2 cups flour
~ 2 teaspoons baking powder
~ 
½ teaspoon baking soda
~ ½ teaspoon salt
~ 1 ¼ cups milk
~ 1/2 cup chocolate chips
~ 1/4 cup butter, softened


Directions:

1.) First you will want to prep the "creme egg" filling. Beat 1/4 cup of the soft butter until fluffy. Add syrup, icing sugar and 1 teaspoon vanilla and beat until well combined. If desired, stir in some yellow food colouring until a pale yellow. Reserve in fridge and let set up.

2.) Turn oven on to 350F. Grease a muffin tin and line with paper cups. In a double boiler melt the unsweetened chocolate, stirring regularly. You can start mixing the cupcake batter while it melts and then turn the double boiler off when the chocolate is melted. These cupcakes are easiest in a mixer, but can be done with a hand mixer or even an able pair of hands. Beat butter until light and fluffy and add in sugar until well combined. Separate the egg whites into a large bowl and beat the egg yolks into the sugar one at a time. Slowly add in melted chocolate and vanilla.

3.) In a separate bowl whisk together the flour, baking powder, baking soda and salt. Alternately fold in dry ingredients and milk in a few batches. Don't over mix! Beat the egg whites to soft peaks and fold in.
Divide the batter into the muffins cups. Remove the creme filling from the fridge and roll out 12 balls no bigger than a centimeter in diameter. In the centre of each cupcake press in a ball of filling as deep as possible. Sprinkle with chocolate chips. Bake for 35 minutes.

4.) Transfer cupcakes to a rack and let cool.

5.) In the meantime combine the last 1/4 cup of butter with the remaining creme filling and beat until uniform. Transfer to a piping bag. The cupcakes should have little holes in the middle. Put your icing into a piping bag and pipe a dollop into the centre of each cupcake. Amazing when eaten just a little bit warm, of course then you risk the icing melting, but it really isn't that bad now is it?

Prep Time: 30 minutes Cooking Time: 25 minutes Total Time: 60 minutes
Calories(approximate per serving): 450
(recipe & photos courtesy of Daily Unadventures in Cooking)


Now you can skip the whole center-filling part and throw a cadbury creme egg in there if you would rather, like this:

(image courtesy of zoey cakes)


Aren't those just the cutest things?  I just love a good surprise, don't you?  Hope your week is turning into a great one!! Photobucket

Friday, March 9, 2012

Juneberry Baby: DIY Nibble Tray for the Pickiest Little Toddler Eaters!


I have the sweetest rascal of a toddler boy...nearly 20 months old and a real stinker when it comes to meal time!  I had so many dreams of all of the lovely creations I would whip up to feed him...and it turns out he had other plans in mind!

That is why I am going to step outside of the box a bit with a different kind of tutorial.  One that is quick, easy, and a little bit genius in that even the choosiest little tyke can find something to enjoy!  So thank you, thank you, thank you to On to Baby for sharing this divinely simple way to add a little fun to our typical food-time frenzy!


Step 1: Find the Compartment Tray
The easiest answer is to grab your standard ice cube tray. If you don’t have one or want to get a little more creative, try something like a simple paint palette. We hear muffin tins also make a great choice. We picked up a few white paint palettes at the local Michaels and we were ready to go! There are also some pretty cool ice cube trays out there (who knew?), like this hexagon one we found at organize.com.


Step 2: Pick out the food, and prep it!
We recommend picking foods that are bright, colorful, and easy to eat with little hands. Choosing foods that will last a bit if sitting out is also a good idea. The idea of the nibble tray is that you can leave it out for your picky eater to graze as he or she desires. Obviously choosing foods you know your little one enjoys is smart, but don’t be afraid to mix some new choices in with the steady favorites.

Step 3: Arrange the food in the tray.
Listen, we told you this was easy! Just take the ready-to-eat food you prepped in step 2, and fill all of your compartments.

Step 4: For extra credit or special treat, add a dipping option!
This is optional, but it can make your tray that much more enticing for your toddler. Kids typically love to dip foods! We created homemade whipped cream for ours (google it, it’s surprisingly quick and easy!), and also provided a dollop of peanut butter. Other options could include cream cheese, yogurt, cottage cheese, or a pureed fruit or vegetable, depending on what other food choices you are serving.

Step 5: Serve!
Now it’s time to present your thoughtful mini feast to your little one. Leave the tray in an easy-to-access spot, so he or she can graze over time.

I love this fun option from Dr. Sears!  You can find it HERE . . .


Or an ice cube tray will work just fine . . .


Muffin tins will do the trick too!


Aha! At last a solution to keep my feisty little guy entertained, happy, and, best yet, FED!  Hope you all have a wonderful weekend!! Photobucket

Thursday, March 8, 2012

St. Patrick's Day Desserts: Two Times the Irish Cupcakes!!

Oh dear, the luckiest day of the year is fast approaching and I feel as if we have been totally ignoring it!  St.Patrick's Day is right around the corner, and just in case you are looking for a few treats to get you in that holiday spirit, we've got you covered!

Here are two of my absolute favorite cupcake ideas; so super yummy and lots of fun too!  The first comes from The Fickle Pickle and they are just the cutest and most clever little things...topped with Air Head Extremes, no less, to make a rainbow!


RAINBOW CUPCAKES


Ingredients:
~ Food Coloring
~ Air Heads Extremes Rainbow Belts (you can find these at Target)
~ Rolo Candies
~ Frosting
~ White Cake Mix
~ Marshmallows for clouds (or you can use frosting!)


Directions:
1.) The airheads are usually a little soft and don't hold their shape when they're fresh out of the package.  Open up the package and let them sit for a day or two before putting them on your cupcakes!

2.) Use any kind of cupcake you fancy; bakery-bought, made from scratch, or even a box of pre-mixed cake batter (you can even divide up the white cake batter and make rainbow cakes if you like!  See how to do this HERE:)

3.) If you do decide to make your frosting at home, here is an simple & tasty recipe for you:

Easy Butter Cream Frosting:

1/2 cup butter (room temp)
1 lb. powder sugar (about 4 cups)
3 TBS milk
2 tsp. Vanilla

Cream butter til light and fluffy.  Add sugar 1 cup at a time mixing well in between.  Add milk and vanilla.  Then whip until it's light and fluffy...really, keep whipping!  Spoon th frosting into a quart sized baggie, snip one corner of the bag and pipe the frosting in swirls on top of the cupcake.


(photo courtesy of The Fickle Pickle)

These next tasty treats are from the woman herself, Betty Crocker, and just turn a favorite childhood breakfast cereal into a fun way to find your inner-leprechaun . . .


LUCKY CHARMS CUPCAKES
(were going to go the easy route on these guys:)

Ingredients:

~ 1 box Betty Crocker® SuperMoist® yellow or devil's food cake mix
Water, vegetable oil and eggs called for on cake mix box
~ 1 container Betty Crocker® Rich & Creamy vanilla frosting
~ 3 cups Lucky Charms® cereal
~ Green edible glitter

Directions:
1.)  Heat oven to 350°F (325°F for dark or nonstick pans). Place paper baking cup in each of 24 regular-size muffin cups.

2.) Make and bake cake mix as directed on box for 24 cupcakes. Cool in pans 10 minutes; remove from pans to cooling rack. Cool completely, about 30 minutes.

3.) Frost cupcakes with frosting. Top each cupcake with 2 tablespoons cereal; sprinkle with glitter. Store loosely covered.


Aren't those fun and worth staying up late for?  See you tomorrow!!!


Photobucket