If you are not redirected in five seconds, click here.

Tuesday, April 10, 2012

Tutorial Tuesday: A Bohemian Backyard Bash & Feathery-Fab Cocktail Sticks!!

Oooh, just in time for the warm weather, our friends at 100 Layer Cake have whipped up the most fantastic little Bohemian Backyard Party, complete with a lovely tutorial on how to make some retro-fab cocktail sticks too!

So what could be better for a Tutorial Tuesday than a bit of outdoor inspiration to get you all revved up for the long, balmy nights that lie ahead?  So tie up your locks with a vintage silk head scarf, throw on your favorite tunic & ankle length skirt, and kick back for a boho-casual beauty of a party . . .


Ahhh, see what a few Indian-block tapestries, a vintage rug, and a few poufs can do!  You can even make your own flower arrangements (stay tuned for a fun tutorial on this coming to Juneberry Lane soon!!)


Check out the tutorial for the drink stirrers below, and the yummy beverages are straight from this DESIGN SPONGE recipe . . . Cardamom Rose Cocktails!!


Fabulous Vendors:

Photography: Scott Clark Photo / Tabletop and rug rentals: Casa de Perrin / Moroccan poofs, blankets, and tea glasses: Imports from Marrakesh / Tree lanterns: Allsop Garden / Catering: Whoa Nelly! / Handmade textiles (we used for pillows and napkins): Nancy Straughan Textiles / Harissa favors: J & R Foods / Indian blankets and Feather-topped drink stirrers: 100 Layer Cake Boutique

And now for the tutorial . . .

DIY FEATHER-TOPPED DRINK STIRRERS


***You can purchase a DIY kit to make these exact cocktail stirrers right here at 100 Layer Cake, or you can gather the supplies you'll need on your own. . .


Supplies You Will Need:
~ Scissors
~ Glue Gun
~ Assorted feathers in different colors & sizes
~ Bamboo skewers
~ Trim (ribbon, twine, or whatever suits your fancy:)


Directions:


1.) Lay out your supplies for the first feather drink stirrer . . .


2.) Start with your biggest feather first and position it in the direction you like. Add a spot of hot glue, and then affix the feather to the top of the stirrer.


3.) Repeat with the second biggest feather and go on down the line until you have them all as you would like them . . .


4.) To add the trim, squeeze out a spot of glue along the lower part of the feather tips . . .


5.) Attach the trim and wind it up the stirrer until it covers the messy part of the feathers. You might want to add another spot of glue midway, if you think it’s necessary. Then one more spot of glue at the top to attach the end of the trim.


6.) Snip the remaining trim away from the stick, and voila! You can cut the stirrers down to size if you’d like them to match the height of your glasses. Or if you want to use these little beauties on a cake or cupcakes, leave the pointy end intact.
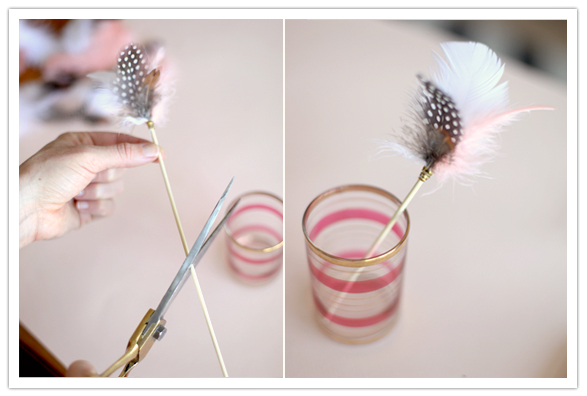


And there you have it!  A beautiful topper to your refreshing summer cocktail!!  Now if that doesn't get you inspired to Spring clean the house for the fun festivities ahead, I don't know what will!!! Photobucket

Monday, April 9, 2012

Juneberry Home: Spring Kitchen Makeover-Orange & Turquoise!!!

Well, you've been putting it off long enough-Easter is over and it's high time to break out those cleaning supplies and get the pad perfected for some memorable summer get-togethers!  And no Spring-cleaning would be complete without a few fun new goodies to look forward to laying out, once your counter tops are scoured and your floors are a-glistening!!

Today, we focus on the kitchen and the hot hue combo of the moment-Orange & Turquoise!  It's time to brighten up those kitchens for the warm weather and there is no need to break the bank while doing it!  Just check out these quick little updates that will fill everyone's favorite room with sunshine . . .

First off, how about these fresh finds from City Chic Country Mouse . . .

(the sweetest little apron-$30)  

(oven mitt/hot pad-$14)

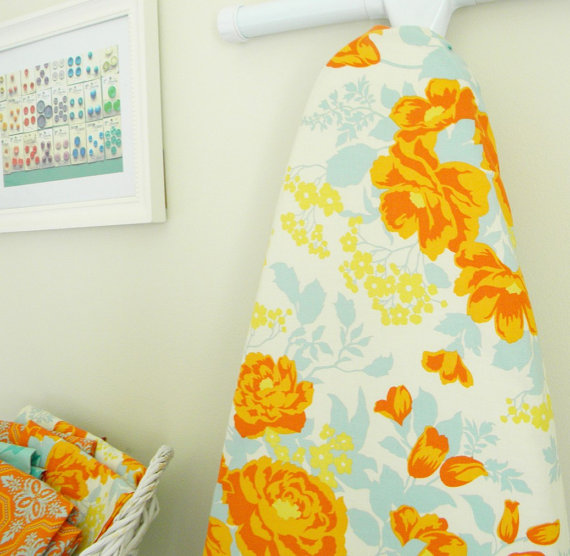
(ironing board pad $24)

(or break it up with chevron-$24)

Or how about these lovelies from Too Cute Custom Crafts . . .

(Reversible Napkins-$28)

(Geometric Table Runner-$26)

And take a look at these fantastic coasters from My Happy Hobbies . . .

(Set of 4 fabric coasters-$9.95)

I just think these Joel Dewberry Heirloom fabrics are the perfect choice for a Spring Makeover, don't you?  


 If you're a DIYer you can purchase your fabric here: Fabric.com

Floral, orange & turquoise, fun brights....so many trends to try, so little time!!  Happy Cleaning!! Photobucket

Thursday, April 5, 2012

Juneberry Beauty Part Two: Trendy Tresses ~ Wrap it Up!!

Since we are all about amping up our tresses for the warm-weather party season ahead, today we are focusing on how to take a HUGE Spring trend from runway to real-life in a few simple steps.

Turbans, head wraps, & silk scarves ruled the runway at Fashion Week (and quite frankly, any way to quickly cover-up a day of lack-luster locks seems pretty darn tempting to me!)

(photo courtesy of A Beautiful Mess)

1. Fold your scarf into a long rectangle (you can do this with traditional square scarves or skinny scarves). Tie it behind your head, under your hair.

(photo courtesy of http://www.keikolynn.com)

1.) Start with a large, square scarf (Vintage silk scarves work great because they're soft and not bulky.)  Fold one corner over to make a triangle.  Fold the point of your triangle to the middle and then fold one more time again, like so:


2.) Put the scarf around your head with the ends in the front, making sure the wrong side of the scarf (the part where you can see the folds) is against your head.  Tie it in a loose knot at the front (keep the whole scarf a little on the loose side, it will stay in place).  Tuck the ends behind/underneath the scarf:


All set!


1.) Start with the middle of the scarf on the back of your head under your hair. Then you simply cross the scarf in the front and then tie it back underneath again! 


(image courtesy of http://www.diyfashion.com)

1.)  Simply take the square scarf and fold it down the middle to make a triangle. Then lay the center of the triangle around the top of your forehead, with the point in the back or off to one side, if you prefer. You may want to get someone to hold the scarf down on your forehead while you tie it in the back. It’s very easy for it to slip while you are tying the scarf. So you take the ends and tie it OVER the point of the triangle at the base of your neck. Just tie it in a regular old knot & you are all set!


What a perfect 'do for a beach BBQ or a backyard cookout...especially once the humidity to starts to soar or your locks are in need of a trip to the salon!  Okay, enough about hair & fashion already...we will be back to the Party-plannin' tomorrow!!  Have a great day!! Photobucket

Wednesday, April 4, 2012

Juneberry Beauty: A Fresh New 'Do for Spring!

Spring is in full bloom and June is quickly approaching!  As we head into this holiday weekend and all of the brunches, BBQs, weddings, and summer soirĂ©es,  it may be just the time for a fresh new hairdo to liven up those lifeless locks!!

And with the help of Instyle,  these chic new styles right out of Hollywood might provide you with just the right amount of inspiration to make a change!  Here are Juneberry's picks for the hottest new tress trends to take a look at . . .

Sleek Bob with Full Bangs:

(Rose Byrne)

(Anna Faris)


What to ask for: A clean, face-framing bob with heavy bangs. "This is for someone who wants an elegant cut with a little edge," says John Frieda hairstylist Harry Josh, who created this style for Byrne. "The blunt bangs are the most important part, but ask to keep a little length to ensure the style stays manageable."

Long Bob With Side-swept Bangs:

(Olivia Wilde)

What to ask for: A textured, collarbone-length bob with soft fringe. Wilde's hairstylist David Babaii recommends asking for clean edges, and using the points of the eyebrows as a guide when cutting the bangs. 

A Shorter Bob with Side-Swept Bangs 


(Rhianna) 

What to Ask For: Ask your hair stylist for a short, blunt bob and to cut your bangs so that they hit the middle of your nose when you pull them.  Don't forget to keep the bangs soft, not blunt!

The A-Line Bob


(Gwyneth Paltrow)


(Maggie Gyllenhaal) 

 (Kiera Knightley)


What to ask for:  A sleek A-line bob that's dramatically angled in the front. A deep side part can accentuate the cut's subtle asymmetry.

Choppy Bob

(Dianna Agron)

(Brooklyn Decker)

(Alexa Chung)

What to ask for: Ask for a short bob with uneven edges; then you can let it air-dry, scrunch it a little, and you are good to go!!  This cut is perfect for those with fine hair & little bit of natural wave!

Choppy Layers

(Jennifer Aniston)

(Nicole Richie)

What to ask for: Ask your stylist to create a long bob that hits just below the collarbone, cut with layers in varied lengths.

Long Loose Layers 

(Vanessa Hudgens)

(Kate Beckinsale)

(Sophia Bush)

What to ask for: Loose, all-over layers with side-skimming bangs. Hudgens' cut is flattering on thick and fine hair alike: Shorter layers create volume for thinner hair, while the long length showcases the natural texture of thicker strands. 

Fringe Bangs


(Katie Holmes) 

(Reese Witherspoon)


Side-swept Fringe


(Natalie Portman)
Everyone's doing the fringe . . . 


I don't know about you, but that certainly has me itching for a change!  In fact, I may have just the right amount of courage to go for something a little like Olivia Wilde's new look the next time I am due for a cut!!  Now most importantly, don't forget to print up your favorite pictures and take them along with you!!  Happy chopping!! Photobucket

Tuesday, April 3, 2012

Tutorial Tuesday: Homemade Peanut Butter Eggs in 3 SIMPLE Steps!!!!


Easter is almost here, can you believe it?  And just in case you have been meaning to whip up something homemade & delicious for your yummy Sunday dinner and are starting to panic because you are running out of time . . . have no fear!  These holiday favorites can be whipped up in no time and best yet, in 3 simple steps brought to you via The Family Kitchen!  See for yourself . . .


Homemade Reese’s Peanut Butter Cup Eggs

Ingredients:
~ 1 cup confectioners’ sugar
~ 8 tablespoons crunchy peanut butter (smooth is fine, too)
~ 2 tablespoons unsalted butter, room temperature
~ 1 teaspoon vanilla extract
~ 1 pinch kosher salt
~ 1/2 cup chocolate chips

Directions:
1. In a large bowl mix the peanut butter, butter, vanilla, and salt with a wooden spoon until well combined. Then add the confectioners’ sugar and stir it well until is completely incorporated with the peanut butter mixture.

2. Use your hands to roll the peanut butter into egg-like oval shapes that are 1/4 inch thick and chill them on a plate in the fridge for about 1 hour.

3. In the microwave melt the chocolate chips until they are completely smooth. Remove the peanut butter balls from the fridge and dip each one into the melted chocolate until they are completely coated. Line a plate with wax paper and allow the chocolate to cool and harden before eating.


Just plain perfect, don't you think?  
Photobucket