Nothing fancies up a special occasion like fluffy pom garland...and if you are looking to put in a small amount of effort and an even smaller amount of $$$, then using coffee filters might be just the way to go!
You can go au natural and use the environmentally-friendly, kraft-colored beauties if you are looking for a rustic vibe, or even dye the white filters in the washing machine to match any type of color scheme you are going for. Here's how it's done . . .
Coffee Filter Pom Garland
Difficulty Level: Moderate
Supplies You Will Need:
~ Coffee filters (10 per pom)
~ knife
~ spray bottle
~ stapler
~ twine or yarn
1.) Separate stacks of coffee filters into piles (they are packed tightly out of the package so this makes them easier to work with in your next step)
2.) Set a towel down to protect your floors and lay out a few rows of the single filters.
3.) Using your spray bottle full of water, spray each filter until it is mostly saturated with water.
(They should look about like this (below) once they are sprayed.
4.) Place your sprayed filters into a pile and repeat the above steps until all of your filters have been sprayed with water.
4.) Place your filters in the dryer, shaking the piles out a bit so they are not all stuck together (the filter material is not 'crunchy' enough to keep the pom shape if you scrunch it right out of the package. It will only hold the shape for a few minutes, so you want to make sure not to skip the spraying & drying process if you want your pom poms to stay pretty).
I started drying mine on low heat but it took too long so I amped it up to high. Be sure to check them every five minutes so you don't start a house fire. Everyone's dryer is different but mine took about 8-10 minutes to dry completely. You will know when they are ready because you will open the dryer door to this . . .
(If you have a forward-facing dryer, be prepared for several filters to fall out when you open the door as your drying time draws to a close:)
5.) Remove your filters from the dryer (they will be much 'crisper' than before) and begin to smooth them back out into the pancake shape.
6.) Place your filters in stacks of 10.
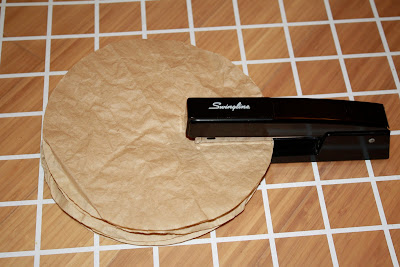
7.) Take your stapler and punch two staples about an 1-1.5 inches apart at the center of your stack of filters.
8.) Using your knife, cut a small slit (as small as you possible can) in the center of the filter stack between the two staples.
***Troubleshooting tip - if you cut the hole in the center too large, your double knotted twine that is going to hold the poms in place on the garland will slip right through the hole in the center. Please be very careful making the hole, you want it to be as small as possible while still being able to slide your twine through. If you feel more comfortable, you can use a yarn needle instead of the knife to make the hole. Repeat the above steps until all of your filters are in stapled piles of ten.
9.) Cut strands of your twine or yarn as long as you would like your garland to be (remember, you will be tying several knots, so cut the twine longer than the area you wish to string with garland)
10.) Double tie a knot at the end of your twine.
11.) Slide your first stack of filters onto the garland, double tie another knot right up to the filters, measure a foot and a half, tie another double knot and slide on your next stack of filters, knotting it off on the other side. Repeat the above steps until all of the piles are on your twine and close off the end by tying a final double knot.
12.) Begin scrunching the inside filter, working around in a circle. Scrunch very tightly as you will be fluffing it into shape later and you want to have texture to work with.
13.) Continue on to the next layer and work through, layer by layer, until the first five filters are scrunched. Then turn your stack of filters over and start again on the other side, working from your inside filter layer on in.
14.) Once all of your layers are scrunched, gently squeeze the entire pom into a ball. Definitely be firm, but be careful not to rip the filters from the staples.
15. Gently unfold and fluff your pom until it looks something like this . . .
This will take a bit of practice and you can work with it until you are happy with the shape. You are just pulling the filter layers out (be gentle, though, because again, you don't want to detach the filters from their staples.)
16.) Repeat the above steps until all of your filter piles are worked into a lovely pom garland, all ready for hanging!! Use white filters and dye them in the washer, and then start with the dryer step above if you are looking to make colored pom garlands to match your event!!
A few of the dyed variety . . .
So very pretty and so much fun to watch the look of surprise on your guest's faces when you let them in on your secret to how you made these fabulous decorations!


