One of my favorite things about Halloween, once the pumpkins are lit & the costumes are fastened, is ladling up a nice steaming mug of hot spiced apple cider to take along with me on my trick-or-treat journey, or even just to enjoy on the front porch while passing out the candy.
So today I thought I would share with you my recipe that gets rave reviews year in and year out and warms you to the core as you venture out into the chilly autumn air!
HOT SPICED APPLE CIDER
Ingredients:
~ One gallon of apple cider (I prefer the fresh, dark kind from the orchards!)
~ Rind of one orange
~ 1/4 teaspoon of nutmeg
~ 1/2 teaspoon of whole cloves
~ 3 cinnamon sticks
~ 1 and 1/2 sticks of butter (you can omit this if you are going for a lighter option-but it is sooo good)
~ 1 cup of brown sugar
~ Captain Morgan (or other favorite brand) Spiced Rum (Optional:)
1.) Pour cider into a large stock pot and bring to a boil, adding in brown sugar & butter. Tie up (orange rind, cloves, & cinnamon sticks in a cheese cloth with cooking string (you can leave them free floating if you prefer, you will just have to ladle around them)
2.) Add nutmeg and bring all to a boil.
3.) Reduce heat and simmer for 15 minutes, stirring occasionally. If you would like to spike it, add rum right before serving, as not to cook off the alcohol. Ladle into mugs and ENJOY!!!!!!! Happy Halloween Weekend everyone!
Friday, October 28, 2011
Thursday, October 27, 2011
DIY Trick-or-Treat Bags: Fast & Fantastic (with Tutorials galore!!)
Trick or Treat night is almost here. You've bought your candy, got you & the little one's costumes all ready, spruced up the porch, and carved your pumpkins. So how about one more fun little project that you can use again and again every year, only takes a minute, and is so darn crafty & fun that you will have a blast putting it together?
Trick-or-treat bags!! I mean, why go to all the trouble of working on the perfect costume if you are just going to accessorize it with a plain old plastic pumpkin Halloween bucket? Here are nine, that's right, NINE different tutorials (most ever-so-easy!) that can send your little prince or princess, pirate or monster, out into the neighborhood with style in no time . . .
These amazing buckets are actually made from gauze bandages and a plastic flower pot! Find the tutorial HERE . . .
The sweetest FIRST AID TAPE mummy bag can be made by going HERE . . .
Or in case you already loaded up on the plastic pumpkin buckets, just cut out felt feathers, eyes, an owl head with ears, eyelashes, and a little beak and end up with a clever little bucket like this one, courtesy of Ellekate.
Or for the fantastic one below, go HERE . . .
or HERE . . .
Trick-or-treat bags!! I mean, why go to all the trouble of working on the perfect costume if you are just going to accessorize it with a plain old plastic pumpkin Halloween bucket? Here are nine, that's right, NINE different tutorials (most ever-so-easy!) that can send your little prince or princess, pirate or monster, out into the neighborhood with style in no time . . .
These amazing buckets are actually made from gauze bandages and a plastic flower pot! Find the tutorial HERE . . .
The sweetest FIRST AID TAPE mummy bag can be made by going HERE . . .
Still hanging on to a few of those paper grocery bags from the last time you forgot your reusables? No worries, you can use them again now! Just use construction paper to cut out fun shapes & faces and glue them on. I would double bag if you have an adventurous tyke who plans on getting LOTS of candy . . .
(photo courtesy of This Next)
Whoo's making an awesome treat bag? Well you are, of course. Find out how to make this one HERE . . .
Or in case you already loaded up on the plastic pumpkin buckets, just cut out felt feathers, eyes, an owl head with ears, eyelashes, and a little beak and end up with a clever little bucket like this one, courtesy of Ellekate.
You know we are a bit candy corn crazy in my neck of the woods this year. Join in the madness and use up your spare ELECTRICAL TAPE by following this tutorial HERE . . .
Make a Boo-tiful Bag with your classic pillow case by popping by for a visit over HERE . . .
Or for the fantastic one below, go HERE . . .
And this is my favorite, sent over by my creative little sister. Remember that chalkboard paint we were going crazy for a few months back? Well bust it out and then head on over HERE . . .
or HERE . . .
Now how are you ever going to resist whipping up one of those clever little carriers? Even better, you probably have plenty of materials laying around the house just waiting to be turned into a bag full of goodies. Ah, I just love the perfect addition to the most adorable costume on the block!!!
Wednesday, October 26, 2011
Wedding Wednesday: DIY "Will You Be My Bridesmaid?' Cards . . .(the cutest!)
Back when I was looking to ask my bridesmaids to be in my wedding, I remember trying to think of a unique and fun way to pop the question, as the simple old phone call just didn't seem to cut it for me! So when my little sister sent over this oh-so-cute handmade Bridesmaid card idea from Once Wed, I just about squealed with joy!!
HANDMADE BRIDESMAID CARDS:
Supplies You Will Need:
~ Paper stock, patterned or solid (for dresses, hair, & accessories-don't forget something sparkly!)
~ Paper for bodies
~ Envelopes
~ Ruler
~Scissors
~ Pencil with eraser
~ Glue stick
Directions (from Anna of Rifle Design):
1.) First, be sure that your chain will fit in the envelope you chose. I decided to make my chain about 6 inches tall and 3.5 inches wide to fit in an A7 envelope. Draw tick marks every 3.5 inches (or whatever width you chose) on the top and bottom of the paper for how many people you want to cut out (this sample is for 6).
2.) Cut out your rectangle and score the paper vertically between each set of tick marks. This will make folding easier and more accurate. Then, fold the paper accordion style.
3.) On the top of the stack draw the shape of your person. Be sure to draw the arms and legs to the edge of the paper so that they will be attached into a chain after you cut it out.
4.) Next, cut out the person shape and open up your masterpiece chain! Decorate your ladies with dresses of your choice and different hairstyles to personalize them. I also drew faces and painted their names on each one.
5.) To complete the set I wrapped a band of paper around the chain and information card and wrote the name of the person I was to be sending it to.
Aren't those just the sweetest? And I love the kraft paper envelope too, not to mention the fact that you can customize the girl's dresses in any way you want-think of all of the fun you could have playing dress-up with your little paper dolls! Not feeling crafty? Just watch the Juneberry Lane shop for our own custom line of printable Bridesmaid cards, coming soon!
Tuesday, October 25, 2011
Tutorial Tuesday: Get Your Glitter On-Pumpkins!!!
Well, it is already Tuesday and we have less than a week to go until the big day. And just in case you have already had your candy corn manicure and you don't feel much like getting your hands dirty, here is a fun little DIY project from the Cake Events Blog to make your pumpkins sparkle & shine . . .
GLITTER PUMPKINS
Supplies You Will Need:
~ Pumpkins
~ Metallic spray paint
~ Elmer's Glue
~ Cheap Paint Brush ($1 at Lowe's!)
~ Newspaper
~ LOTS of glitter!!!
1.) Lay out your newspaper and wipe all of the dirt off of your pumpkin.
2.) Spray your pumpkin with a shiny metallic spray paint and allow it to dry.
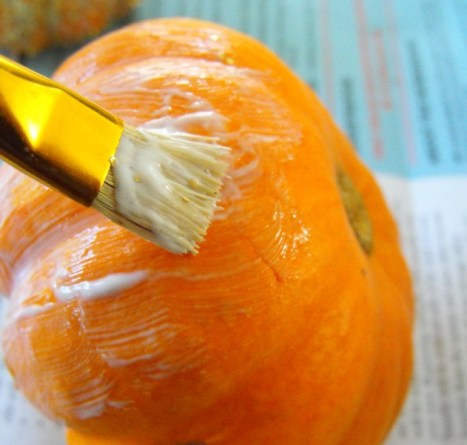
3.) You can either leave the pumpkin like this (or at least one or two, the metallic paint looks amazing!) or move on to the good stuff . . . GLITTER!! Using your paint brush, apply a very thin coat of elmer's glue over the entire pumpkin (this one is left plain, but if you spray them with metallic paint first you will have double the shimmer!!)
4.) Then sprinkle, sprinkle, sprinkle to get as much of a glitter look as your fabulous little heart desires!! Once the glue/glitter on your pumpkin is dry, use your fingers to lightly brush any loose pieces of glitter off the pumpkin (not too much, just the glitter that will fall off the minute you pick it up!)
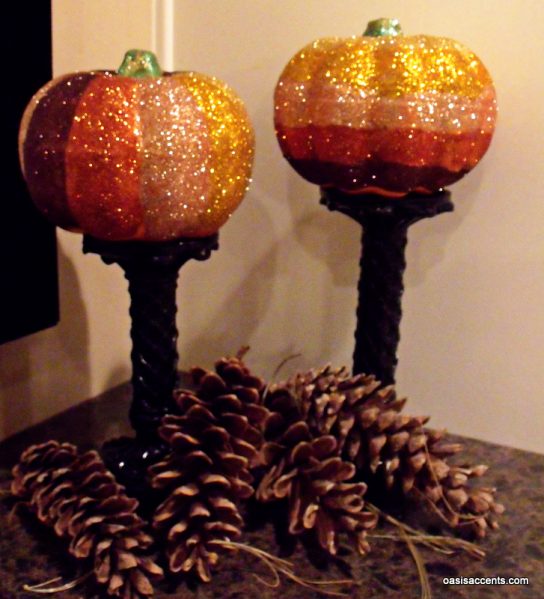
Then you will have a gorgeous ball of sparkle like these . . .
Go ahead and carve them if you want!
Or how about ombré?
Ahhhh, those just scream 'Glamour Girl'! I love a good glittering, don't you? Happy Tuesday!
Friday, October 21, 2011
Desserts for Fall: Crepe Ghost Cupcakes (No Fondant!!) and my Top 5 Halloween Cakes & Treats . . .
Now, I just love the look of those sweet little fondant ghost cupcakes, but I honestly am not a huge fan of the taste or texture of fondant! So the amazing Stef over at Cupcake Project worked it all out for us and created these darling Pumpkin Pie Ghost Cakes made from CREPES!
What's more, crepes are even easier to make than pancakes, so you get to have a little fun in the simplest kind of way. And they end up super delicious too, which is the whole point, right?
Here's how it's done . . .
Pumpkin Pie Crepes
Ingredients:
~ 5 eggs
~ 3 tbsp sugar
~ 1 tsp vanilla
~ 2 C flour
~ 1 1/2 C milk (I typically use 2%, but whatever you have on hand will work)
~ 1 C water (I've used extra milk instead of the water and it just makes them a bit richer)
~ Several tablespoons of butter for the skillet
1.) In a large mixing bowl, mix all ingredients except butter until there are no lumps.
Heat a skillet on medium (the size of your skillet for the perfect ghost cupcakes is 6 and 1/2 inches-you can find our favorite one HERE)
2.) When the skillet is warm, melt enough butter in it to coat the skillet.
Pour a ladle full of batter onto the buttered skillet and swirl the pan to spread the batter evenly over the entire skillet.
3.) Cook untouched until bubbles form in the crepe (about 1 minute). Flip the crepe and cook for another minute. Turn out onto a plate.
4.) Repeat steps 3-7 until all of your batter is used. To speed things up, you can work two skillets at once. It's not as hard as it sounds.
Now don't forget, you're going to need some tasty cupcakes underneath those crepes, with a delicious frosting to make these little guys as yummy as can be. You can use your favorite cupcake & frosting recipe or you can use the one Stef likes (her Apple Cobbler Cupcakes with Pumpkin Pie Frosting)
Pressed for time? Go ahead and use a box of cake mix and a store bought frosting. I'll never tell! Just make your cupcakes, let them cool, give them a frost and lay your crepe right over the top, pressing down carefully to make them stick. Then add two chocolate chip eyes and you are all set!
The inspiration for our ghost cupcakes (these are made with fondant!)
Or stand them up!
Boo-tiful Ghost Cake; you can find out how to make this here: I Am Baker
Get the lowdown on how to do this spider cake HERE.
Love these little witches with chocolate ice cream cone hats? Whip up a batch of these cupcakes by visiting HERE.
Ahh, now you just have to think of something you'll need cute desserts for, no? Happy Haunting!
Thursday, October 20, 2011
Candy Corn Crazy!!
Even if you absolutely hate the taste, you certainly can't deny that candy corn is a classic symbol of everything October & Halloween. And what's great about these little projects below is that you don't even have to enjoy the sweet stuff to add some festive flair to your fete!
I can't wait for you to see this fun collection of goodies we've put together to inspire you, and we've added a ton of links so you are sure to be busy all of the way until the end of the month!! Take a look . . .
Trick-or-Tini
From Stirrings
Ingredients:
~ 1 part coconut cream
~ 1 part tangerine flavored mixer (suggested, Stirrings Tangerini)
~ 1 part banana liqueur
~ Splash of white rum
1.) Chill ingredients in fridge or freezer.
2.) Once cooled, pour the first three ingredients, in the order listed above, slowly over the back side of a spoon into a martini glass.
3.) Top with a splash of white rum.
(Serves 1)
Candy Corn Tissue Poms
You just make your traditional pom and layer the 3 colors to create your 'corn' look. LOVE it!! Never made poms before? Let Martha help you out HERE.
Candy Corn Satchets
You can find the tutorial for these HERE
Yummy Pudding Parfaits
You can find the recipe for these from Hershey's HERE
Candy Corn Jello Shots
Sent over from my little sister, Meggie. Here's how to do it: Jelly Shot Test Kitchen
The Prettiest Pudding
HERE
Macarons & Meringues
And this is kind of my favorite. Talk about ten times the terrific . . .
Now if that doesn't get your wheels turning for Halloween, I don't know what will! And you didn't even have to take one bite of candy! Have fun!
Subscribe to:
Posts (Atom)