If you are not redirected in five seconds, click here.

Tuesday, November 20, 2012

Free Thanksgiving Printables

Last year I whipped up a few free Thanksgiving Day Printables for you...and just in case you missed them or never got around to using them, here are the links for you to take advantage this year.

If you have muffins, cupcakes, or any type of sweet treat that you would like dressed up a little on this lovely holiday, here are a few circles that are sure to bring a smile to your dinner guest's faces  . . .

Multiple Thanksgiving Circles

And if you are lucky enough to avoid the stress of preparing the feast, well then these free printable tags will make the perfect addition to that host/hostess gift that you simply MUST bring to dinner for whoever has been slaving away in the kitchen for you and yours.  Perfect for a bottle of wine, a bouquet of flowers, or any thoughtful present you have in mind . . .

Free Printable Thanksgiving Gift Tags
Photobucket

Monday, November 19, 2012

Thanksgiving Day - The Ultimate Turkey Prep and Free Printable List of Everything you need to Make the Perfect Dinner:)

Hi there, hello, so glad to be back with you!!!  Hope you are all having a ton of fun getting prepped for your big Turkey Days on Thursday... I just love this holiday-not just for the delicious food and the special time with friends & family, but also because it kick-starts the entire holiday season!

If you were brave enough to venture out to the grocery store this weekend, you are sure to have already experienced some major hustle & bustle...but just in case you are a bit behind I thought I would share with you a quick & easy printable list of family favorite Thanksgiving Day recipes, along with a printable grocery list and some easy instructions for preparing the perfect Turkey!  


And here is just how to cook the perfect turkey every time, courtesy of EveryDay Food Blog:

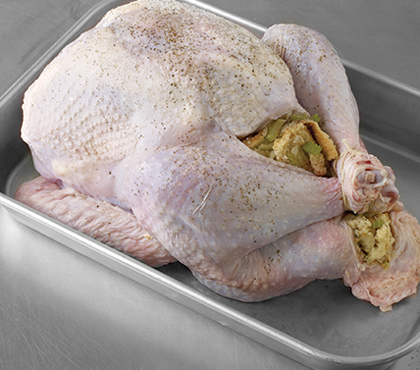
Turkey prep:

1.) Tuck wings underneath body.

2.) Pat turkey dry inside and out. Salt and pepper inside of turkey.

3.) Gently separate skin from turkey breast. Stuff softened butter under skin.

4.) Loosely stuff large cavity of turkey (stuffing will expand as it cooks).

5.) Stuff neck cavity with a small amount of stuffing. Fold neck skin over opening.

6.) Using kitchen twine, cross the legs together and tie them.

7.) Season turkey all over with coarse salt . . .

8.) and freshly ground black pepper.

9.) Put turkey into roasting pan. It's ready to roast.

Roasting the Bird:

Roasting Chart:
(via Sunset.com)

Turkey weight with giblets: 10-13 lb.
Oven temp.: 350°
Internal temp.: 160°
Cooking time: 1 ½ to 2 ¼ hr.

Turkey weight with giblets: 14-23 lb.
Oven temp.: 325°
Internal temp.: 160°
Cooking time: 2 to 3 hr.

Turkey weight with giblets: 24-27 lb.
Oven temp.: 325°
Internal temp.: 160°
Cooking time: 3 to 3 ¾ hr.

Turkey weight with giblets: 28-30 lb.
Oven temp.: 325°
Internal temp.: 160°
Cooking time: 3 ½ to 4 ½ hr.

Tips:

Start with a completely defrosted bird (allow 24 hours in the fridge for every 5 lbs., the safest way to defrost).

To measure the internal temperature of the turkey, insert a thermometer through the thickest part of the breast to the bone.

Times are for unstuffed birds. A stuffed bird may cook at the same rate as an unstuffed one; however, be prepared to allow 30 to 50 minutes more. While turkeys take about the same time to roast in regular and convection heat, a convection oven does a better job of browning the bird all over.

When you remove the turkey legs, if you find that the meat around the thigh joint is still too pink, cut the drumsticks from the thighs and put thighs in a shallow pan in a 450° oven until no longer pink, 10 to 15 minutes.


Cook: 
(via Chow.com)


Place the turkey, breast down, on a roasting rack set in a roasting pan and put the reserved neck in the bottom of the pan. If you don't have a roasting pan with a lid, you can cover an aluminum Roast for 45 minutes, basting the turkey every 20 minutes once the pan juices accumulate.
After 45 minutes, flip the turkey onto its back and continue to baste and roast for about 2 to 2 1/2 hours.
When a meat thermometer inserted into the inner thigh registers 170°F and the juices run clear, remove the turkey from the oven and let it rest 20 to 30 minutes before carving. (If you’re planning on making your own gravy, be sure to reserve the neck in the bottom of the roasting pan and the vegetables from inside the bird’s cavity.)

And finally . . .

LET IT REST:
(via American Food)


Now, if you've followed the procedures above, you are about to cut into the most delicious, juiciest turkey you've ever had, but STOP!!! Sorry, didn't mean to startle you, but you must let the turkey rest for AT LEAST 20 minutes.
When you remove it from the oven, cover it very loosely with foil, and go about getting your side dishes to the table (or have a glass of wine and delegate). Don't worry, it won't get cold; a covered 20-lb turkey will stay hot for over 40 minutes, so don't rush it.
Letting it rest not only gives you time to finish the gravy, and the rest of the meal, but also allows the juices in the turkey to redistribute, which is the secret to moist, tender meat.


I sure hope this helps take a little stress off of your last-minute dinner planning!  Have a great Monday!
Photobucket

Friday, November 16, 2012

FROSTED: Thanksgiving Finger Food Feast...No Table Needed!


During this month of November many of the social media websites have been filled with people sharing the things in their lives that they are thankful for. I have seen it range from giving thanks for their children to showing their admiration for reruns of their favorite television show. Everyone has something in their life that they can appreciate and openly recognize during this time of year. So this Thanksgiving, I am extremely thankful for the "F's" in my life: my fiance, family, friends, food....and my Frosted followers! I wish that I could sit down with you all at an orange and red clothed table adorned with beautifully folded napkins and enjoy all of the classic Turkey and fixins.

But, I realize that not everyone's Thanksgiving tradition includes a sit down dinner. With everyone's schedules getting busier due to attending multiple dinners with family and friends, there is hardly any time to relax and enjoy a formal meal at a table. So this week I am sharing a fabulous way to enjoy the same Thanksgiving feast that we all love...but with finger foods that are easier for guests to enjoy while mingling and sitting around the living room watching football.

These recipes would also make fantastic dishes to bring to any Thanksgiving potluck at your work, a perfect addition to any Thanksgiving church buffet, or as donations to your local soup kitchen or food pantry. So pile a few of these goodies on your plate and enjoy the highly anticipated taste of Thanksgiving with your fingers!

 Cranberry Bruschetta
(Courtesy of Food Fashion & Flow)


Ingredients:
  • 1 12 ounce of package fresh cranberries
  • 1 jalapeno pepper
  • 1/4 cup of green onion chopped
  • 1/4 cup of cilantro chopped
  • 3/4 cup of sugar
  • 1/4 teaspoon of cumin
  • 2 Tablespoons of lime juice
  • A dash of salt
  • A crusty french baguette; cut in thick slices
  • Goat cheese or cream cheese
 Directions:

1.  Put the cranberries and jalapeno pepper in a mini chopper or food processor. Pulse until the cranberries are chopped, but still a little chunky. 

2.  Chop up green onion and cilantro into small pieces. Add all ingredients and mix together. Refrigerate for at least a few hours to allow cranberries to soften a little and for flavors to blend.

3.  Toast baguette slices and spread with goat cheese or cream cheese and top with cranberry mixture.


Mashed Potato Puffs
(Recipe by The Kitchn)


Ingredients:
(Makes between 12-24 puffs depending on the size of the pan)
  • 2 cups of mashed potatoes (your favorite Thanksgiving recipe)
  • 3 eggs, beaten
  • 3/4 cup of grated Parmesan or Gruyere, divided
  • 1/4 cup of minced chives
  • 1/4 cup of diced ham (optional)
  • Salt and freshly ground pepper   

 Directions:

 1.  Heat the oven to 400°F and lightly grease the cups of a regular muffin tin, or a mini-muffin tin.
Whisk together the mashed potatoes, the eggs, 1/2 cup of cheese, the chives, and ham. Taste and season, if necessary, with salt and pepper.

2.  Put a spoonful of the mixture in each muffin cup. Sprinkle the top of each potato puff with grated cheese. Bake for 20 minutes, or until the potato cups are set, browned on top, and hot through and through. Serve immediately.


 Green Bean Casserole Stuffed Mushrooms
(Via Taste of Home)


(Image from She Makes and Bakes)

Ingredients:
(Serves 30; Makes 2 1/2 dozen mushrooms)
  • 3 strips of turkey bacon, diced
  • 1 1/2 teaspoons of minced garlic
  • 1 can (14 1/2 ounces) of French-style green beans, drained
  • 3/4 cup of grated Parmesan cheese, divided
  • 1/4 cup of condensed cream of onion soup, undiluted
  • 1/4 cup of water
  • 1/8 teaspoon of ground nutmeg
  • 1/8 teaspoon of pepper
  • 1 cup of dry bread crumbs
  • 30 whole baby portobello mushrooms
  • Cooking spray
  • 1 can (2.8 ounces) of French-fried onions
Directions:

1.    In a small skillet, cook bacon over medium heat until crisp. Add garlic; cook 1 minute longer. Place the green beans, 1/2 cup cheese, soup, water, nutmeg, pepper and bacon mixture in a food processor; process until blended. Transfer to a small bowl; fold in bread crumbs.

2.  Remove stems from mushrooms; discard stems or save for another use. Spritz mushroom caps with cooking spray; place in an ungreased 15-in. x 10-in. x 1-in. baking pan, stem side down. Bake at 425° for 10 minutes, turning once.

3.  Drain liquid from caps; fill with green bean mixture. Top with remaining cheese and fried onions. Bake 8-10 minutes longer or until mushrooms are tender and filling is heated through.


Turkey Stuffing Balls
(Courtesy of Jun-Blog)


Ingredients:
(Makes around 15 balls)
  • 4 Tablespoons of butter
  • 1 medium onion, finely chopped, (about 1 cup)
  • 4 stalks of celery, finely chopped, (about 1 cup)
  • 1 loaf of white bread, dried and torn into 1-inch pieces
  • 1 Tablespoon of poultry seasoning
  • Salt and freshly ground black pepper to taste
  • 2 cups of chicken stock
  • 1 egg
Directions:

1.  Preheat the oven to 375 degrees F.

2.  Sauté onion and celery in butter until onions are translucent, about 5 minutes, and spoon over the torn pieces of white bread.  Dust with poultry seasoning, salt and pepper.  Whisk an egg in the chicken stock and pour over the stuffing until it is moist enough to form balls that hold together.

3.  Form the stuffing into 3-inch balls. Bake until golden brown, about 15 minutes.


Thanksgiving Pie Petit Fours
(Recipes by Savory Simple)


Tart Dough Ingredients:
  • 12 ounces of all purpose flour
  • 1 teaspoon of salt
  • 7 ounces of cold butter, chopped
  • 1/3 cup of cold water
Pecan Pie Filling Ingredients:
  • 1/2 egg, beaten
  • 1/4 cup of sugar
  • 1 ounce of butter
  • 1/8 cup of maple syrup
  • 1/3 cup of pecans
  • a splash of vanilla 
Pumpkin Pie Filling Ingredients:
  • 1 cup of pumpkin puree
  • 3/4 cup of heavy cream
  • 1/4 cup of packed brown sugar
  • 1/6 cup of white sugar
  • 1/4 teaspoon of salt
  • 1 egg + half a yolk, beaten
  • 1 teaspoon of cinnamon
  • 1/8 teaspoon of fresh grated nutmeg
  • 1/8 teaspoon of ground cloves
  • 1/8 teaspoon of ground cardamon
Sweet Potato Pie Filling Ingredients:
  • 1 cup of sweet potato puree
  • 1 Tablespoon of butter, melted
  • 1/8 cup of heavy cream
  • 1 Tablespoon of brown sugar
  • 2 teaspoon of pumpkin pie spice
  • 1/8 teaspoon of salt
  • 1/3 cup of chopped toasted pecans (optional)
  • Marshmallow Fluff 

(Image courtesy of One Charming Party)

Tart Directions:

1.   Add flour, butter and salt into a food processor. Pulse on and off until the mixture is crumbly. Slowly add the water with the machine running just until the dough forms a ball. Chill for at least 2 hours.

2.  Roll the dough very thin and carefully shape it into the tart molds.**See notes below.** Allow to chill for at least 30 minutes.

3.  Dock the dough and cover the bottom with parchment paper and beans. Blind bake at 400 degrees for 15 minutes or until firm, then allow to cool.

4.  Make pie fillings. Spoon pie fillings into tarts. Bake at 375 for 15 minutes. Allow to cool.

Tart Notes:
  •  You need to work very carefully with the dough here.  Since the bites are so small, you want to roll the dough as thin as possible.  Paper thin, if you can.  If there is a lot of dough in each bite, the filling won’t stand out.
  • While working with the dough, you always want it to be cold.  The dough can become elastic once it gets too soft or overworked.  Break up the dough into separate pieces and work with a small amount at a time while the rest is being chilled.  If you keep balling it up and trying to roll it out again, it will shrink.  With mini tarts you want the walls to extend all the way up.
  • After you roll the dough into the petit four molds, chill for at least 30 minutes.  Then poke numerous tiny holes the dough with a small point such as a bamboo skewer or push pin.  This is known as docking and it will prevent air bubbles from forming and causing the dough to rise.
  • After you dock the dough, I recommend placing tiny squares of parchment in the middle of each tart, then topping with uncooked beans.  This is additional protection against the dough rising. 
Pecan Pie Filling Directions:

1.  Combine all ingredients in a bowl. Add a teaspoon into each pre-baked petit four shell. Bake 375 for 15 minutes. Allow to cool.

Pumpkin Pie Filling Directions:

1.  Mix sugar, spices and salt in a bowl. Add the eggs, pumpkin puree and cream.  Whisk until well combined. Add a teaspoon into each pre-baked petit four shell. Bake at 375 for 15 minutes. Allow to cool.

Sweet Potato Pie Filling Directions:

1.  If you’re using a fresh sweet potato, poke several holes in it with a fork and then roast in the oven at 400 degrees F until soft all the way through (check after 20 minutes).  Use an immersion blender or potato ricer to make a puree.  You can also use canned puree.

2.  Whisk the sweet potato, butter, cream and spices together.  Fold in the pecans. Add a teaspoon of the mixture into each pre-baked petit four shell. Top in the center with a small dollop (maybe 1/2 teaspoon) of Marshmallow Fluff. Bake at 375 for 15 minutes. Allow to cool.

(Image from One Charming Party)

Nothing could be more festive and fun than these tiny appetizer versions of your favorite Thanksgiving day side dishes. These recipes are perfect to serve at the kid's table at your traditional Thanksgiving formal dinner or even as munchies for football Sunday (made from your Thanksgiving leftovers). The possibilities are endless for these miniature Turkey Day staples.

So try a nibble of these yummy Thanksgiving dishes and be thankful for another "F" in your life...FINGER FOOD! Have a wonderful weekend and a scrumptious Thanksgiving!


Photobucket

Friday, November 9, 2012

FROSTED: Trick Or Treat...Turn Your Candy into Something New To Eat


This time of year everyone is starting to prepare for Thanksgiving and fantasize about fragrant roasted turkey, creamy buttery whipped potatoes, fluffy moist stuffing, candied marshmallow topped sweet potatoes, and warm flaky rolls. But before you can add more food to your kitchen table you need to find out something to do with all of that leftover Halloween candy!

While it would be tempting to just take it to work and let your co-workers fight over it, use it to bribe your kids to do their chores, or just throw it away...why not take a more creative and delicious approach?

So unwrap those fun-sized chocolate bars and whip up some fabulous treats to turn your old October goodies into something new and delicious that will make your guests forget all about the stress of the upcoming Turkey Day feast!

Leftover Halloween Candy Bark
(Recipe by Brown Eyed Baker)


Ingredients:
(Makes approximately 2 pounds)
  • 1 pound of bittersweet chocolate, chopped
  • 3 Butterfinger candy bars (or 8 fun-size bars), cut into 1-inch pieces
  • 3 Heath candy bars (or 6 fun-size bars), cut into 3/4-inch pieces
  • 8 Reese's peanut butter cups, each cut into 8 wedges
  • 1/4 cup of honey roasted peanuts
  • 3 ounces white chocolate, chopped
  • 1/2 cup Peanut M&M's, Pretzel M&M's, or Reese's Pieces

Directions:

1.  Line a baking sheet with parchment paper; set aside.

2.  Place the chopped bittersweet chocolate in a medium bowl and microwave at 50% power in 30-second increments, stirring after each, until completely melted and smooth. Pour the chocolate onto the prepared baking sheet and, using an offset spatula, spread into a thin layer (about 1/4-inch thick - a 12x10-inch rectangle). Sprinkle the melted chocolate with the chopped Butterfingers, Heath bars, peanut butter cups and honey roasted peanuts, making sure all pieces touch melted chocolate (so they adhere). Lightly press to make sure the candy adheres to the melted chocolate. Refrigerate for 30 minutes.

3.  Melt the white chocolate using the same method as the bittersweet chocolate (in a microwave in intervals) until completely smooth. Using a spoon, drizzle the white chocolate over the chilled bark in a zigzag pattern. Scatter the M&M's (or Reese's Pieces) over the white chocolate drizzle, and again press to make sure the candy adheres to the melted white chocolate. Chill again until the white chocolate is set, about 30 minutes.

4.  Cut/break the bark into irregular pieces and serve. Store leftovers in an airtight container in the refrigerator.


Leftover Halloween Candy Brownies
(Courtesy of She Makes and Bakes)


 Ingredients:
(Makes a 9x9 pan full of brownies)
  • 1/2 cup of butter
  • 6 ounces of bittersweet chocolate chips or coarsely chopped
  • 3/4 cups of sugar
  • 2 eggs
  • 1/2 tablespoon of vanilla
  • 1/2 cup + 2 tablespoons of all-purpose flour
  • 1/4 teaspoon of salt
  • 1-2 cups of chocolate candy, coarsely chopped  

Directions:

1.  Preheat your oven to 350 degrees. Line a 9x9 pan with aluminum foil, leaving a few inches hanging over the sides (this foil will turn into handles to lift the brownies out of the pan later). Spray the foil generously with nonstick spray, paying special attention to the corners and sides.

2.  In a large microwave-safe bowl, add the chocolate and butter. Microwave for 30-second intervals until melted and smooth, stirring in between. Add the sugar and vanilla into the bowl with the chocolate and whisk until incorporated. Add in the eggs and whisk until thick and glossy (about a minute). Stir in the flour and salt until just combined. Fold in the chopped candy.

3.  Pour the batter into the prepared pan and bake for 25-30 minutes. Twenty five will result in gooey brownies, and thirty minutes will be more set in the center. Let cool.  


Leftover Halloween Candy Cookie Pizza
(Via Pillsbury)


Ingredients:
(Serves 16 people)
  •  1 roll (16.5 oz) refrigerated sugar cookies
  • 1 jar (7 oz) marshmallow creme (1 1/2 cups)
  • 1/4 cup of candy-coated chocolate candies
  • 1/2 cup of coarsely broken pretzels
  • 20 bars (fun-size) candy, unwrapped, cut into fourths (about 2 cups)
  • 1/4 cup of semisweet chocolate chips, melted 
 Directions:

1.  Heat oven to 350°F. Line 12-inch pizza pan with foil; grease foil with shortening. Cut cookie dough into 1/4-inch slices; arrange in pan. With floured fingers, press slices to form crust. 

2.  Bake 25 to 30 minutes or until deep golden brown. Cool completely, about 30 minutes. 

3.  Use foil to lift crust from pan. Carefully remove foil from crust; place crust on serving platter or tray. In small microwavable bowl, place marshmallow creme. Microwave uncovered on High 15 seconds to soften slightly; stir until smooth. Spread marshmallow creme over crust. Sprinkle candy-coated chocolate candies, pretzels and cut-up candy bars evenly over top.  

4.  Drizzle melted chocolate over cookie pizza. Cut into wedges or squares. 


 Leftover Candy Blondies
(Recipe from Simmworks Family Blog)


 Ingredients:
  • 1 cup of butter, almost melted
  • 1 cup of brown sugar
  • 1 egg
  • 1 teaspoon of vanilla
  • 1 pinch of salt
  • 1 cup of flour
  • 1 cup of diced candy bars
 
Directions:

1.  Preheat the oven to 350. Grease an 8×8 baking pan. Cut up candy bars.

2.  Cream the butter and brown sugar until light and fluffy. Add in the egg and beat until well combined. Add vanilla and salt and mix again. Take bowl off stand mixer. Fold in flour until just combined. Fold in candy bar pieces until just combined.

3.  Spread mixture into pan and cook for 20-25 minutes or until crust is golden brown. Let cool in pan for 5 minutes. Turn onto a wire rack and let cool completely before digging in. Cut into squares and serve.

 
 Leftover Candy Cake
(Courtesy of ScarlettaBakes)


Cake Ingredients:
  • 3 cups of all-purpose flour + more for dusting
  • 1 Tablespoon of baking powder
  • 1/2 teaspoon of salt
  • 1 1/2 cup of dark brown sugar, tightly packed
  • 1 cup of vegetable oil + more for greasing
  • 3 large eggs
  • 1 cup of Greek yogurt
  • 2 cups of assorted candy, roughly chopped (I recommend going with chocolate-based candy pieces here; I included fun-sized versions of Twix, Snickers, Milky Way and Peanut Butter Snickers in my cake.)
Glaze Ingredients:
  • 4 Tablespoons of unsalted butter
  • 2 Tablespoons of skim milk
  • 1 cup of confectioners’ sugar
  • 1 1/2 teaspoon of Ancho chile, ground   

 Directions:

1.  Position a rack in the lower third of your oven with several rungs of space above it, and preheat the oven to 350°. Grease a 12-cup capacity bundt pan liberally with oil and dust with flour, tapping out any excess. Set aside.

2.  Cream the sugar and oil together in a large bowl. Add the eggs and continue to mix. Beat in the flour, baking powder, salt and yogurt, beating just until all of the ingredients are incorporated. Fold in the chopped candy pieces.

3.  Pour the batter into the prepared pan. Bake for 50-60 minutes or until a cake tester inserted in the center of the cake comes out clean. Remove the baked cake to cool for 10 minutes before unmolding to a wire rack to cool further before finishing.

4.  Meanwhile, to prepare the glaze, heat the butter over a medium flame in a large, heavy-bottomed sauce pan. Cook the butter, stirring often, as it bubbles and turns color. Be sure not to burn the butter; the browning process will take about 10 minutes and simply requires patience and frequent stirring.

5.  Once the butter is browned and fragrant, remove it to a large bowl. Whisk in the confectioners’ sugar, ancho chile, and milk, mixing vigorously until all of the ingredients are combined into a smooth glaze. Pour the finished glaze over the top of the cake and spread it slightly with a rubber scraper so that it runs down the sides of the cake. Serve immediately or store for several days in a sealed container.


There is no better way of recycling that leftover Halloween candy!  These tasty new desserts would be a wonderful dish to serve at your next children's playgroup, while hosting a festive Fall bonfire, or as a treat for the team after your kid's next sporting event.

What a fantastic way to clear your home of all of those plastic pumpkins full of trick or treat goodies while serving your friends and family a new drool-worthy confection. So hang up that Halloween costume, put on that apron, and whip up some scrumptious desserts with your candy leftovers.  Have a wonderful weekend!


Photobucket

Friday, October 26, 2012

Juneberry Baby: Our Little Girl is Here!!!

Hello friends . . . I hope you have been enjoying your October and having lots of fun getting ready for my favorite holiday-Halloween!  I am so excited to share with you our fantastic news...our little girl has made her appearance and we are now a family of FOUR!!

Little Miss Cecily Kate arrived at 10:36 pm on Wednesday, October 17th 2012 at 7 lbs 3oz and 20 inches.  My sweet little girl was very easy on her mama and her delivery was an absolute dream!  She is such a cuddly, sweet baby and her big brother, Sully, thinks she is quite funny already too!  Here are a few pics of our girl . . .


We'll be back with more party inspiration full time soon, just spending a little more time enjoying our new addition!! Photobucket

FROSTED: Lions, Tigers, and Bears...Oh My!! Frosted Animal Cookie Creations!!


As a child I remember one of my favorite things to do was to go to the local zoo and see all of the exotic animals. I LOVED watching the monkeys swing from the ropes in their habitat, the hippos taking an afternoon nap in the cool, refreshing water, and giraffes using their long necks to dine on all the green leaves growing high on the trees.

My love for animals continued whenever my mother allowed me to have a treat at the grocery store. I will never forget the times that I chose those delicious, sweet pink and white frosted animal cookies. These yummy treats not only satisfied my sweet tooth, but also provided me with hours of play time as I acted out the animals that I had seen at the zoo with each cookie that I pulled out of the bag.

In honor of the birth of my new niece, Cecily Kate Tumino, (whom I hope not only loves the color pink, but also has a love for animals like her Aunt) I am sharing some colorful tasty frosted animal cookie inspired goodies that will not only remind you of your childhood, but will bring a smile to your kids' faces at your next event.

So, take a peek at these wild treats...and recreate the sweetness of your youth.

Frosted Animal Cookie Truffles
(Courtesy of The Domestic Rebel)


Ingredients:
  • 3 cups of Frosted Animal cookies
  • 1/2 can of cream cheese frosting
  • 1 package of white chocolate almond bark
  • Rainbow nonpareils
  • Pink food coloring  
Directions:

1.  Line a rimmed baking sheet with foil and set aside. Meanwhile, in a food processor, grind the animal cookies (about a cup at a time–work in batches) until finely ground, coarse crumbs. Pour all the ground cookies into a large bowl.

2.  Once cookies are ground, spoon in the half can of cream cheese icing. Using your clean hands or a spoon, and mix together the crumbs and frosting until thoroughly combined.

3.  Begin portioning the crumb mixture into inch-sized balls (I used a small cookie dough scoop) and place the balls onto the foil-lined baking sheet. Repeat until all the mixture is used up.


4.  Freeze the truffles for about 3 hours or until completely frozen and solid. While they’re freezing, prepare your white chocolate according to package directions until smooth and melted. Pour half that mixture into a separate bowl, and using your pink coloring, tint one of the bowls a pretty pink shade.

5.  Dip half the batch of truffles into the white chocolate, and the other half into the pink chocolate. I used a fork to coat all sides of the truffles, then allowed the excess to drip off the bottom before gently placing each dipped truffle back onto the foil-lined sheet. While still wet, sprinkle the truffle tops with the rainbow nonpareils.

6.  Allow all the truffles to harden and set, about 20 minutes in the fridge. Store leftover truffles airtight for about 2-3 days at room temperature, or a week in the freezer–just allow them to come to room temperature before eating them that way.

 (Picture from Just A Spoonful of Sugar)

Jumbo Frosted Animal Cookies


Ingredients:
(Makes approximately 15 cookies)
  • 5 cups of all-purpose flour
  • 2 teaspoons of baking powder
  • 1 teaspoon of salt
  • 1/4 teaspoon of freshly grated nutmeg
  • 1/4 teaspoon of mace
  • 1 1/2 cup (3 sticks) of unsalted butter, at room temperature
  • 2 cups of sugar
  • 2 eggs
  • 2 teaspoons of vanilla extract
  • 16 oz. of buttercream icing
  • pink food coloring
  • nonpareils (rainbow)
 Cookie Directions:

1.  Preheat an oven to 350°F. Over a small bowl, sift together the flour, baking powder, salt, nutmeg and mace. Set aside.

2.  In the bowl of an electric mixer fitted with the flat beater, beat the butter on high speed for 2 minutes. Reduce the speed to medium, slowly add the sugar and beat for 2 minutes, stopping the mixer occasionally to scrape down the sides of the bowl. Add the egg and vanilla and beat for 1 minute, stopping the mixer once to scrape down the sides of the bowl.

3.  Stop the mixer and add half of the flour mixture. Beat on low speed until most of the flour has been absorbed. Add the remaining flour and beat until all of the flour has been absorbed and the dough starts to pull away from the sides of the bowl, 2 to 3 minutes.

4.  Turn the dough out onto a work surface and divide into 2 equal balls. Shape each into a disk and wrap separately in plastic wrap. Refrigerate for at least 2 hours or up to 2 days.

5.  Let the dough stand at room temperature for 5 minutes.  Roll out the dough to almost 1/2-inch thick on a lightly floured surface. Cut out shapes with cookie cutters and move them to parchment-lined baking sheets with a firm, metal spatula. (I used stoneware baking sheets, so didn't need to line them.)


6.  Bake the cookies until very light golden brown, about 18 minutes. Transfer the baking sheets to wire racks to cool for about 5 minutes. Transfer cookies to wire racks to cool completely.

Icing Directions:

1.  Place the buttercream icing in a microwave-safe bowl from 15-30 seconds (until pourable). If it becomes too runny then, add some powdered sugar. Divide icing into 2 bowls. Tint half of it pink and keep the other half white.

2.  With the cookies on a wire rack, place the rack over a baking sheet (or over wax paper). Use a spoon to cover each cookie with the icing. Sprinkle with the nonpareils.  


Frosted Animal Cookie Mini CheeseCakes
(Recipe from Culinary Concoctions by Peabody)


Ingredients:
  • 16 ounces of cream cheese, at room temperature
  • 1/2 cup of granulated sugar
  • 2 eggs
  • 1/4 teaspoon of vanilla extract
  • 1/2 cup of Greek yogurt (2%)
  • 1 bag of Frosted Animal Cookies
Directions:

1.  Preheat oven to 275F. Line muffin tins with cupcake liners (preferably white). Place a pink (they show up better) cookie at the bottom of each cupcake, sprinkle side down. Set aside.


2.  Using a stand mixer, beat cream cheese and sugar on medium-high speed for about 5 minutes.
Add eggs, one at a time, beating for about 1 minute. Scrape down the bowl after each addition.
Add vanilla and Greek yogurt, beat until incorporated.

3.  Crush up remaining Animal Cookies. You can use as many or as much as you want. I just used the rest of the bag because I really like the cookies. Add them to the cheesecake batter and mix until the cookies are throughout the batter evenly. Pour into prepared cupcake liners.

4.  Bake for 22 minutes, rotating half way through. Remove from oven and let cool to room temperature. Chill in fridge in muffin tins for at least 4 hours or overnight.


Frosted Animal Cookie Ice Cream
(Recipe by Purple Chocolat Home)

(Courtesy of The Domestic Rebel)

Ingredients: 
( Makes around 2 quarts of ice cream)
  • 1 1/4 cup of white sugar
  • Equivalent of 4 pasteurized eggs (Egg Beaters)
  • 1/2 cup of marshmallow cream
  • 2 cups of heavy whipping cream
  • 1 cup of milk
  • 2 cups of crushed frosted animal cookies
  • Pink Food Coloring
  • Additional Frosted Animal Crackers   

Directions:

1.   In a large mixing bowl, combine the sugar, Egg Beaters, and marshmallow cream on low. The stir in the whipping cream and milk. Add a few drops of pink food coloring to make it pink (if desired).

2.  Place the cream mixture in your ice cream maker freezer container.

3.  When the ice cream is almost frozen sprinkle in half of the crushed cookies. Let the ice cream maker freezer mix them in.

4.  When it is frozen (as frozen as the ice cream maker can make it), hand stir the remaining cookies into the frozen ice cream. Make sure to stir all the way to the bottom. Add additional crushed cookies, if desired.

5.  Place the ice cream in the freezer for several hours until solid.

(Picture by The Domestic Rebel)

Frosted Animal Cookie Cupcakes
(Courtesy of Cake FYI)


Cupcake Ingredients:
  • 1/2 cup of butter
  • 1 1/4 cup of sugar
  • 2 eggs
  • 2 teaspoons of vanilla
  • 1 1/4 cup of flour
  • 1 1/3 teaspoon of baking powder
  • 1/4 teaspoon of salt
  • 3/4 cup of milk
  • 24 Frosted Animal Cookies
  • nonpareils (rainbow)
Buttercream Icing Ingredients:
  • 1/2 cup of butter
  • 1 1/2 - 2 cups of powdered sugar
  • 1 teaspoon of pure vanilla extract
  • 1 Tablespoon of milk

Directions:

1.  Preheat your oven to 350 degrees. Cream the butter and sugar until fluffy. Beat in eggs one at a time, then add the vanilla and mix well.

2.  In a separate bowl, combine flour, baking powder, and salt. Add a third of the flour mixture to the butter mixture and beat until incorporated. Add half of milk and mix well. Add another third of the flour, mix, then add the remaining mix. Beat in the remaining flour mixture until well incorporated.

3.  Line or spray a cupcake tin. In each well, add a tablespoon of batter, then drop one frosted animal cracker into each. Then add 1/4 cup of batter to each, covering the frosted animal cracker. Add another frosted animal cracker on top of the batter in each cupcake well.

4.  Bake for 16-18 minutes until golden. Once cupcakes have cooled, top them with buttercream icing and nonpareils!


 What a scrumptious way to bring back all those wonderful childhood memories and share with your children one of your favorite treats from when you were their age. All of these pretty pink and white desserts would stand out at a kid's circus birthday party, a girly carousel-themed baby shower, or as a snack for your child's class on their next school trip to the zoo. 

Not only will you get rave reviews from adults and children at your next party...but think of how much fun you can have guessing each animal shape as you pour them out of the bag.  So allow your kids to finally get that bag of frosted animal cookies that they have been begging you for and create some of these fabulous rainbow sprinkled desserts. Have a wonderful weekend!


Photobucket